If you are looking for Shopify website builders, you’re obviously trying to…
How To Set Up Shopify Store As beginner From Scratch

Are you considering setting up a Shopify Store but feeling a bit overwhelmed?
Do you want to learn how to set up Shopify store? Don’t worry; the process is more straightforward than you might think. Let’s walk through it together.
One of the most challenging tasks before launching your online business is setting up your e-commerce store.
It can sometimes be clumsy and time-consuming when you cannot narrow down your products and group them into necessary catalogs.
Setting up your inventory depends on how many products you plan to sell.
When you know the size of your inventory, classify it into different categories to make it easier for your customers to access and find their desired products.
A wrong setup of any online store can undoubtedly create difficulty for your customers, adversely affecting your sales.
When you organize your store correctly, you create a pleasant shopping experience for your customers.
Table of Contents
How to Add Products to Your Shopify store
After adding your first product, you can add more products from the same or different sellers in the same manner, regardless of the seller.
Shopify allows you to add as many products as you can sell on your desktop, iPhone or Android. To add products to your online store, follow the steps below ;
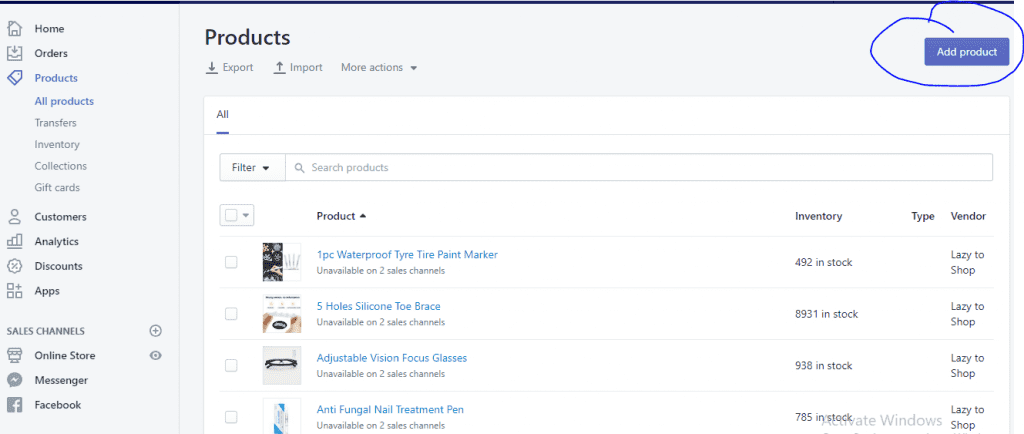
• On the left-hand side of your dashboard, click products, and a product page will automatically open.
• From the product page, click the “add product” button.
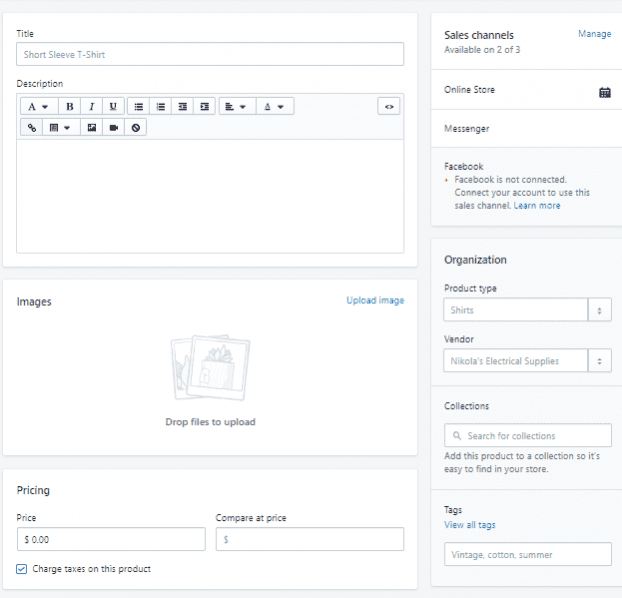
• Click on the title bar and add the category or title of your product.

The product details grant your customers an easy search for your products and allow easy organization.
After adding the product title, you can add additional information about the product, such as “description of products,” “shipping details of the product,” “weight of the product,” “product image,” and more.

- To add an image, click on “add a picture.” You can then drag the image from your desktop or browse through your folder to upload the product image.
- Then click Save product\.
Step by step in organizing your products on Shopify
When you have many products in your online store, you can create a product collection to ease and aid in searching for products on your website. Examples of collections you can create include:
- Men’s Fashion: – where you can find men’s clothes, glasses, shoes, belts, trousers, etc
- Women’s Fashion: – for items like women’s clothes, shoes, handbags, scarves, etc
- Phones: – for different types of phones
- Accessories: – for all items such as hand chain, necklace, etc
- Items in a particular color or size
- Children collections
- Items on sale
- Items with discount
These are a few examples of groups of items. Each category can have as many sub-items as you want. Let me show you the best way to Set Up a Shopify Store.

How to create product collections
- Once on the left-hand side of your dashboard, click on the collections page, then click Create a Collection.
- Enter the title of your collection on the title and description bar.
- You can see sales channels and select a channel from the active.
Channels in your store to allow the collection to be available on your chosen channels.
Some examples of your sales channels are the “buy” button, your “order now” icon, the “make payment” button, the “Shopify online store” icon, the “Facebook” icon, the “Amazon” icon, and many more.
You can also choose your mode of adding your products: You can add products manually, picking and adding each product one after the other, or you can add products automatically, adding as many products as possible.
If you choose the ‘automatic button,’ you’re opting for a more efficient way to add products.
You’ll need to set selection criteria under the ‘conditions’ button. Once you do this, products that match your conditions will be added automatically.
You can also use the drop-down icon to organize your catalog further.
Click the “save collection” button to effect your changes.
If you’re building your collections manually, you must select each product individually and add it to the collection.
This process allows you to add the same product to multiple collections, providing flexibility in organizing your store.
How to add the “About Us” and “Contact Us” pages on your Shopify store
On your “about us” page, add information that will help your customers learn more about your business, your store, and its mode of operation; information that does not change frequently is usually written here.
Pages are added with information such as your organization’s details. These are crucial steps when setting up a Shopify Store.

Meanwhile, the “About Us” page is filled with information on how to contact your store, its social handle, its address, and its phone number is usually written. The page is separately created to give detailed information about contacting your store.
How do you create a new page for “About Us” or “Contact Us?”
From the Admin icon on your dashboard, click “online store” and then go to “pages.“
Click on the “Add Page” icon. A new web page will open; click “Title bar” and “content” in the available box. While selecting your web page title, clearly state it. The title will then automatically display in your browser’s title bar.
Under the “Visibility” icon, you can select whether you want your page published. However, your web page will be “Visible” automatically when you click the “save” button.
But if you want the page not to be visible, you should click on the “Hidden” icon. By default, your new page will be hidden from your online store. Then, set a “Publish date” and click the “save” button.
However, you should note that even if you choose the “visibility” icon, you must modify your “Add menu” to link your store and allow your customers to access your website.
How to Add a Menu link to your Shopify store
As said earlier, the essence of the Menu link is to allow your customers to access and explore your store.
On your dashboard, the main menu has links to the “Homepage” and the “Catalog page,” and the link to the “Search page” can be found in the “Footer Menu.”
To Add, delete, or edit the Menu link, follow the steps below;
On your dashboard, go to the “Online store” and then to the “Navigation page” on the “Navigation bar.” You will be able to edit your required “Menu.”
Click on the “Add Menu” icon to add an item. A “Menu item” will pop up with two boxes or fields. On the “Name field” bar, add the name of the link you want to add, and it will be automatically displayed in the field.
There is a drop-down button beside the “link name.” Click it to select the type of link you want to use.
The “Homepage” link takes you or your customers to the homepage of your Shopify store, while the ” Collection link ” connects you to a specific collection.
The “All Collections” link takes you to a page where all collections are available.
The “Product link” connects you with a particular product, while the “All Products link” connects you with all products available in your store. Other links include the page link, Blog link, search page link, web address link, etc.
When you click on any of the above links, a drop-down menu will appear beside the “Link Field.” You can then use the drop-down menu to choose a particular page to visit or add to your collection.
For example, if you choose the “Blog link,” a text field will show beside the “link field” to add a drop-down; copy and paste the URL of your desired page as a drop-down; that will be your destination page.
Then click on the “save menu” icon. Setting your store on Shopify.
Before you make your store available to your customers, individual settings and modifications should be made to avoid giving them a poor impression of it.
Make sure you check the following :
- Select the shipping settings for your store.
- Select the payment method and how you will receive your payouts.
- Modify your tax settings and add the policy settings on your store’s check-out page.
How to make your Shipping settings on Shopify
To ship your products, add your shipping address and state the type of package they offer.
How to Add a Shipping Address on Shopify
If you are shipping your products from another destination besides your store’s main office, specify by describing the new shipping address to enable correct shipping rates and tax to be included. To add your shipping address;
- From your Shopify admin, click on Settings, then go to Shipping.
- On the Shipping page, click on the “Edit address” icon and fill in the proper address where your products will be shipped from. Then click “Save.”
- You can also edit the weight and dimensions of your goods. Click “Settings,” go to “Shipping,” and you will see a “Packages” section. Click “Add package” to add the required information about the product. A notice will appear in the dialog box to warn you about size restrictions.
Note:– The essence of adding dimensions and packages is to have a well-calculated shipping rate
How to set up a payment method on Shopify
You can use a different payment method on Shopify, but the simplest method is to use Shopify Payment. Shopify Payment removes the need to set up a third-party payment method, as it is fully secured and embedded into your Shopify store. This allows you to manage your finances and transactions in one place.

The following steps apply to setting up Shopify payment on your Shopify store.
- From your “Settings,” go to “Payment Providers.”
- Click the “Accept Credit Cards” icon and click on “Add a Provider.”
- Select “Shopify Payments” and click “Continue.”
- Then click “Account set up.”
- Enter the necessary details about your store and provide your banking information, then click “Complete Account Set up.” After setting up your Shopify payments, you can test-run your transaction on the store.
How to Set up your taxes
As an entrepreneur, taxes might be charged on your sales and remitted to your government.
Although tax laws change often, Shopify can help you calculate simple tax calculations on your sales.
Shopify’s default tax rate on your sales is regularly updated. If you use the default tax rate, confirm whether it is accurate and then overwrite it when necessary.
You must ensure that your tax settings are updated and you file your taxes. You can seek more information about taxes on the Shopify store.
To set up your taxes, set your destination where your goods will be shipped. This step is necessary because setting your default tax rate is based on your shipping address.
For Shopify POS, set up your tax rate based on your retail store’s location, as the POS tax rate is based on the area where your transaction takes place.
You should set the tax rate based on the region where you sell and ship your products.
Suppose you sell digital products and set up the tax that applies to them. After setting up the tax, you can review your tax settings on the “Taxes Page” under your “Shopify Admin” button.
Steps in adding your store policies on Shopify
On most e-commerce websites, customers check the refund policies, privacy conditions, terms and conditions of service, and refund policy pages. Well-written policies and terms have a positive effect on customers’ decisions.
Therefore, you should add your store’s policy on a new web page. To add store policies to your online store, the following steps will guide you :
To set up the “terms and conditions, privacy and refund policy on your Shopify store;
- Open a new window or tab, go to your” Page,” and create a” new page.”
- Write your policies and conditions on your new Page on the appropriate Page, then click the” Save “button to save the pages.
- Then, easily add a link to your pages for customers to access, as discussed above.
The next thing to do is prepare for your Shopify store’s launch. Before launching, make sure you test-run your store. You can create an” Order” to check how efficient the “order button” is and check other buttons and icons to test their functionality.
If satisfied, you can remove the password and launch your store.
How to test your order on Shopify.
To check the efficiency of your order icon, you can place a test order to ensure that the check-out, ordering, shipping, inventory, and tax processes are working perfectly.
You will not be charged for testing orders. Make sure you test your order before launching your online store and whenever you make specific changes to your payment settings.
Sign up for a free trial and enjoy 3 months of Shopify for $1/month on Select Plans.
How to make Test Orders
When you aren’t using a Shopify Payment module, your test orders can be made in two ways
1. You can use a Shopify bogus gateway to stimulate your transactions.
2. By using a payment provider system.
To set up your Shopify Payment Method,
Go to settings on your Shopify Admin button, then click “Payment Provider” in the section that reads “Shopify payments.” Click on the button and click “Edit.”
Click the “Use test mode” button to place your test order. After making the necessary checks, turn off the “test mode.”
Conclusion:
As explained above, setting up the Shopify Store is easy; if you haven’t signed up for Shopify, consider doing so now. Did you find this article helpful? Please comment, share, or like.
Start Shopify For Only

Try Shopify free for 3 days, no credit card is required. By entering your email, you agree to receive marketing emails from Shopify.


Comments (0)