
If you’re operating a Shopify store, you’ve certainly encountered a chargeback; if…
How To Make Your Shopify Store Live

Are you ready to launch your Shopify store? Publishing and publicizing your store is relatively easy.
Many people work for some time to perfect their store and then wonder why they have no visitors. It’s simple: after setting up your store and uploading your products, you must activate it so customers can begin shopping.
This guide will show you how to make your Shopify store go live. We’ve rounded up a few simple steps for you to follow, and by the time you are done, you’ll be able to set up your store to completion and make your first sale.
Table of Contents
Setting up your Shopify store
To help beginners start the journey of making their stores go live, we’ll begin with the initial setup steps. Let’s look at what you must do to create a successful storefront.
Create an account.
Shopify is the best e-commerce platform for both beginners and advanced sellers. To create your Shopify account, you must provide your email address, password, store name, contact number, country, and other details.
Start a free 3 Day trial and enjoy 3 months of Shopify for $1/month Instead of $39/month on selected plans. Sign up now
You can take advantage of their 3-day trial to set up your account. After the trial, choose a Shopify plan based on your budget.
Select a theme for your store.
After setting up your Shopify store, you’ll be directed to the admin page to choose a theme.
This is the customization stage, where you’ll need to create a front-end that customers can engage with smoothly while shopping. On the admin page, select a theme and choose the one you’d like to use for your store.
With Shopify’s integrated theme designers, you can run your store without making any changes. Always compress the graphics when customizing a theme to improve the business’s loading rates.
Upload products
Go to the product page on the admin page and start adding your products. You can upload products individually or in bulk using the CSV file.
Here are the steps to follow:
- In the Shopify admin, go to products.
- The product page will open. Then click on “Add product.”
- Enter the details of the products, including the title, pricing, photos, description, SKUs, etc.
- Click to save your product.
Choose a plan.
Shopify lets you choose the best plan by offering a range of options for most small businesses. Business owners’ most significant benefit of using Shopify is the ability to choose a package that suits their needs and budget. Shopify is a platform that can accommodate enterprises of any size. Shopify plan pricing includes:
- Basic- $29
- Shopify- $69
- Advanced- $299
- Plus- $2300
You can start for free, then pay $1 for 1 month as you prepare to subscribe to a better plan later.
Setting up the store fully before settling on a plan is essential to avoid being charged while developing. If you want to start small, you can subscribe to the basic plan and upgrade as your store grows.
Select a payment provider.
You may choose to use Shopify Payments, a Shopify payment provider. However, this payment provider is only available to merchants in the United States.
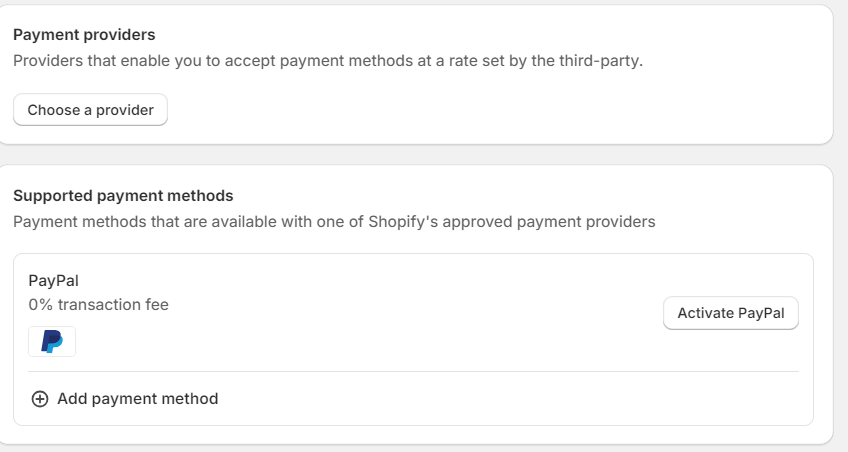
To serve merchants worldwide, Shopify integrates with local and global third-party providers. Follow the steps below to choose a payment provider for your store:
- Go to settings, and then click on Payments.
- You’ll see the payment provider section. Click the “Choose a provider” tab below.
- Choose a provider from the list.
- Enter your account details for the provider you’ve chosen.
- Click “Activate” and then “Save.”
You are setting your Shopify store live.
Once you are done setting up and perfecting every aspect of your store and have uploaded your products, the next step is to make the store go live. Here’s what you need to do.
Register your domain on Shopify or connect an existing one.
Your domain name is your online address, like “yourstore.com.” Ideally, you want a memorable and brand-reflective domain.
Shopify lets you purchase a new domain name directly on its platform. Alternatively, if you already own a domain name from another provider, you can connect it to your Shopify store. This involves updating some settings on your domain registrar’s website.
To add or connect the domain to your Shopify, this is what you need to do:
Go to the sales channel, then to Domains on Shopify. You can select “buy new domain” or “connect existing domain.”
If you have an existing domain, copy and paste the name. The system might prompt you to log in to your domain name provider.
Upgrade the DNS records.
The next step is to upgrade the DNS records. DNS records are like a phonebook that directs web traffic to your store’s online location. Shopify will provide specific instructions on updating these records with your domain registrar. This process usually involves changing a few codes. This step is scarier than it sounds, so don’t fret.
Shopify provides clear instructions and many online resources to help if needed. These are the steps to follow:
- Visit the domain provider’s website.
- Replace the primary A or @record with 23.227.38.32.
- On the domain settings page, add storename.myshopify.com to the www.CNAME section.
Set Primary Domain
If multiple domains are connected to your Shopify store, you must designate one as the “primary domain.” This is the leading web address that customers will see and use to access your store.
Choosing the primary domain helps with search engine optimization (SEO) and ensures a consistent online presence for your brand. Go to “sales channels,” then “domains,” to select your principal domain.
To ensure your domain score is good, check the box that says “redirect all traffic to this site.” Traffic from other domains will be redirected to the primary domain.
Remove Any Storefront Password
During the setup process, you might have added password protection to your store while it was under construction. You must remove this password so customers can access the store when it goes live.
A password is a great way to keep your store private while you build it. But before you launch, make sure to remove any password restrictions.
Go to the “sales channels” tab and click on it. Move to “references” and then to sword protection.” Uncheck the ‘Enable password’ option to ensure everyone can view your site when it goes live.
Add additional domains (if any)
Do you have any other domain names you can connect to your Shopify store?
You may have a brand name variation or a specific domain for a particular product line. Shopify allows you to connect additional domains, extending your online reach and potentially attracting more customers.
Last Check Before Publishing Your Store
Before the big reveal, take one last look around your store. The following are the tests that you should perform before launching the store:
Proofread the title and the meta description.
When customers visit your website, the two items are the first things they see. They give the first impression and inform buyers about the items you are dealing with. Confirm that the title and meta description effectively introduce whate what you sell.
Test your Shopify website.
Copy your Shopify store’s URL and paste it into a browser to see how everything displays. Check that the pages load correctly and examine the content, missing pages, site links, loading times, etc.
Check to ensure that no templates or software slow down your website. Also, confirm that the website works well on other devices, including smartphones. It is also essential to check if the password has been deleted.
Check everything in your store and place a test order through checkout.
Place a test order.
Ensure that everything is running correctly by placing a test order. This is a crucial step and will help you leave no stone unturned.
A test order will help identify any issues (if any) that your customer might encounter when placing an order. You can place a test order and then cancel it. This will help you determine whether your store’s checkout works well and whether the shipping details are correct.
If you use Shopify payments for your store, you can test payments in test mode.
Go to Payment Providers> Settings > Enable Test Mode to do that.
Read Also: The Best Shopify Marketing Tools.
Proofread the legal page setup.
Every store must have legal pages, including the privacy policy, terms of service, and return or refund policy. These legal pages protect you and your customers.
To manage these pages, go to the dashboard, then preferences, and click legal. You create all your store policies in this section. Ensure you include the link to the legal pages in your menu and footer.
A summary of the standard checks on Shopify:
- Proofread product descriptions and titles for correctness.
- Check if the graphics are well presented, of good quality, and free from grammatical errors.
- Double-check product pricing and ensure there are no errors.
- Preview your store on different devices (desktop, mobile) to ensure it displays correctly.
- Confirm if the email notifications are being delivered and received correctly.
- Review your shipping and return policies to ensure clarity.
Once you’re confident everything looks polished and professional, you can hit publish and unveil your unique Shopify store.
Conclusion
Shopify’s colossal benefit is how easy it is to set up a store.
The e-commerce platform caters to businesses of all sizes, making it well-known. But if your store is visible to your audience, you might feel safe about what to do.
By following the steps outlined in this guide, you can successfully launch your Shopify store live and attract customers.
Frequently Asked Questions (FAQs)
- How do I tell if my shop is live?
To check whether your store is live, copy the URL of your Shopify website. Paste it in your web browser and see if it loads without asking for your password. If it doesn’t, that shows it is live and visible to the public.
- What is the pricing plan for Shopify?
Shopify features four pricing plans to serve retailers of all calibers. The plans include:
- Basic Shopify: $29/month
- Shopify: $79/month
- Advanced Shopify: $299/month
- Shopify Plus: Custom pricing, starting at $2,000/month
- Can I sell internationally with Shopify?
Yes, you can sell globally with Shopify. All you need to do is set up multiple currencies, adjust tax and shipping settings to serve different localities, use various international payment providers, and translate your store into numerous currencies.
- What are Shopify payment providers?
Shopify has a payment provider, Shopify Payments, that is available only to merchants based in the US. On top of that, it integrates with third-party tools or services that process payments in your store. Shopify connects with thousands of payment providers to serve a broad audience. These payment gateways include Stripe, PayPal, and Apple Pay.
- Why do I need to provide my payment details to launch my store?
Yes, you have to provide your payment information to launch your store. You need payment information to select a Shopify plan for your store, which enables your store to go live.
- How long does it take for a Shopify store to go live?
The time it takes to set up a Shopify store depends on how much you know about the business you are starting. The planning process might take days or weeks, but setting it up entirely takes 30–60 minutes.
Related Posts


[…] example, it is easy to remember Shopify because of the Shopify shopping bag icon or Facebook because of their significant capital F icon in […]