
If you are looking for Shopify website builders, you’re obviously trying to…
How To Install A Shopify Theme (Setting & Configurations 101)

1.
How To Install A Shopify Theme (Setting & Configurations 101)
In this post, you will learn how to Install Shopify Theme. This guide aims to help newbies who want to customize and set up shipping, payment gateways, and the important Shopify pages.
Shopify Themes can also be downloaded to your computer. If you want to use an editor to make some changes to your theme.
Make sure you create a duplicate of your theme, but if you have reached the limit of 20 for your available number of themes, you can delete one and create a duplicate copy.
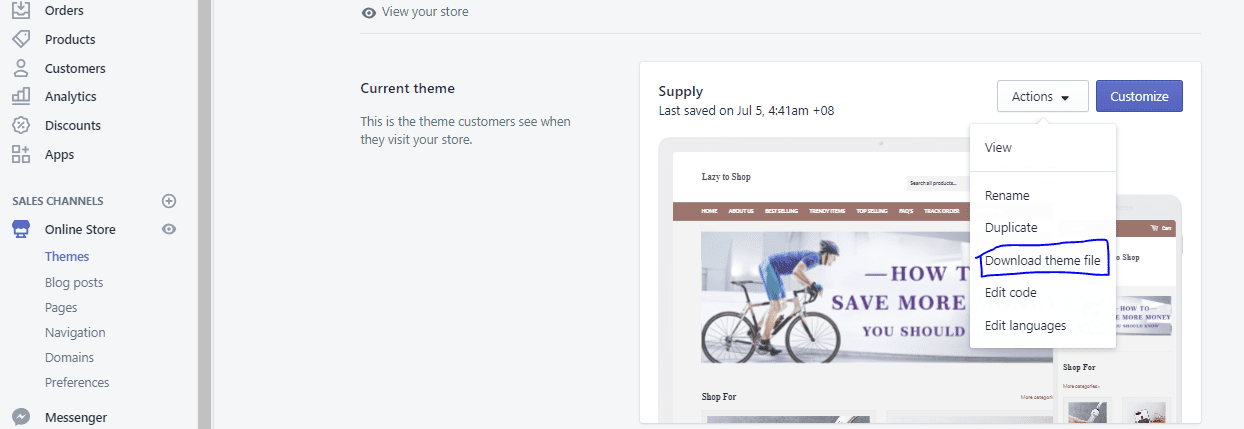
Downloading a Theme
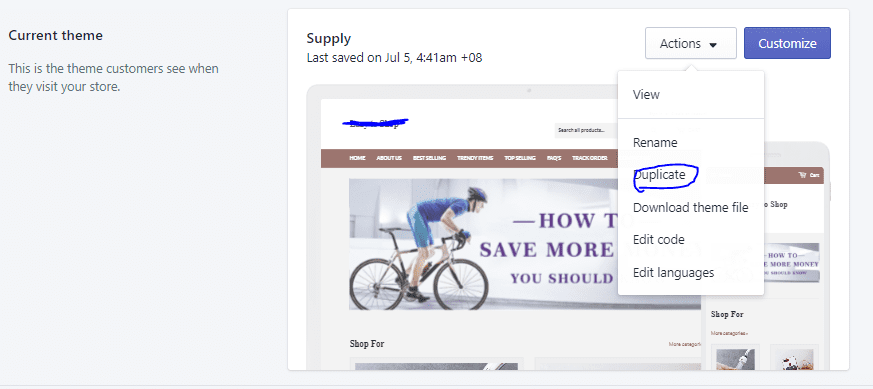
From your dashboard on the Shopify admin, click on the “Online Store” then go to “Themes.” click on the “Actions” button, and a “Download theme file” will bar will be seen; you click on it to access and download the theme you want.
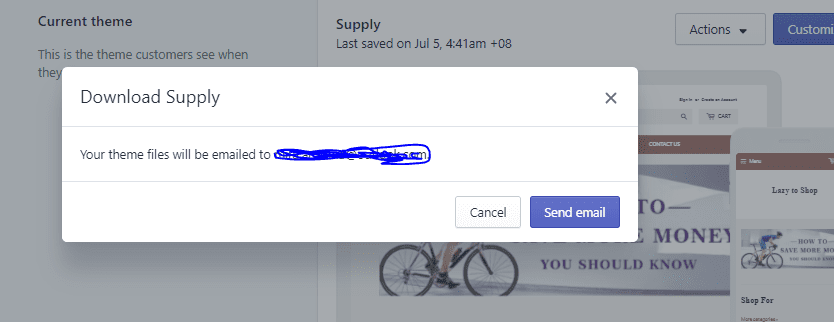
The theme will be downloaded in a “zip file” into an email folder linked to your Shopify store account.
After downloading your desired theme, you can delete it from your Shopify admin page. To use this same theme in the future, all you need to do is to re-upload it again.
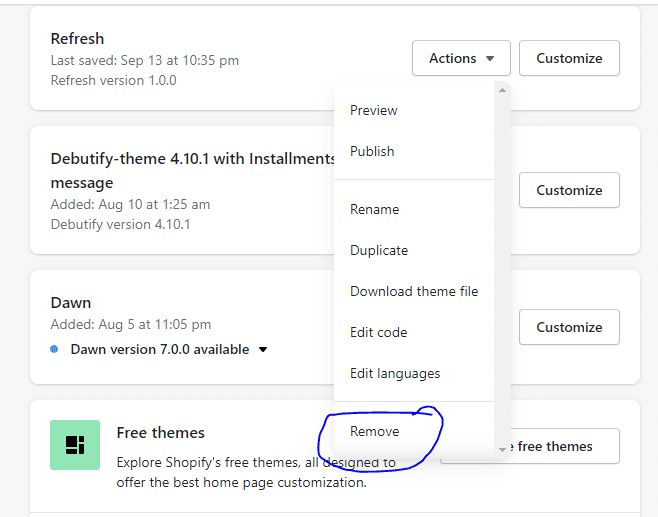
How To Remove a Theme From your Online store
As much as you can upload a theme to your online store, you can also remove any theme from your archive. Removing a theme can be done on your “Theme” page on the Shopify admin.
You should understand that when you remove a theme, you have permanently deleted it and cannot recover them for future use.
But if you still want to access a removed theme, you can re-upload it following the previous steps.
Removing themes can be done when you have already reached the maximum of 20 themes and you want to create space for more themes.
How to update your themes
One of the beauties of technology is that sometimes more advanced research leads to the release of newer versions of a system or application, thereby improving some aspects of the system. This makes the developers release a new and updated version of the theme.
An updated version of themes is presented periodically, thereby improving certain features of the theme; sometimes, if you haven’t altered the codes on your theme or installed applications that have altered the settings and codes of your theme, then such theme can automatically update itself if new versions of the theme are released.
But if any code of your theme has been altered, your theme won’t update automatically.
This occurs because code changes will automatically be affected when a theme is updated.
You can also access the most updated version of all the themes in your store. This can be found in the “Theme Store.” An advantage of purchasing a theme from the “Theme Store” unlike buying a theme from a third-party theme store, the theme you purchased from the Shopify theme store will be updated for free.
Meanwhile, you will need to contact the theme developer for an updated theme if you purchase from a third party.
How to add an updated version of your theme to your Shopify Store
One of the attributes of the updating of theme versions on Shopify is that when you manually add an updated version of a theme, automatically, a second version of the theme will be added to your online store, and this will make the new version be in a state of default without any of your modifications or customizations.
The updating process does not affect the old version of your theme; all your codes and settings will remain intact.
To add an updated theme version to your Shopify store, create a duplicate of your existing theme.
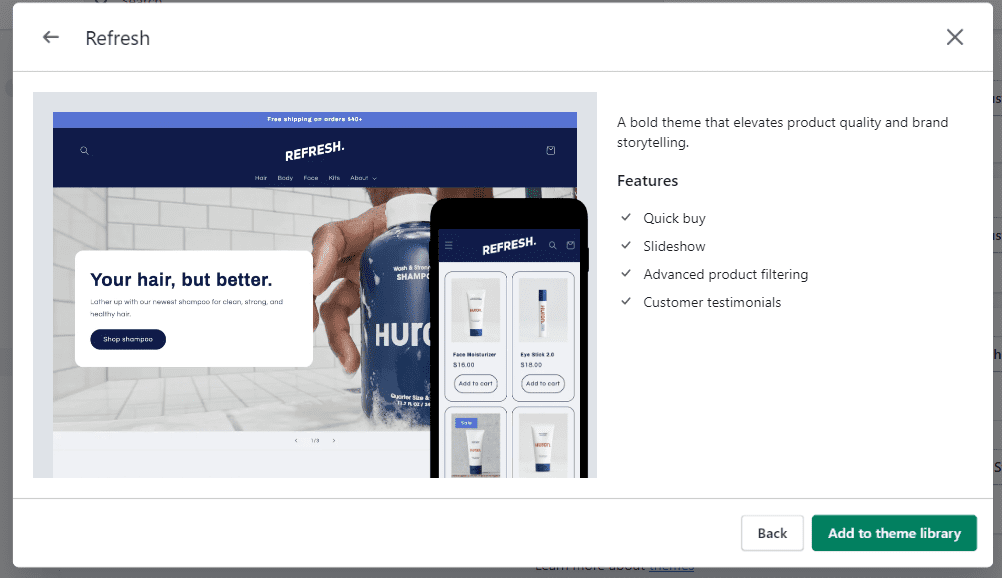
Go to the Shopify Theme Store and Shopify login to the interface. Before you can buy a theme, you will create an account with the Shopify theme store; these account details will then be used to log in.
After logging in, check the top bar search box to search for your desired theme, a list of themes will be shown on your search results, and you can select your desired theme.
Then click on the “Add latest theme version or a theme.”
After adding an updated version of your theme to your Shopify store, you can then decide to do the following tweaking ;
- You can use the “Theme Editor” to customize your theme.
- Launch and publish your theme
- If there is an application that adds code to your theme, Uninstall that application and then re-install it from the Shopify App Store.
- You can also contact your app developer for support if you don’t know whether your app needs to be reinstalled.
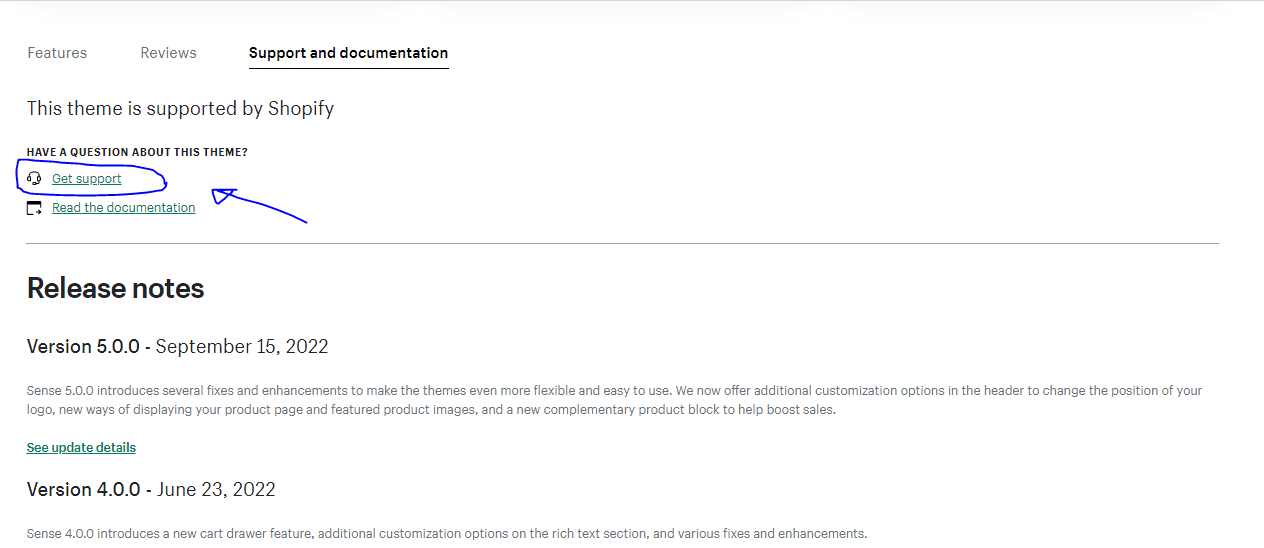
To contact your theme developer, find the application on the “Application page” of your Shopify admin, then click on the “View details” to get the contact of your app support, and click on “Get Support.”
How to customize your theme
Sometimes after selecting a Shopify theme, you might desire to re-modify the theme to customize the basic layout of your store. Your theme can be customized to meet your needs and suits your brand. Your theme settings can be customized from the Shopify admin using the “Theme editor.”
The tools in the theme editor include a theme preview and add and remove tool for adding and removing content from your themes. You can learn more about the settings available in your theme custom; see your theme’s documentation for more details.
If the theme you are using on Shopify is free, then all you need to do is to go to “Free Themes From Shopify” and click on the name of your theme.
Meanwhile, if your theme does not have the required settings for the modifications you want, and you know how to alter HTML, CSS, and Liquid, then you can edit the “theme code.”
How To Publish A Theme On Shopify store
A published theme: – This is the theme that displays on the homepage of your online store. It is the one seen by your customers whenever they visit your Shopify store.
On your Shopify store, you can add about 20 different themes to an online store, although you can only publish and display a theme at a time.
Multiple themes cannot be published simultaneously on your admin dashboard; a published theme can be found in the “current theme” section of the “theme page.” while the themes that are yet to be published can be found on the “More Themes” section of your Admin page.
To check for an old theme, the theme you published recently will be automatically moved to the “More Theme list” section after publishing a new theme.
All your recently published themes are saved there automatically for future use. None is lost.
How to publish a new theme
To create and make a new theme displayed on your homepage, you can do it from your admin page. This can be done by following the below steps:-
Go to your Shopify admin page; from your admin page, click on the “Online Store” icon, then go to the “Themes” section.
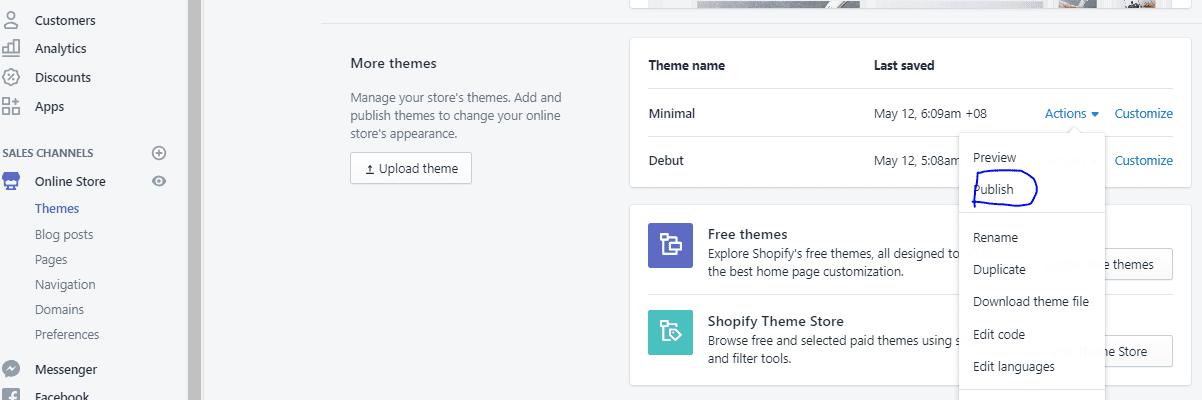
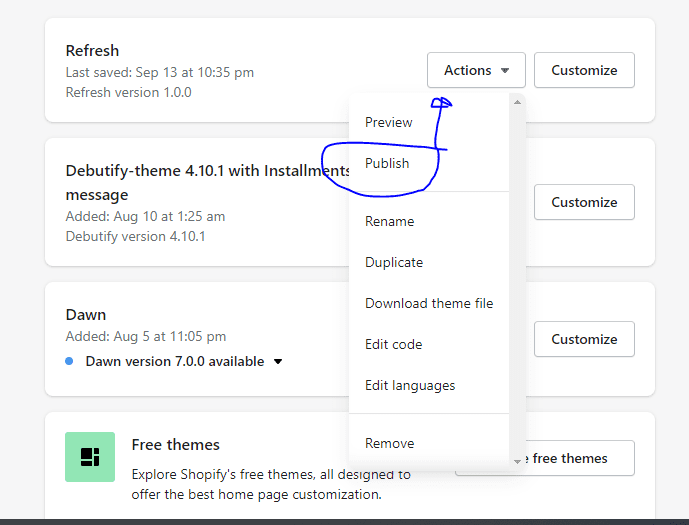
Scroll down; you will find a “More Themes” section; find your favorite theme that you will want to display to your customers, then click on the “Actions” you can preview this theme to see how it displays if you are satisfied with it, then click on the “Publish” icon for the theme to be added successfully.
While you are on the “Publish Page,” and after you publish a new theme, your previous theme will automatically be moved to the “More Theme” section of your “The Theme” pages.
How to duplicate a theme on your Shopify store
Duplicating a theme means making a copy of your original theme so that after customization and modification, you will still have a copy of the previous theme unaltered.
So before you customize a theme, it is advisable to create a backup copy of the theme so that if you do not like your customized design, you can delete it and still have a copy of the previous theme. You can also start the customization again if you so desire.
It should be noted that; if you already have 20 themes on your Shopify store and wish to make a duplicate copy of the previous theme, it cannot be duplicated unless you delete one of these themes to enable you to have a duplicate copy of your desired theme.
How To Manage Shopify Themes
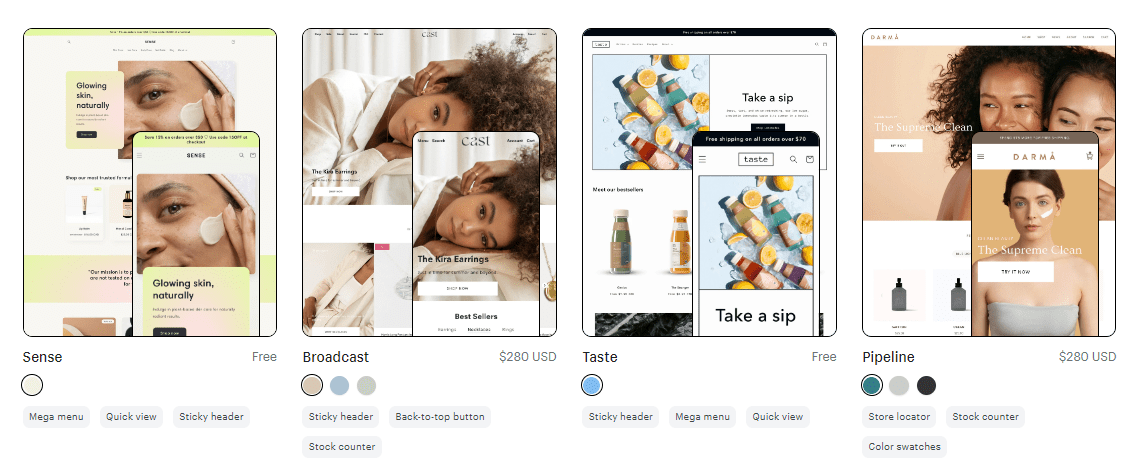
You can choose a Shopify theme for your Shopify store, either the free or paid versions; the kind of Shopify theme you choose depends on your choice and budget.
Scroll through the left-hand side of your dashboard menu bar, and click on the Online store; there will be a drop-down of the sub-menu, where you will see Themes; click on it to open the Theme page.
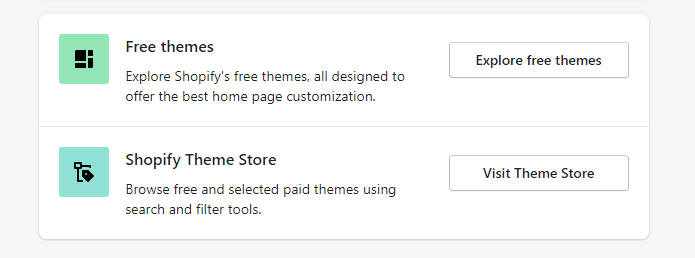
You can check the available Shopify themes you could install; the theme could also be customized and modified if you wish.
You can also find paid Shopify themes that are very nice and attractive; you could decide to buy one and install it on your Shopify store. We recommend the Debutify theme.
Check the available themes, preview them, and make a decision.

It’s common that when you register your Shopify store, it comes in a default state with all its functions as clean as a slate, with the necessary functions, bars, and navigation icons available.
So it’s the choice of the Shopify store owner to design his store, just like when you just own a shop, you log in to your store, make the necessary tweaking, just like you choose a preferred color, your preferred logo or store’s logo, the kind of navigation menu you desire, etc.
An advantage of Shopify over all platforms is that all these can be easily set up.
So, right on the Theme bar you’ve previously selected, a theme page is automatically opened; if you scroll down the page, you will find the available free themes.
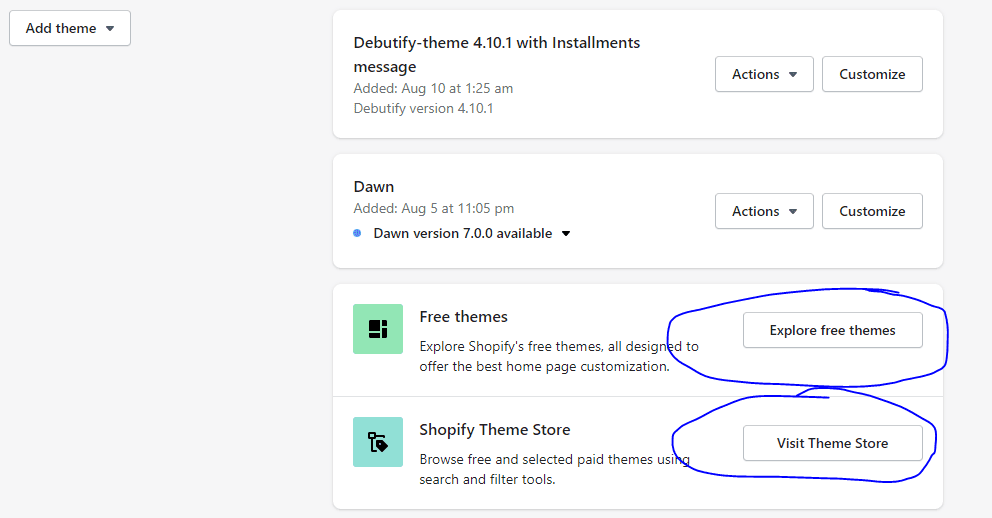
The next thing is to ask yourself the kind of theme you want your store to use because you want to maintain integrity; you wouldn’t want to set up a store that looks exactly like an existing store.
I’ll advise you to use the Debutify Shopify Theme or choose the one that best suits the kind of impressions you want on your customers.
You click on the theme you want, and when you click on it, you will have the features list; this is built in a group of catalogs such as a sideshow image, a collection menu, a sidebar, etc.
Now when we scroll down, you’ll see that it has more themes and theme names, and right here, we have the supply theme, right? So, let me just go back.
How to undo and redo changes on Shopify
The “Undo” button can be used when you want to reverse an action you carried out, while the “redo” button is used to “Redo” an action you carried out. It is used to add back a change that you undid. Can one Make Changes To Shopify Theme?
Just like when using a Microsoft package, click on the “Undo” button several times will continue to “Undo” your work. At the bottom of the “theme editor,” you can find the “Redo” and “Undo” icons.
You can click on the “Undo” icon to reverse the changes you have made; changes such as mistakenly deleting a section, reordering, adding, applying the wrong color, fonts, and other settings can be reversed using the Undo button.
How to Choose a social media picture
Shopify allows you to share a link to your online store. On any of your social media platforms, a platform such as Pinterest, Facebook, Instagram, etc., a thumbnail image of your Shopify store can be displayed in your post.
How to show a featured product image
When you post your online store link to your social media, the feature product images for the page you shared will be shown on your social media; this occurs for all the free themes you use on Shopify.
For example, if you post a product link on your Shopify store to your social media, the link of that product and its image will be shown on your social media.
Although some page links on your Shopify store do not have a featured image, such as your home page or your “About Us” page, only the image shared on social media is shown.
How to do the settings of your social media image
You can choose the product image to be linked to your social media. Go to your dashboard and click on the Shopify admin, then go to your “Online Store” then “Themes,” scroll down to find the theme you wish to edit, and click on the “Customize” button. Click on the “Theme settings” button and go to the “social media” bar.
A “Social Sharing Image” area will be seen; you can select the product image you want to display on your social media platform and click “Save.”
How to Update your images
You should know that on the Shopify platform, Open Graph tags are the avenue used to link your online store information to your social media platform when you use a free theme. Open Graph is used by social media such as Facebook, pinter estate, Twitter, LinkedIn, and others.
The information on Open Graph is managed by Facebook and stored for specific days before you can check for updates. If you change the product image of your social media, you can use the Facebook Sharing Debugger to refresh all pieces of information that are saved for your Shopify page links.
How to edit Theme code on your Shopify store
To make some informative and detailed changes to your Shopify store, you can edit your theme store to make it look better. Liquid (a Shopify template language) is usually the style that is made up of a theme. These files can also be written in HTML, Javascript, and CSS codes.
Do not edit these codes except if you understand the HTML or CSS code and have a basic understanding of Liquid.
Before you customize your theme on your Shopify store, make sure you carry out the following steps :
Create a duplicate copy of your theme and have a backup copy. This allows you to discard any modifications made and start all over again if you got the designs all wrong.
As discussed earlier, ensure you know the support level available.
Know the best practices and requirements before you upload your product images.
How to edit your theme code
You can edit the code of your theme if you have basic coding knowledge. The following steps can assist you.
From the admin of your Shopify store, click on the “Online Store” and go to “Themes,” then click on “Actions,” where you will see the “Edit Code.”
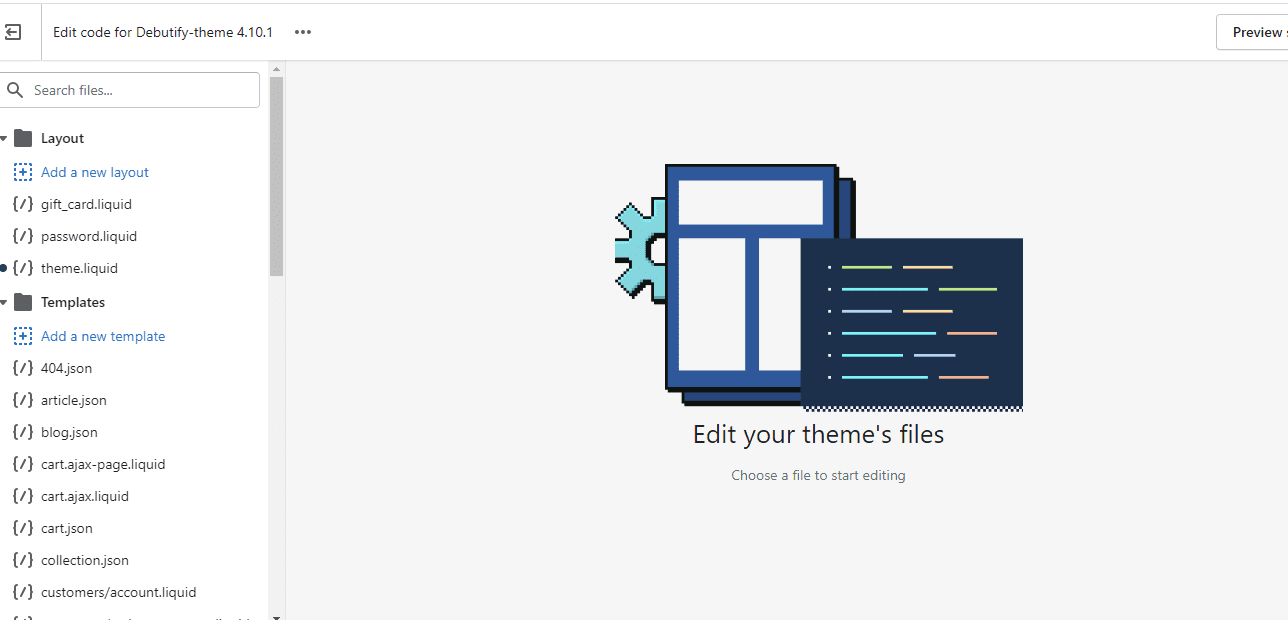
In the “Code editor,” you will see the directory of theme files and a bar to view the theme and edit the file that can be found on the right. The code editor can be maximized to fit your device screen by clicking on the “expand” icon.
You will return the page to normal when you click the “minimize” button or the “Collapse” button.
The code editor will be opened when you click any theme file in the directory on the left. Multiple files can be opened and edited at a go. Any customized file will show a purple dot next to the file’s name. This will help you know the files you have worked on.
If, after you have clicked “Save,” you still want to revert any changes you have made to a file, you can do that by opening the file and clicking on the “Older version” to open the older file.
Also, there is a drop-down menu, which will show you the date and time for each modification you have done and saved. Select the version you wish to revert to and click on the “Save” button.
Besides, when you maximize the screen of your code editor, you can modify the editor color and toggle between “Light” and “Dark” by clicking on the button below the page.
How to Get help with Customizations
In case you are stuck and need support in making changes to your theme, then you can contact your theme’s developer for support.
You can visit the Additional resources for theme support to see other resources and materials that can assist you with theme customizations.
How To Edit Your Theme Settings
Your themes can be edited to customize and modify your Shopify store to suit your needs and style, and your store’s content, layout, colors, and display can be altered.
Each of the available themes has its settings which are provided for it to allow you to change the outlook and style of your online store without the knowledge of coding.
Before you customize your theme, the following steps can assist you greatly.
- Make sure you duplicate your theme to have a backup copy. This will allow you to easily delete your modifications and start again if there is a need for that.
- Make sure you understand the available level of support service provided for you.
- Make sure you know the practices and requirements for uploading your images.
How to edit your theme settings
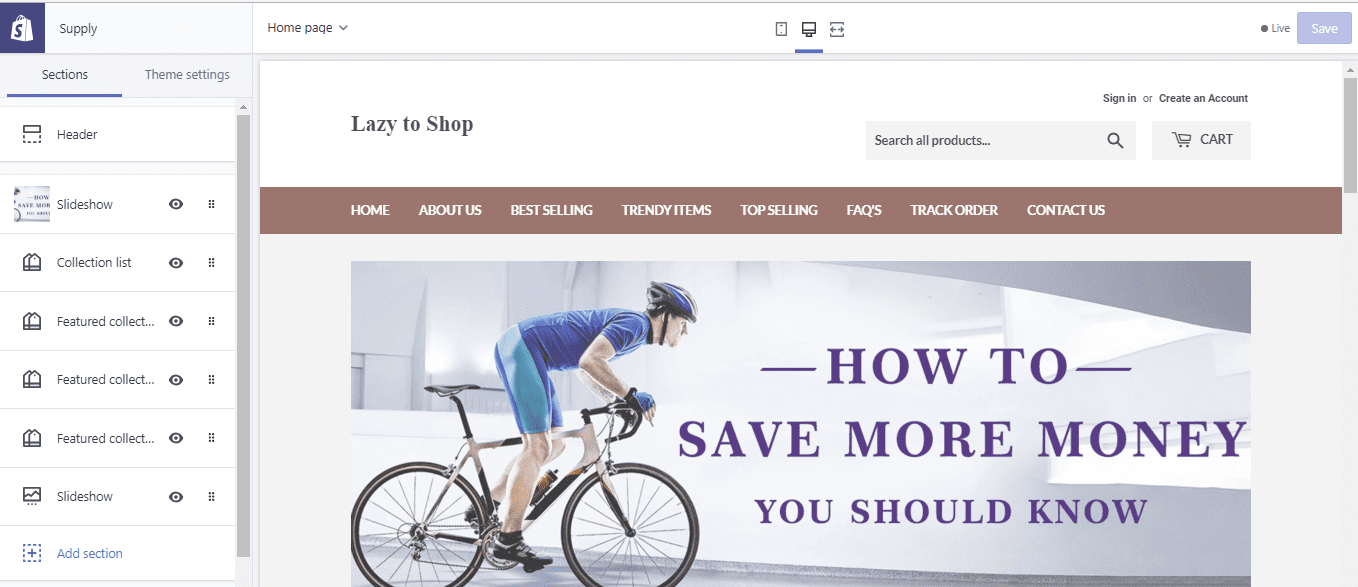
To edit your theme settings, go to your Shopify admin, Online Store, and click on the “themes.”
You then select the theme you want to edit and click the “Customize” button.
When you open the theme editor, you will notice that there are different types of pages, each with different theme sections; on the theme editor, the homepage settings are displayed.
To access the settings of pages other than the homepage, select the required page number from the top drop-down menu from the bar.
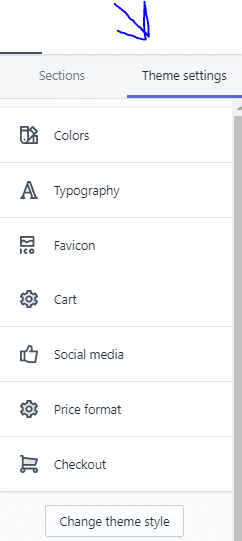
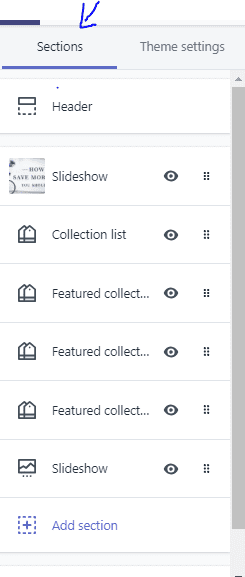
The theme editor tool is divided into the “sections” bar and the “theme settings.”
The “section” can be used to customize the themes’ layout, topography, and the content of different pages on your Shopify store. In contrast, the “theme settings” can be used to modify the fonts of your store, its colors, check out the bar, and even your links to your social media.
On the “sections” and “theme settings,” you can learn more about editing sections and theme settings.
You can also find a detailed description of the “sections” and “settings themes” by checking out “free themes from Shopify and selecting the name of your theme if you are using a free theme from Shopify.
You can also get help on how to customize your theme by contacting your theme’s developer for support and visiting the” additional resources for theme support ” to check other content available to assist you with customizing your theme.
How to customize the ” Sections” and “theme settings.”
In the “theme editor” toolbar, you can find two icons; they are the “section” and the “Theme Settings” icon.
The “sections” are used to modify and change the layout and content of the different pages on your Shopify store. The “Theme Settings” can be used to change or modify the fonts and colors of your Shopify store; it can also be used to make changes to the links of your social media and the display of your “Checkout settings.”
Note, if you are using a free theme from Shopify, more explanations of the sections and settings can be found by going to “free themes from Shopify and selecting the name of your themes.
Modify” Section ”
A section is a block of content that is designed in such a way that it determines the layout of your Shopify store; it can be customized. On each theme, there are two types:
- The static sections and
- The dynamic section
The static section
A static section is a particular location on your online Shopify store, this section can be edited, but it can neither be rearranged nor removed on each type of page you have on your online store; there is a different static section.
The dynamic sections
In this icon, dynamic sections that can be used to customize the layout of your page can be modified; they can be added, re-arranged, and removed. There is a distinct set of dynamic sections for each theme.
How to edit “static Sections.”
The content of the static sections can be edited by following the below steps ;
- On your dashboard, go to your Shopify admin icon, click and go to your “online store” from there, you can then click on “themes.” scroll through to find the theme you want to modify, and then click on “Customize.”
- You will see a drop-down at the top bar; you can select the page you wish to modify. Using this as an example, let’s assume you wish to edit your store’s “product pages”; you only need to select the “product pages” from the drop-down menu.
Editing these sections can be done regardless of the page type you choose because both the “Header and Footer” sections appear on every page chosen.
- You can then click on the section containing the icons you want to edit and make modifications that suit your needs.
- Then click on “Save.”
How to add dynamic sections to your home page
Shopify allows you to have up to 25 dynamic sections on your homepage. If you want to add a dynamic section to your homepage,
It should be noted that when an image is added to the “section,” the image automatically goes to the “Files section” of the admin. An uploaded image can then be re-added in other sections or pages of your Shopify store.
How to rearrange dynamic sections
The following steps will guide you through the process of rearranging dynamic sections:
• From the admin of your Shopify dashboard, go to “online” and then the “themes.”
• Search through the theme you want to edit and click on the “Customize” button
• Placing your cursor on the section you want to move, right-click and drag the section to your desired place.
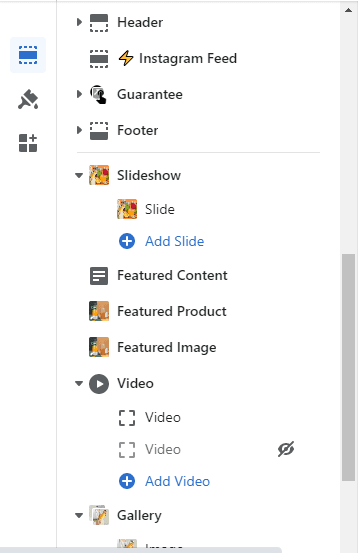
How to hide dynamic sections
Sometimes you might not want a section to display on the homepage of your online store; these sections can be hidden, especially sections that are unfinished or ready to be published.
For example, you might have created a slideshow for a new product, but you are not yet ready to start selling the product; this type of product can be hidden till you are ready to start selling.
Also, you might have created a section that advertises a product discount according to the season; if the season has passed or it’s not yet time, you can hide this section until the season comes by and the discount becomes active.
How to hide a dynamic section :
On the admin page of your Shopify dashboard, from the Shopify admin, go to your “Online Store,” then go to “Theme.”
Search through the theme that you want to edit and then click on the “Customize” button
To hide the dynamic section, in the theme editor toolbar, an “eye” icon is presented; click on the “eye” icon to hide; when the section becomes hidden, a slash line shows on the eye.
To show an already hidden section, click on the slashed eye again.
How to remove dynamic sections
Content can be removed from the “dynamic section,” or you can delete a “dynamic section” from the homepage. When you remove content, the section content will be completely deleted, but nothing will be removed from your content.
Also, note that if you remove a product or collection of a block from a section, that product collection will still be saved in your Shopify admin.
For example, if you delete a product image from your section, such an image can still be re-added.
How to remove content from your dynamic section
To delete content from your dynamic section, follow the simple steps below;
From the admin of your Shopify store, click on the “online store” and go to “themes.”
Scroll down, find the theme you wish to edit, and click on the “Customize” button.
Click on the “section” containing the content you want to delete.
In the “Content” section, click on the content that you want to delete from the section. You can click on the “Delete content” button, where you have a content type (collection logo or image).
How to delete a dynamic section
To delete a dynamic section from your Shopify store,
Right on the Shopify admin, after going to the “Online Store” and clicking on “Themes.”
You find the theme you wish to edit and click on the “Customize” button.
While on the “theme editor” toolbar, you can click on the “Section” that you want to delete and click on the “Delete Section” below the toolbar.
It’s my belief you learn something about Shopify Theme Settings. Share this post to help someone wondering how to configure Shopify Theme Settings.
Start Shopify For Only
Try Shopify free for 3 days, no credit card is required. By entering your email, you agree to receive marketing emails from Shopify.
Related Posts
Comments (0)