If you love WordPress CMS but you want the power of Shopify's…
How To Organize Products On Shopify Store
Now that you have successfully imported products from Aliexpress to the Shopify store, the next important task is to know how to organize products on Shopify so that they do not end up in the wrong collection or appear where they are not needed.
Before you start customizing your store layout, it is wise to know the number of products in your store. It will help us understand how many products will be tagged in a particular collection.

For instance, you can categorize your products using tags or broad category terms like Best Sellers or Trending, but each collection must be balanced with the number of products that appear in each.
You already added products to your Shopify store; we need to create a collection to help sort them manually or automatically when posted based on your store settings.
Table of Contents
Creating a collection
In your Shopify admin panel, head over to the product section and click on it; the following dropdown will give you an option to create a collection. Click on the collection tab.

You can name the collection; in this case, we should choose ‘best seller ‘ as our first collection.
It would help you create a collection based on your niche or selling products.
If you are in a fashion niche, your Store may have collections such as women’s underwear, bikinis, bottoms, tops, etc.

You must write your collection name and add a unique description in the collection section.
Writing your description is advised, but this also depends on your Shopify theme; some themes will display these descriptions while others don’t.
So, to be safer, write at least three lines or leave it empty.
Not all are good at copywriting; hence, the challenge of writing descriptions may arise.
I use AI to write collection and product descriptions but later edit the output and add human elements.
You can also use ChatGPT to give you high-quality collection descriptions or Copygenius, explicitly designed for Shopify users who want to write product descriptions and store content.
Adding Feature Images and Videos to collections
Just like when you add products to your StoreStore, the same applies when creating your collection: you can add a collection feature image or embed a video in the description.
Adding a media file to your collection is vital; the images may include 3D models and videos.
Adding media like 3D models for your product collection gives your customers an in-depth understanding of the function of product features in that collection; this is one factor that increases store conversions.
Adding 3D models to your product collections or page requires a supportive theme, such as the Debutify theme, which supports 3D models.

You must use a theme that supports 3D models and video uploads; if you are using an outdated article, it’s necessary to update to their new version to be able to upload 3D models and videos in your product collections or even your product pages.
Read Also: Enhance Product Image With Shopify 3D Scanner On iOS
The other option is to modify your current Shopify theme, and if you are good at coding, you can edit your theme source code to upload 3D models.
Your collection or product images can be accessed through the content section in your StoreStore right in your files folder within your Shopify admin panel.
Collection type
You can decide to let your products appear in specific collections automatically, or you have to manually tag each product to the corresponding collection in which you want them featured.
So you have two options: check the manual or the automatic collection type.
A manual collection will always feature the exact products added unless you add or remove a product.
If your StoreStore has more than one staff member, ensure that you don’t work on the manual collection simultaneously to avoid having the same products twice in the same collection.
You can only add a product as a whole to a manual collection, but you can’t only publish a product variant to a manual collection.
A manual collection can be scheduled to go live at any given time. You can choose when the collection will be published in your Shopify store.
Let’s say you have an incoming product line and want to launch it on Black Friday; you will edit the collection date to go live on Black Friday.
Creating A manual Collection on Shopify
From your Shopify admin dashboard, you want to head over to the products section; right after clicking it, you will see a dropdown with collections:
- Click on the Create Collection option on the far top right.
- Enter your Collection name and add collection descriptions.
- Under the Collection type, you want to select a manual option by clicking on it.
- Double-check and click save.
You can manually add products to this collection by adding the collection name as you edit your products before publishing.
The other way around is to go to your existing products and select the ones you want to add to the collections; you can do this one by one or use the bulk edit option, which is capable of bulk moving products from one collection to the another, deleting collections or products as well.
Creating Automatic Collection
Automatic collection is a second option now that you’ve learned to manually organize products on Shopify by tagging them into your collections.
Automated product collections decide where the product will be automatically added based on the conditions and rules, including matching products.
You have the option to add up to 60 selection conditions. You can add up to 60 selection conditions.
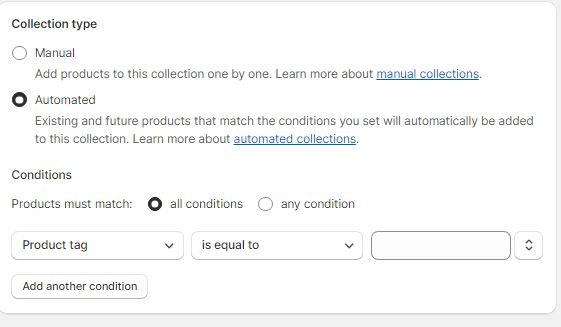
You can specify whether products must meet all requirements or any condition to be included in the collection.
Shopify allows users to create up to 5,000 automated collections, each with conditions and rules. You can also apply a sort order and other details to tag your products automatically in the proper collection.
A user can edit and delete existing conditions on any collections but won’t be able to add any conditions while over the limit.
If everything is done correctly, all future products that match your set conditions and rules will be automatically tagged or added to the corresponding collection on your Shopify store.
Search Engine Listing Preview
Right after the collection type option, you get to edit your collection snippet; this is how Google will see your collection description and collection name and how the listing will preview on search engines.
Do keyword research and optimize this section as far as the on-page SEO rule is concerned.
You must at least include the keyword in the meta description, ensure it matches the product name, and throw in 2 long tail keywords or search queries relating to the collection.
It will make your collection eyeball and ranking easy when Google creates your Shopify store.
You can change the URL, edit its name and description, make it short and precise, and avoid long sentences.
Sales Channel Setting
For the products tagged in any collection in your StoreStore, you must choose the sales channel you want them published to; there are different online sales channels on Shopify.
A sales channel represents different marketing platforms where one can sell products.
A sales channel helps store owners keep track of their products, orders and monitoring.
Shopify offers various online sales channels. You can install the sales channel.
Shopify supports several online sales channels. You can install the channel you want tour products listed on.
Online StoreStore is a default sales channel on your Shopify Store, allowing Shopify store owners to sell products through their checkout pages; when a product is published, it goes to your Online Store, enabling customers to place an order with a one-page checkout.
- Shop sales channel: It sells your products to customers through the shop app.
- Facebook sales channel: You can post and sell your products directly from your online StoreStore to your Facebook page if this option is selected.
- Buy Button channel: Suppose you don’t want to sell on the Shopify Store. You can have the buy button feature embedded on your website or blog, and customers will be able to checkout.
- Instagram: You can also sell your products through the Instagram sales channel by tagging the products appearing on the Instagram shop.
Sign up for a free trial and enjoy 3 months of Shopify for $1/month on Select Plans.
Channel eligibility
Sales channel availability depends on the store location and other eligibility requirements.
You must check if your StoreStore is eligible to install a specific sales channel that you need to use.
Sometimes, the sales channel may read unavailable in your Shopify store admin. Sales channels like Tiktokshop, Instagram shop, and others are only available in the US and other countries.
Adding the collections to Store Navigation
You can add unlimited collections in your navigation, and this is the menu that will display all your created collections and other pages that you want customers to see in your store header or footer menu.
Conclusion on how to organize products on Shopify
So, if you are wondering how to organize products on Shopify, I pray this guide has shed some light on how to do it.
You can add as many collections as you wish and create many menus; you can have menu dropdowns and links to your submenu.
You must organize products on Shopify in a user-friendly way to increase user experience and conversion.
Let me know if you have any questions in the comment section below.
Start Shopify For Only
Try Shopify free for 3 days, no credit card is required. By entering your email, you agree to receive marketing emails from Shopify.


Comments (0)