
If you are looking for Shopify website builders, you’re obviously trying to…
How To Sell Digital Products On Shopify Store

Many want to start selling digital products on shopify, and they need to know where to begin regarding product research and the cost involved.
This guide will break down the cost of starting digital products on the shopify ecommerce platform.
I’ll give you step-by-step blueprints on what to spend and how to pay and track your investment with your digital shop on Shopify.
Table of Contents
Cost of Starting Digital Products store on Shopify
How much would you need to start a digital product store on shopify?
The short answer is a thousand dollars, but the more, the better.
Now, each month, you have to top the $1,000 by 100 dollars. However, starting your digital products download store on Shopify will likely be the cost of starting and running the business on this e-commerce platform.
The following are the costs for the digital product:
- Shopify plan: $32 a month
- Digital assets: $50 per month
- Theme: $50 a one-off payment
- Logo: $20-$50 a month
- Marketing: $500-$2,500 monthly
Shopify offers a $1 Per month offer after a 3-day free trial, then reverts to their regular pricing.
Sign up for a free trial and enjoy 3 months of Shopify for $1/month on Select Plans.
If you want to use a free theme like Debutify, which offers over 40 prebuilt apps, then you can go ahead; Debutify is the most Instal Shopify theme by Dropshippers and a digital download store.
You only pay if you want to upgrade to more advanced features on Debutify, but you can use the free version of the theme.
Using Debutify means you avoid installing numerous apps; It comes with all the essential apps your store needs.
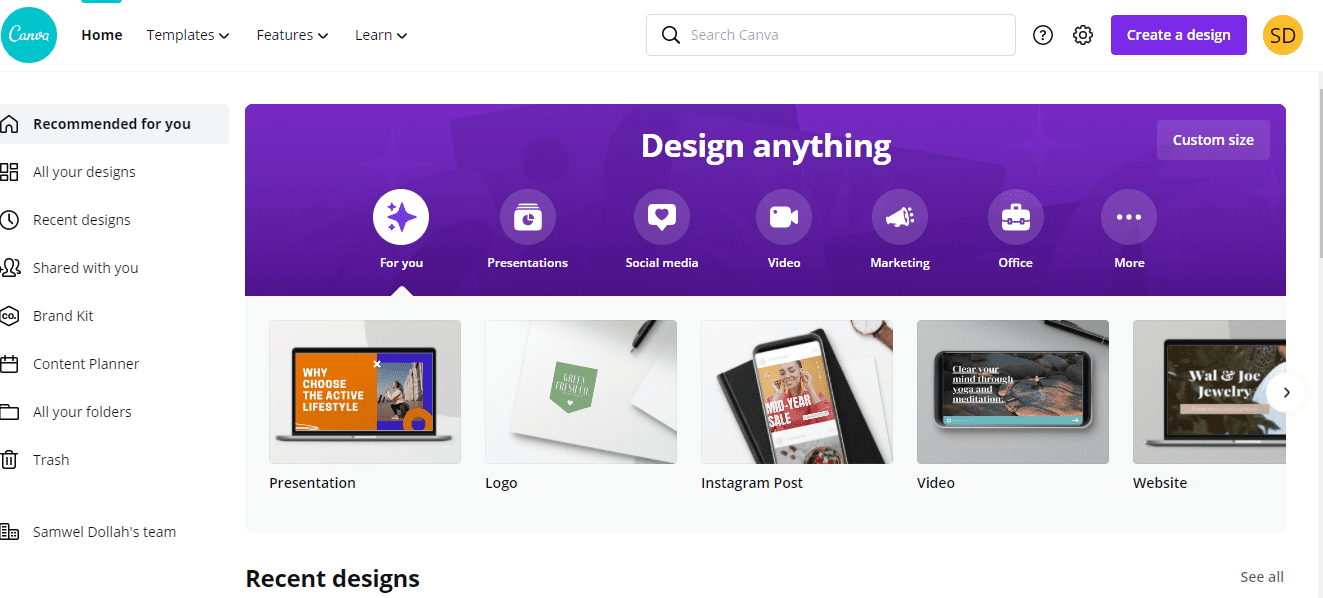
You can make a professional logo using Canva. On Canvas, head over to their search bar, type “Logo,” browse through the premade logo templates, choose the one that aligns with your brand, customize it, and change the dimension and color to your liking.
You can then download the logo as a transparent background and upload it to your shopify store.
Let’s get straight to the advantages and disadvantages of digital products because many of you need to learn how it works.
Pros of starting a digital products store
Unlike dropshipping businesses, selling digital product downloads has many advantages compared to other ecommerce business models.
Instant shipping times: Since it is a digital product, customers will receive it immediately after buying from your Website.
High-profit margins: Digital products have high profit margins depending on how you go about the business.
You buy the digital asset, create it once, and whenever somebody else orders it, you make 100% profit because you’ve only had to develop that asset once.
Whenever a client orders, you look like you’re at profit margins because you don’t incur costs regarding goods’ cost. You own the assets.
You own the assets: By creating the digital assets yourself—and I’ll be inducting you later—you own them, they’re yours, and you can license them.
As such, you can only have them if you give the seller permission, but overall, it is a terrific way to build an online asset.
Cons
Limited digital products: The business model offers a limited range of digital products.
The digital product space is still new, and there’s a restricted range of activities you can engage in.
Value: Regarding how much you can charge, digital products also have a limited perceived value, so there is a limited received value based on their nature.
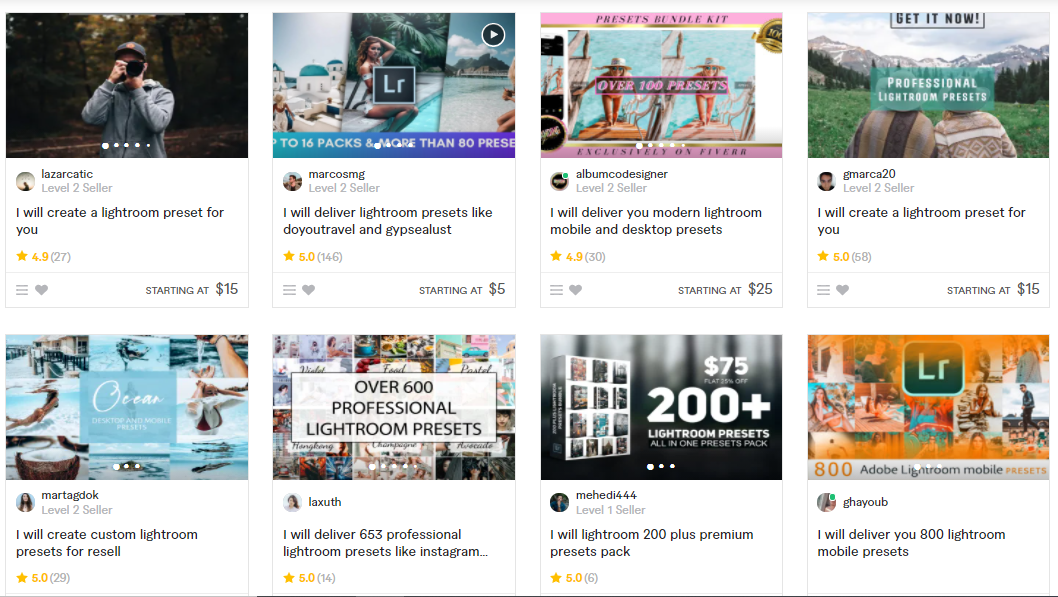
Best Digital Products Niches
The best digital product niches, based on my experience, include:
- Lightroom Presets
- Video Luts
- Phone wallpapers
- App Icons
What are Lightroom Presets?
Adobe Photoshop creates Lightroom, and the Lightroom Presets lets you colorwork your photos, making them look brighter and friendlier.
This is a way to get people to look at your photos and think, “Wow, they look stunning.”

People pay huge sums to buy professional presets because they want to add them to their Lightroom by clicking one button.
It is like an Instagram filter. The Lightroom Presets are the high-end version of the IG filter button.
Thus, Lightroom presets are one of the most considerable digital assets.
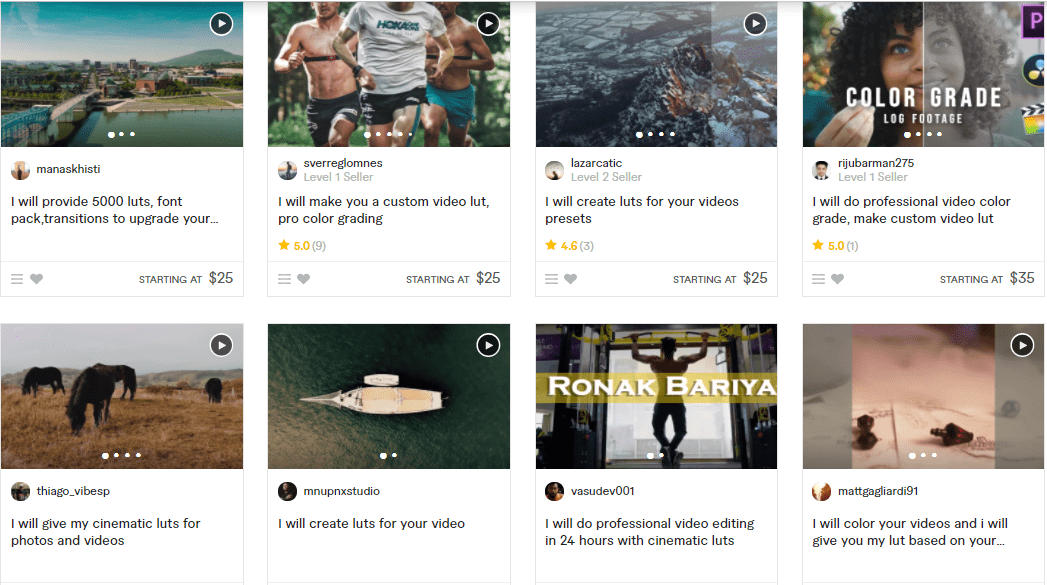
The video luts is the Lightroom Presets video version. It can be used with Finals Pro Premiere and most video editing programs.
It adds a filter to a video.
The video luts are much more complicated than Lightroom (photo button video) and are highly demanding, particularly given the global situation.
Many people now pursue photography and videography.
These two are some of the big assets people want to acquire.
Phone Wallpapers is a perfect app, and so is an app icon. You have Icons on your Android or Apple phone, and people spend a lot of money making them look cool.
Finding Winning Digital Product Ideas
Study your competition
What are the winning ideas for digital products?
The best way to find winning ideas is to browse through competitors’ sites, exercise due diligence, and determine what works well for them and what does not.
The idea is to refrain from copying.
Please do not copy anybody; you can only collect information on the business model.
When researching, you should research your competitors. This is a great way to determine which niches I have recommended, such as lights, wallpapers, and app Icons.
It is one of the best ways to find the industry’s best work.
You get to Google, type in Lightroom presets or video lut to where it says Shop section, and you’ll be and see some of the bestsellers.
You click on one, and it is a well-known store for selling digital products. You can head over to their mobile Presets, go through their Website, and see which ones have done the best for them.
You can also look at the Facebook ad library to see how many ads they run for Which Lightroom Presets.
When you go to the ad library, it shows you the brands’ ads they run on Facebook. Whatever ads they run must be performing the best for them.
Now you want to see that there is a different preset style for some types of photos.
Again, if the IG-Styles do the best for them, for example, because they run many ads on Facebook, this points to the kind of look that is so good you could notice.
If IG or Instagram Photo Presets work well, you want to avoid copying how your competition did their Presets, although that’s what the industry currently does, in preset terms.
Head over to Etsy
Another great way to find proof for your digital products is to go to Etsy and look for Lightroom presets video luts, and any digital product you have opted to deal with.
For instance, when you head over to Etsy and type Lightroom presets, and loads of different retailers who sell the Lightroom presets, it shows how many orders they have and how many reviews they have.
You can find those with the most orders and the best reviews by browsing through Etsy. And once again, you’re not here to copy or steal your competition work; instead, you’re here to research what works and what doesn’t work well.
For example, if an Insta blogger has almost 4500 reviews, that’s good. Remind yourself that it’s saying that it’s the best seller.
Perhaps they also had Instagram Presets doing very well when you went through the other Presets website.
As such, you want to consider what’s required and create an Instagram preset that contains everything.
Your due diligence ought to highlight what an Instagram preset is, its colors, and what type of photo editing it includes. This is what you want to do.
Again, I will emphasize that you refrain from copying anyone; you’re researching to learn what works correctly.
Best Methods to Create Your Digital Products
Now, let’s look at the best ways you can leverage to create your digital products, and here you’ve got:
- Upwork
- Fiverr
- YouTube
- Dropship of digital products
Fiverr
First, head over to Fiverr. And Fiverr is essentially the platform where freelancers find work. And what you want to do is to look for what you want. So maybe you’d like to type video luts.
If you type in video luts, you’ll see people who create your video luts. The results will show loads of different people. If you do the same for Lightroom presets, in the search bar, you type Lightroom presets, and you’ll see more sellers come up.
Again, if you type app Icons or similar things, you will see that there are vendors. They can create app icons and design them however you like.
A spot checks on their plans, and you figure they are divided into primary, standard, and premium. And in the bio, you can see that it is for commercial reuse.

Now, that information is vital. You need to make sure they’re designed to be commercially reused when you hire people to create these digital products for you; that is, you can sell them for yourself, which is very important. You cannot do it if you do not receive this permission.
And if your vendor, for marketing purposes, indicates commercial use in their bio, you still must contact them and ask.
You want the assets custom-made. You can sell them on your website after they have been created and licensed.
Ensure the seller creates custom-made digital products. You don’t want this person buying products off platforms like Etsy and selling them to you as a drop shipper. This wouldn’t work because it isn’t their work.
So, if your vendor sells their work and you can resell it on your Website, order your presets from them as soon as you find out it’s their work.
You must pay for the pro package, and I recommend getting at least five to 10 of these digital assets when you make presets or videos. You want them!
When you order them, certain conditions and requirements touch on what you seek.
Remember, when you researched what works best and what doesn’t, you saw that the IG theme works well.
You may have to ask if you can make me a few Instagram presets as part of the requirement because you know the industry works well right now.
In this case, you can just put whatever is trending and get them to research an expert.
The seller could then ask, “How many presets are you going to need?” I always recommend five to ten, which work just fine.
And then they might ask, “Have you any raw images?” Do you have any images you want to send them to apply on preset? Always say no. You want to wait to do that.
And that’s it. You should pay $45 (Based on your chosen freelancer). Pay for mobile export presets as DNG.
So, if you make a Lightroom preset and opt for that, ensure it’s the DNG file. You want to ensure your customers can upload it on mobile and desktop so you can pay an additional $10.
You have spent $55 so far on this. Again, this is back to what I said: paying $55 to build my digital asset. Now that’s done.
If I sell the digital product, I’m technically selling it for free, as you paid for it once.
That’s the price you’ve paid for the goods, and that’s why the profit margins are so high. When people purchase it, after making $55, all I do is profit, so it’s a lucrative business option.
Upwork
The second way you can create your digital products is, I’m honest here, to head over to Upwork. It’s much better. Upwork is similar to Fiverr, but instead of looking for someone, you put on a job with higher-quality leads.
So, go to Upwork and click “post a job.” Then, you should follow the instructions and complete the fields as directed.
For the job title, enter Lightroom presets. For video luts, you can do video, Icons, or even new app Icons. In the job category, apply as image editing or whatever your job category is.
Your description under ‘Description’ then reads, ‘I’m looking for an expert in Lightroom presets who can create ten unique presets for the photography industry’s trend designs.
‘ You may also want to describe that “I can reuse my Website commercially. “You want to make it very specific and tell them you wish to license or relicense the digital product as soon as you create it.
You want to license it so people cannot sell it without your permission when it is licensed.
And, if they do, they risk running into trouble. If you’re licensed, then people who wish to sell your presets, Which is the distribution of classes, have to pay some royalty if you are licensed, Which I’m going to speak to in a.
In detail, enter a one-time project for the project type. The screening question, ‘How many years of experience do you have?’ is below.
‘ I have provided all you need for this section: a copy-and-paste template.
You can fast-track your process with the Google Doc sheet, Which has all the copy & paste templates. The contents of a Google Doc cheat sheet takes shape as follows:
FREE CHEAT SHEET DIGITAL PRODUCT
MINI COURSE 2021
BEST NICHES:
- Lightroom presets
- Video luts
- Smartphone Wallpapers
- App icons
HOW TO CREATE YOUR DIGITAL PRODUCTS:
You can watch video tutorials or read on how to create your presets for
For example, this article
IT WOULD BE BEST IF YOU MODIFIED IT. YOU CAN’T JUST COPY THE VIDEO
You Can hire someone on Fiverr to make your custom presets
Or you can use Upwork and post a job post
HOW TO DROPSHIP OTHERS PRESETS
Digital product outreach message for rights to sell digital assets
Questions to ask Sellers BEFORE WORKING WITH THEM
Hello (seller name), I want to dropship your digital product
My name is (your name). I’m offering you a % to sell your digital product. I have a few questions regarding you as a seller.
1. Am I allowed to dropship this product on my Shopify website &
marketing platforms like Facebook and Google?
2. Do you have a license to sell this digital product as á seller?
3. Are the videos and images on your page okay for me to
reuse? Also, are you able to make new content just
for us?
I look forward to hearing from you. Let’s make money together.
DON’T SELL WITHOUT PERMISSION OF THE SELLER WHO HAS THE LICENSE OR COPYRIGHT
You can find sellers on this Website: filtergrade.com
BEST COMPANIES FOR CREATIVE MATERIALS:
For photos: https://www.pexels.com/
For mockups: https://www.pexels.com/
How To Set up a Digital Product Store On Shopify
- Shopify 14 Day Free Trial:
- Recommended Shopify theme: Phono
- Store name idea: (your brand name)presets.com
Sign up for a free trial and enjoy 3 months of Shopify for $1/month on Select Plans.
YouTube
You can also create your own digital presets or digital assets. Do it yourself and learn how to do it. Do not hire someone; do it yourself. There are great YouTube channels, one of which is AR-editing.
AR Editing is a professional Lightroom editing channel on YouTube. It teaches you to create presets.
The presets are ‘How to create the caramel look,’ ‘How to create the wedding look,’ and ‘How to create the selfie look.’ The channel shows you how to create all the various Lightroom presets you want to make.
Knowing something about Lightroom presets can help you create digital assets. The same applies to video editing.
Some people show you how to create video luts, and some teach you how to make your app Icons. You can, therefore, try to teach yourselves how.
It’s an excellent way to save money, ensuring you do it yourself and know it’s your work of creation. Although I’m of this view, you’ve got to make sure you don’t exactly copy the videos as you watch them. You’ve got to make sure your videos are unique to you.
You can’t simply watch and copy one of these videos and make replica videos. You have to change the way you do them.
You cannot follow the principal structure but must make the videos uniquely. Thus, you can license them.
Nonetheless, it is a great way to learn how to do it yourself, create it, and license it.
Dropship of digital products
Are you there? The following way to get digital assets involves dropshipping other people’s work. It’s an excellent way to get engaged. The downside? You have to pay the royalty, but don’t pay for any of the work this way.
Also, you can hire people to do your long-term work without hiring people. You know the people you dropship from; they are best at what they do, and you can rely on their work.
And you know that. Here’s how it works. The digital product message is an outreach message you want to ensure you send out before working with them.
Without that permission, you cannot sell someone else’s digital assets, but you can’t. Here’s how you go about it. You want to say hello (their name), I want to dropship from you. My name is (your name) & I’m offering a percentage to sell your digital product percentage-wise. I have a couple of questions about you as a seller. ‘
Can I dropship this product to my Website and promote it on Facebook and Google marketing platforms? Do you have a digital product license to sell it?
Because these people you find sometimes don’t own the original right, you must ensure you find the individual making all the videos and images on your page or your Website.
It’s all right to use commercially for ads like Facebook, etc.
Then you post. I look forward to hearing from you; let’s make money together. And here you put it in bold (Our cheat sheet template): Don’t sell this stuff without its consent.
Again, it’s copyright, and they have a license for us. You can only do it with their consent if you have their authorization and a contract has been signed.
It would help if you only did it when you had permission, and I’ll show you an example of how to do that. Before we proceed, many of you probably say, “Well, why would someone want to sell without permission?”
It is called distribution. If you sell something because you have a hobby, and lots of digital people, like Lightroom, video, luts, etc., are passionate about creating these products, but business-wise, they could be better at selling them or getting digital products out there.
This is your responsibility as a marketer. And so many companies do what we refer to as distribution.
For example, Walmart’s products are not owned or produced by Walmart if we look at Walmart. Walmart is simply good at acquiring customers.

And here you are doing the same. You reach out to the people and say, “Well, look, you created a terrific product.”
But I’m here to make you money through royalty and promote it. This is a classic form of distribution, and it works. It’s the norm rather than the exception.
For example, if you can go to a webpage like a filter grade, many professionals are putting in their work.
If you go to a photo, you can see the Lightroom presets, click on them, look at loads of different Lightroom presets, and see what it does. Then, it shows who the creator of the assets is.
Here, you’ll see ‘Creator.’ Click this, then. Then, you will see who the Creators are. And what you do is you search for the name on Google search.

Again, as I said, many sellers are only interested in their passion. They like to work but lack experience in business, so they make a little money from it.
However, if you can help them scale and potentially sell them independently, they will willingly do a royalty or distribution contract format. Dropshipping digital products is, therefore, an excellent way to do that.
I recommend dropshipping the digital assets. The next part of the course focuses on setting up the Shopify digital store. We’ll ensure the store converts well, looks professional, and is a genuine, solid brand.
Setting Up the Shopify Digital Product Store
Brand Name
So, guys, creating a logo and selecting your domain name is the first step. If you go to Canva, you can make the logo on the platform, but you must develop a brand name before designing a logo.
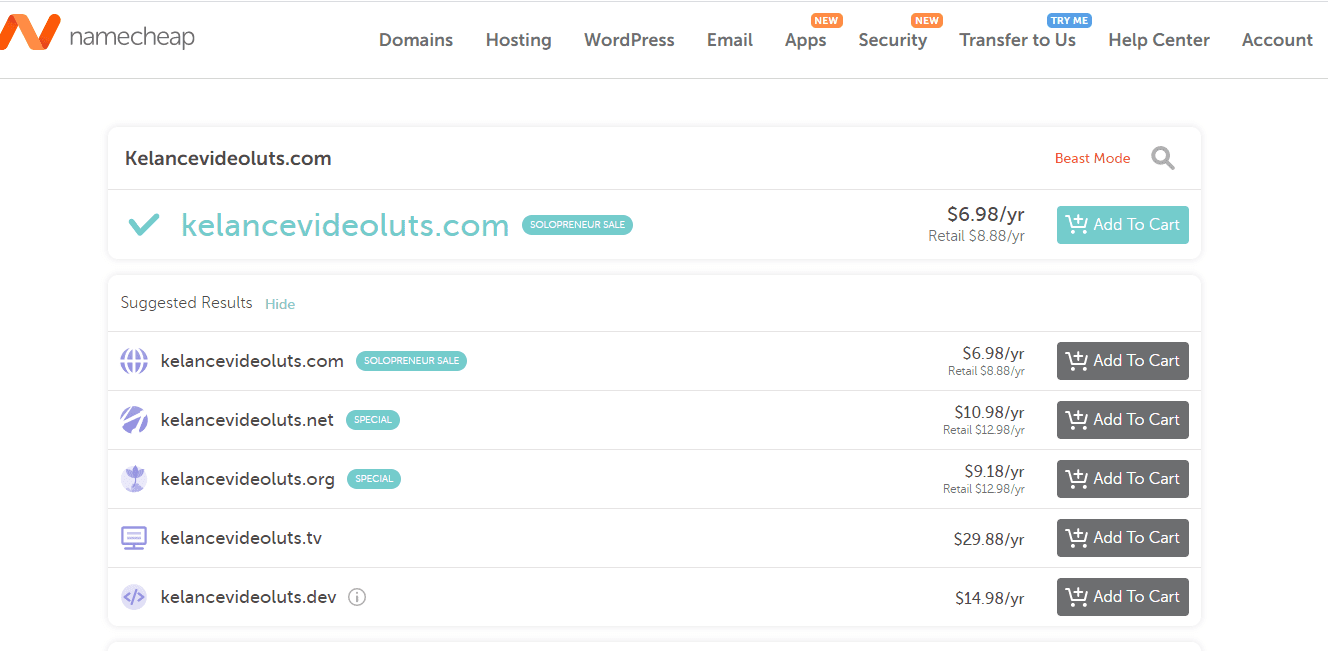
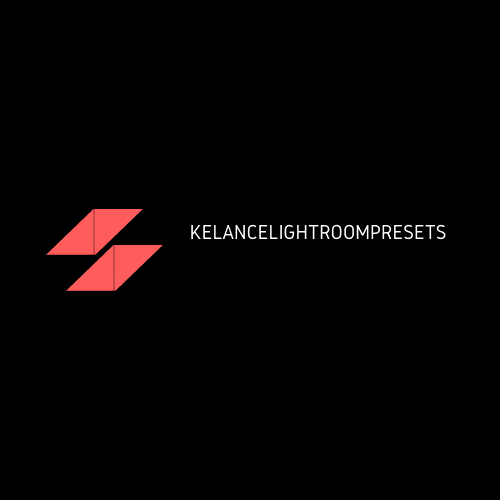
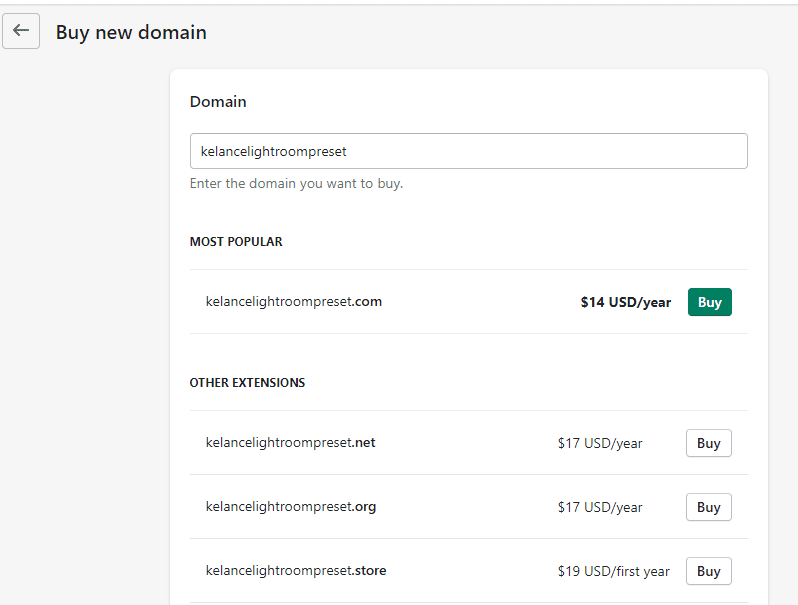
My shop domain name will be KelanceLightroompresets.com, and the domain names always have (.com). You see that here as well. Now, you could do something like, for example, Kelancevideoluts.com.
But you want something branded that stands out and that tells people precisely what you are doing. You always want to use the (.com) extension.
You should now go to Google Domain Names and Shopify Domain Names and make certain you do not pay a lot of money for the domain name you’re looking for.
You want your domain name available, so you should ensure you pay a domain name worth $14 or less. You can also head to Namecheap and buy your domain name for just $10.
So, ensure you have a domain before choosing a brand name. The last thing you want to do is create a logo, and then when you come to buy your domain name, it is unavailable or available but at a ridiculous asking price.
Logo
So, once you’ve your brand domain, head over to Canva. Then type in Logo. Once you have done that, click on the top one, and a logo format will appear.
Now, you want to skip tours, so I recommend you get Canva Pro. There is a free trial of 30 days, and Canva Pro can come with some awe-inspiring features.
In this free course, we will use Canva a lot. Take this into consideration. The pro version is necessary. You want to scroll through the various logos and find something that fits your industry.
The industry again plays an essential role in determining logo design. I’ve previously created a logo without an emblem; it was a word logo.
A single word logo I went to Text. Then, I’d drag the text That I felt truly aligned with my line of business. I felt, for example, that my industry would match it. I pulled it over. I just pulled it over. And I changed it in every sense of the word.
You can delete the box because you don’t need it, and that’s if you opt for a text logo, as I did.
By deleting the text, I changed it to say that Kelance Lightroom presets. And that’s pretty much it. I bet you probably think the Logo is whack and ask why you would have it only as words.
I was in the Lightroom presets, the photography, the videography, and lots of brands don’t have absurd logos; they’re usually the brand’s name and the person’s initials.
Maybe you’ve seen the same. You want to fit the prevailing themes that people feel comfortable with, so you will just use the download button to export your Logo.
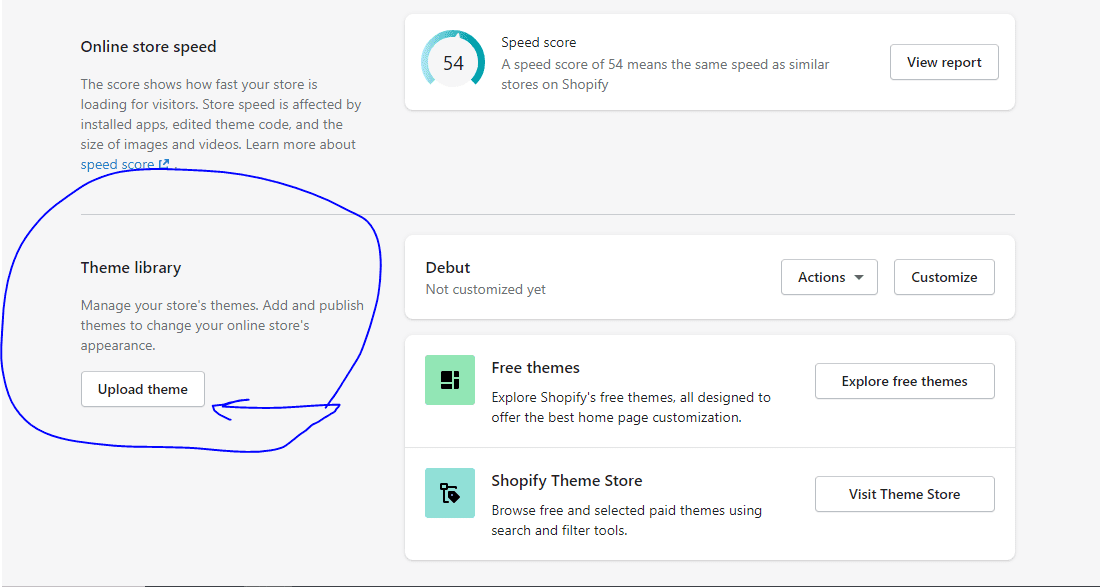
Shopify Theme To Use
The next step is to pay for and download the theme I recommend, namely the Phono| Mobile Store and PhotoShop Shopify theme.
You might say, “C’mon, it’s a mobile theme; why would one want it for their digital product?”
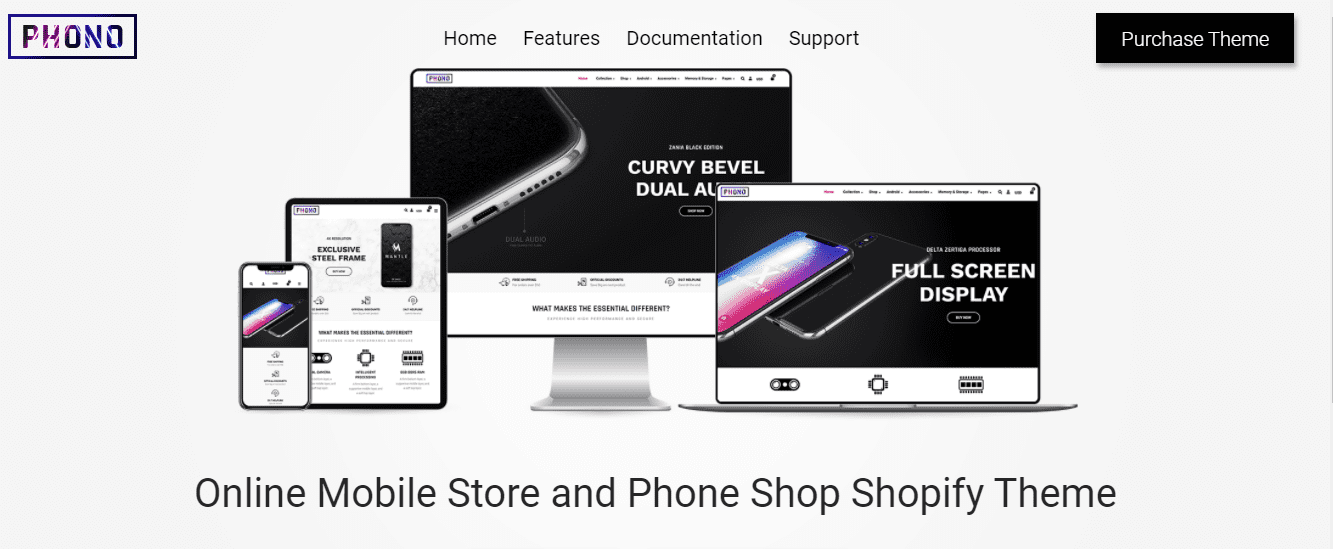
The theme looks best for you, and I bet you will agree with me. It is incredible. It now costs about $49-$55, which is very modest. It affords a professional and beautiful look for your shop.
I shall refer to this theme for the better part of this course. So, it will prove hard to follow if you do not have the theme yet. Again, you can find this theme to work best by having digital stores and testing, just like in my case.
Shopify account
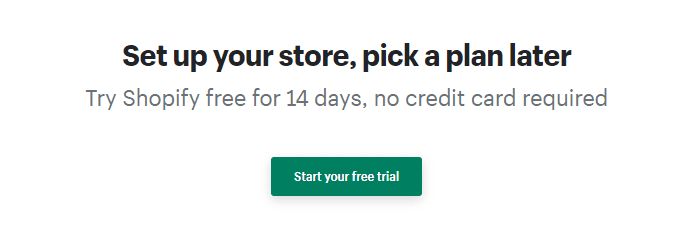
The next thing you want to do is create a 14-day free trial for your Shopify account. Once you have done so, you should land on a screen where you signed up with your details.
Sign up for a free trial and enjoy 3 months of Shopify for $1/month on Select Plans.
Once on this screen, you want to go to domain names and buy a new domain name in your niche. For example, I purchased KelanceLightroompresets.com for my brand, and once I have the domain, I want to return to your online store.
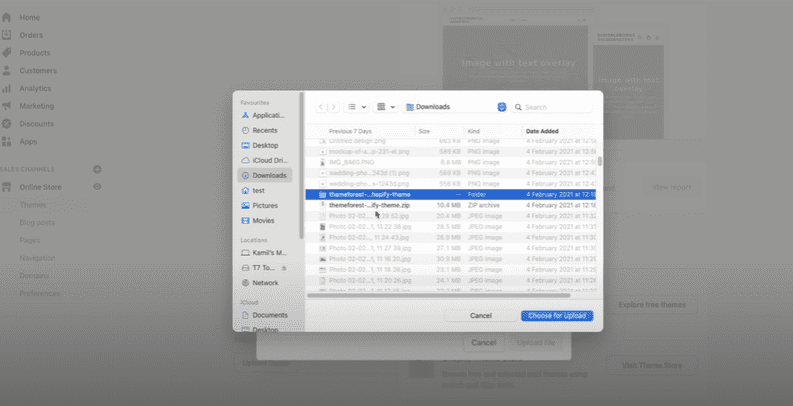
First, upload the theme you bought by clicking the upload theme button. Then, go to your downloads and click on the folder.
To upload, click the theme zip file. After the theme has been uploaded, it should indicate the theme you just added. Next, hit action. That’s what you should do.
Upon clicking actions, a new publishing theme ought to appear. If you click Publish, it now reads ‘change the main theme,’ it changes to the theme you bought.
You want to hit the customization button. Clicking the customization button ought to land on a screen that is your editor.
There is no placement at all, and you can see. The Frames here tell you the size of images and whatnot.
Right now, I will get you to create the theme. The Phono theme has been central since it makes your site professional and beautiful. Let us start with the main pop straight away.
The first thing you want to do is go where you can find the notification bar, and by clicking it, you would like a top notification bar.
The notification is then activated. By now, you want to ensure that your brand’s colors are changed and should have at least three colors.
In this case, you changed the Color to dark red because it is part of my brand’s color. You want to put “Download instantly” in the notification text.
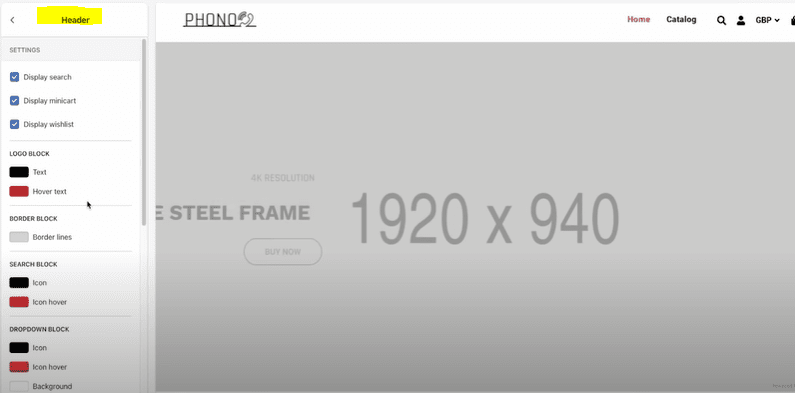
Once you do that, you can get back to the Navigation. You want to remove the display mega-menu and turn it off. It is down to preference, though. I have not turned it off in my case, so you want to head over to where it says header.
The search for displays is vital. I have turned it off myself. To turn on the mini cart, click Yes; to turn on the Wishlist Display, click Yes. You want to have the two on.
You have the colors and want to ensure they correspond to your brand’s colors. For example, you want to ensure your colors are red (KelanceLightroompresets.com).
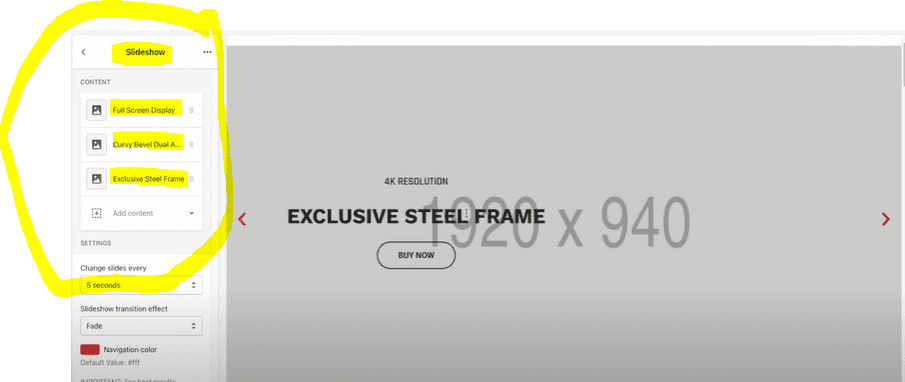
If your primary colors are blue or blazing, you want to change them to blue, maroon, or your brand’s primary colors. Having done this, you would like to go where it says slideshow and the slideshow the size of 920 by 940.
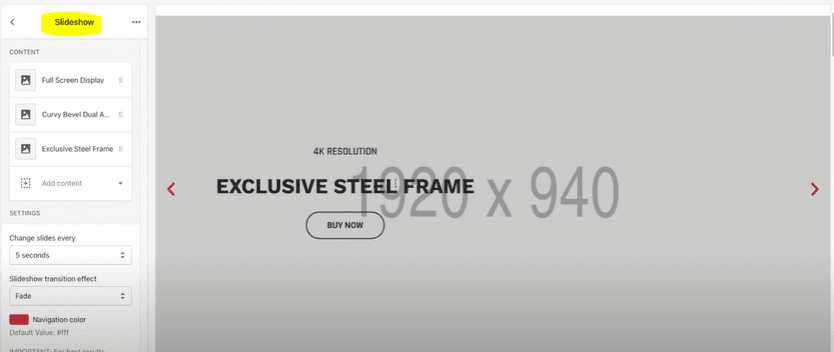
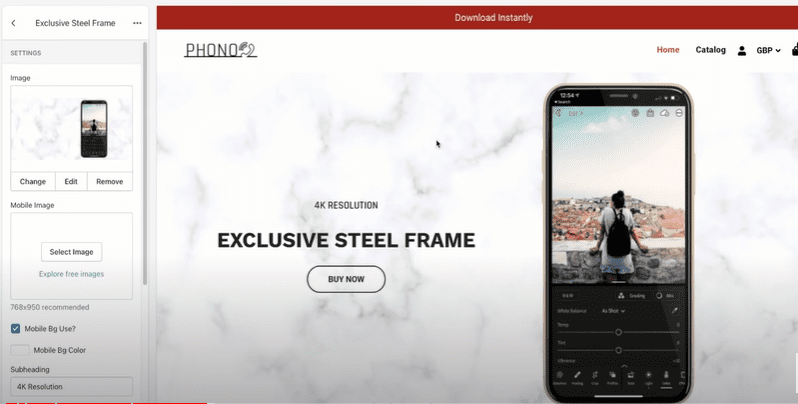
Now, you want to click the Full-Screen Display and the Curvy Bevel Dual Audio. You want to delete the two; you want one active, not both. How do you accomplish that?
Click on the Full-Screen Display, click the top three buttons, then Remove. Do the same on the Curvy Bevel Dual Audio. Delete one content (Exclusive Steel Frame) and leave one content.
You now want to click on the content-exclusive Steel Frame. You can see that you have an image on a mobile image. Therefore, you can choose a website and a mobile image on the desktop, which is essential.
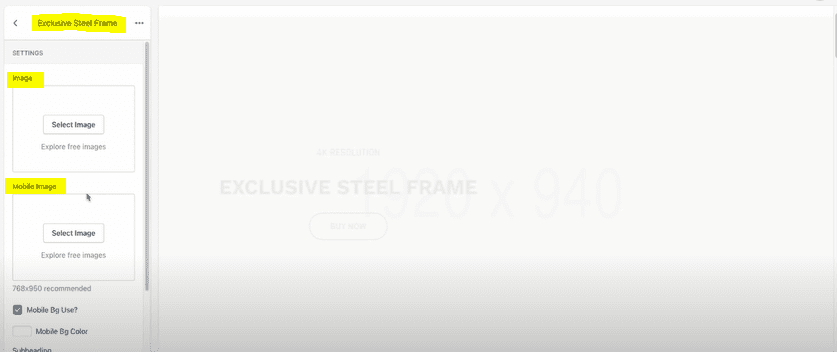
Due to the stark difference between mobile and desktop websites, what works on the desktop may not work on mobile devices.
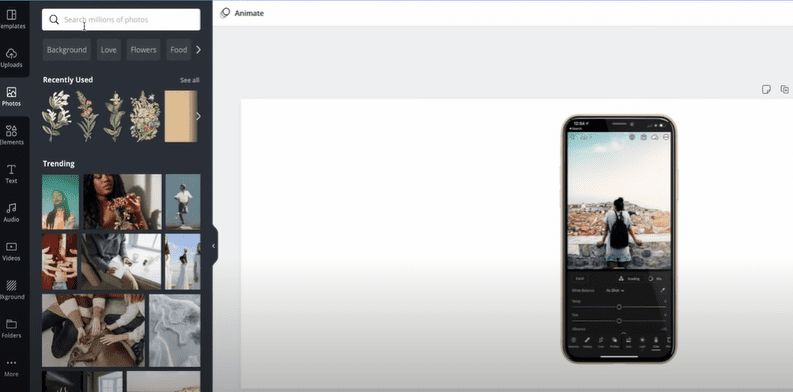
Therefore, these options are great to have. Now, we have to head to Canva and create the Image using Canva.
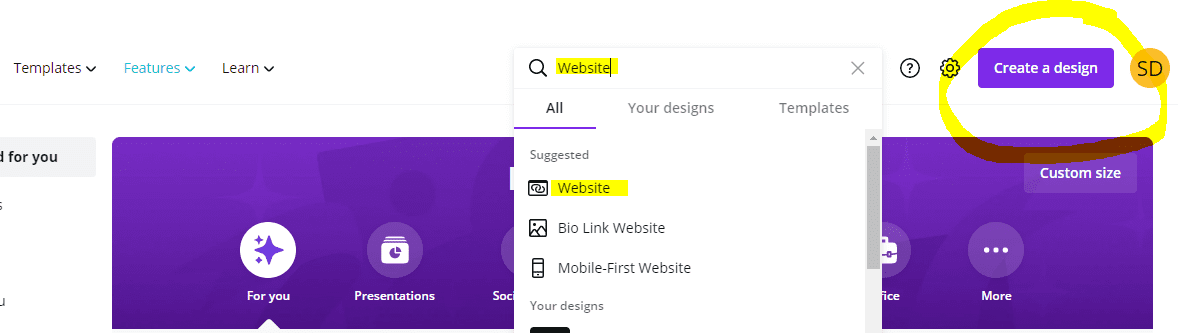
I’ve previously created and designed a website in Canva, which is fantastic. So, you should head over to Canva and search for a Website. Then type in Website, select Website, and hit Create a blank website.
It would be best to land on a screen with the correct dimensions for that image insert. Once you’ve done that, head over to Placeit. Placeit is the best company for mockups.
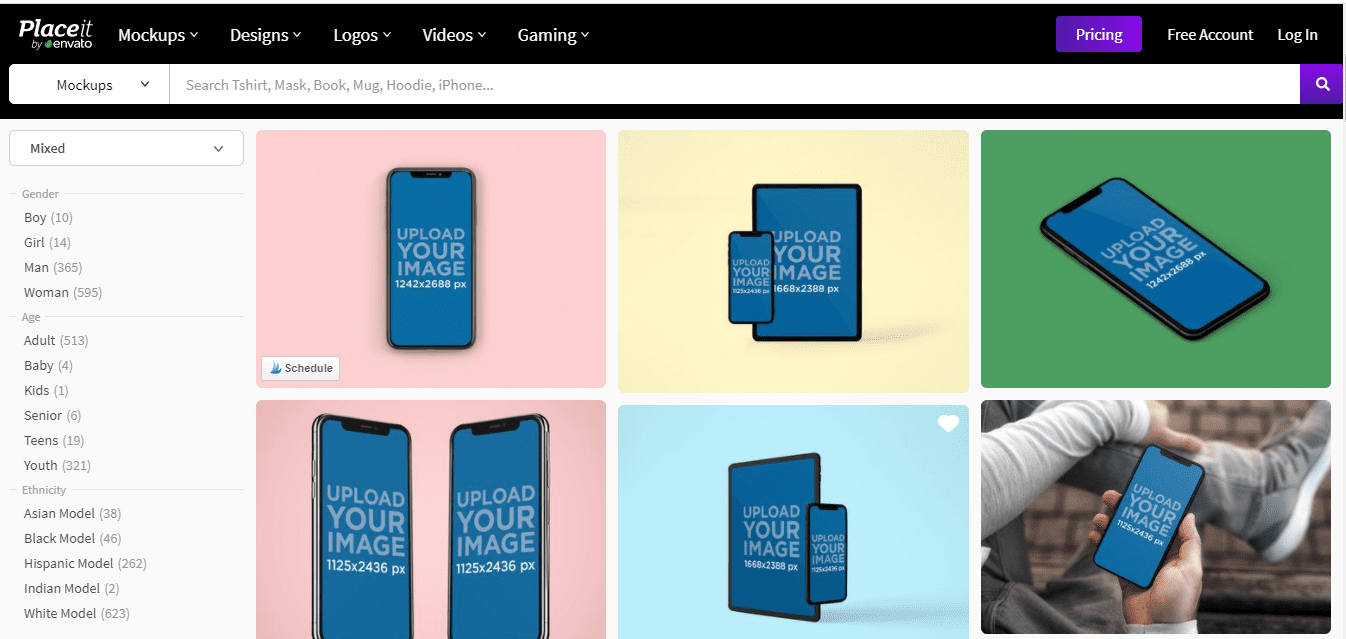
When you make mockups, you want to scroll down and select what works better: an iPhone or a laptop. This determines what mockup you should create.
You can then upload the image. You can go to your phone; if you have an Android, you could use an Android.
Open up Lightroom, add an image in Lightroom to your Lightroom account, take a print screen, and then send it back over to your computer.
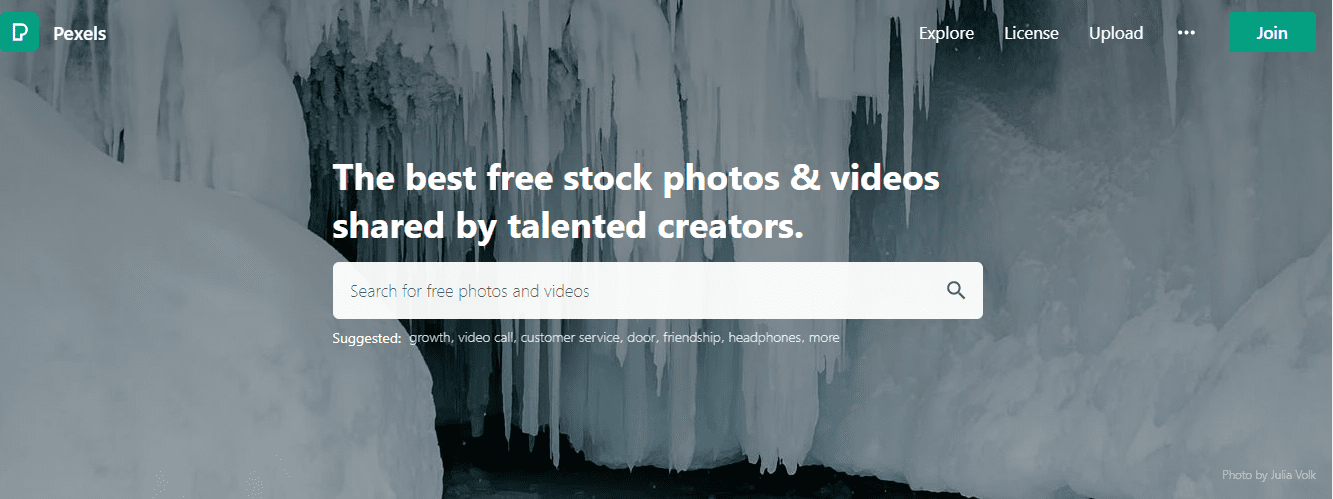
Now, you can go to a website called Pexels.
Type in Pexels in the search bar. The company provides free stock photos that you can use.
For example, if you’re using Lightroom presets or video footage, you’ll need some form of photography to apply those presets and show off the work.
You won’t have that; thus, you can head to Pexels and get it yourself.

Type in travel. You will see lots of various travel images come up. A travel preset is one of the presets you had your person create. So, please select the Image, download it, and then upload it to Lightroom.
Remember that you can do the work on your phone. So, head over to Lightroom. But if you go home, go back to view your photos.
The image you uploaded is what you have. Click on the three dots, then. Then, hit presets, and the presets have been uploaded.
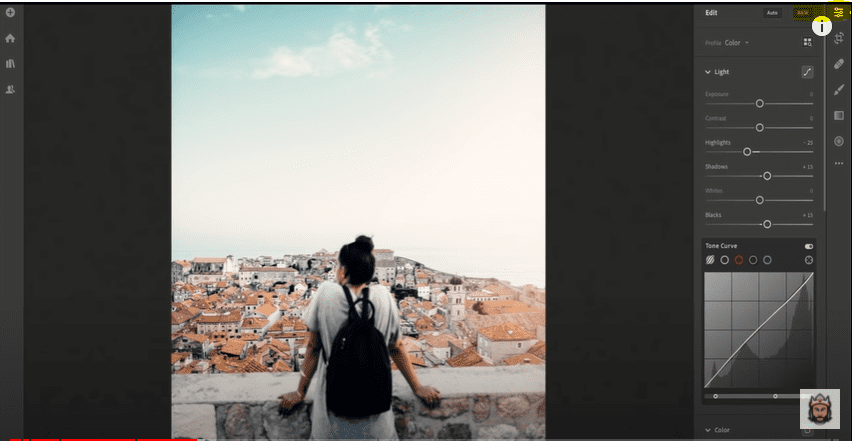
Apply the travel presets. You will notice the difference when you click Show original without presets and add the preset.
You can do it on your handset, and you must click the Print Screen button on your mobile phone. You can also do it on your desktop. Choose; it is down preference.
I prefer the mobile phone looks, which I have been doing. You go to Insert Image, and after doing so, upload the Image of your print screen to the Lightroom editor, final editor, or any digital asset you are creating.

Say app Icons, whatever it is, Upload, and then go to the background, change it to a transparent background, and click on the download button.
When you hit the download button, you will go to your downloads, and here, you will see all your downloads.
You will then download what you have. You want to go back to Canva uploads once you have finished downloading, then upload. You will see what you have uploaded, and then what you are doing is to make the Image bigger. Then, somewhere adjunct, add that image.
Then, you head to where it says photos and type in marble. When you click marble, you get a marble background image.
Here’s what you do to break up the wire and inject a bit of funky into the backdrop: Click position, click backward. This way, the phone is on the overlay.
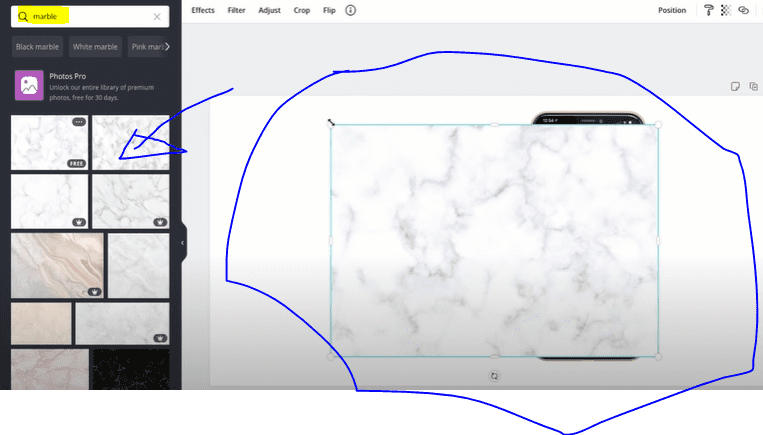
You can resize it to be larger, reposition it wherever you want, and add text, but I do not recommend it. You can click on Publish as a website and then click Download.
Now, go where it says to select an image, click Upload, and upload it. Click Select and add that to your Image. Now, remember that the Image will be dimmed. Do not worry. If it dims out, click the save button and refresh the screen.
It will change once you click Save. It does not dim out, and I appreciate that you can fuss about it often. But you fix it that way. Next, you guys want to select a mobile image because it looks different when you change it to a mobile editor. There is a different image behind this.
Put the Buy Now button and change its Color so that it is now outlined in red but gets a total red look when you hover over it. That’s pretty much it for the first part. Then click the top right button, click Save, and ensure you save your work.
Innovative Qualities and Features
The following section is Innovative Qualities and Features. Here, there is a photo of any device you use. Then, there are a couple of bullets around. You have the size 430 by 600 placement holders here.
Again, you go to the Custom design, click, and add the Custom design. If you look at the website you created, you will see that you used the same front mockup of the phone as you did for this guide.
You have (bullets around the mockup) Instant change, ease of edit waves, wi-fi is unnecessary, Graph Friendly, and Cloud-based. These are just a few of the benefits of using innovative qualities that feature why photographers love your products.
If you return and have the size outlines (100 by 70), you do a hundred by seventy. You can have a Smiley face, Power effICient showing a chipset, and a Wi-Fi logo showing that individuals needn’t bother with Wi-Fi to utilize them after downloading them.
Likewise, you can have a cloud base that tells individuals that they can use them on the cloud since that is essential to many individuals.
If you’ve done that, you must download the icons that best match your digital product assets. What you will do is click it and select Image.
You’ll see the section heading (reads Innovative Qualities & Features) & small Heading (highlights: Why Photographers Love Us).
When you scroll down, you see the Icons. These are the various Icons, and again, there is a subheading and a description.
Grid Banner
Once you’ve done that, the following thing that you need to do is the grid banner you need to head over where you see ‘Upcoming products’ hide that, you needn’t bother with that; however, what you need to do the Grid banner this is truly important.
The grid banner is an incredible way for you to feature your works. It’s a great way to show people the effects you’ve had on photography or your deal, and essentially, that’s what you’re doing.
Now, you need to make a beeline for where it says Grid, and again, this will show you the size of the photographs you need.
You need to go into Canva and resize the photo to match it. If you don’t, it won’t check, influencing how it looks, which can look amateurish.
An illustration of that is if you didn’t resize the photo, you’ll figure it doesn’t fit, while if you do so, it saves time. It’s, therefore, crucial that you resize these photos in Canva.
When you scroll over, it shows right in, so you can see the ‘Buy Now’ button. You can scroll through it, and it doesn’t show because you’ve deleted it. How do you do that?
You go to the grid banner, select your images, and delete all the text and descriptions. You can also review the entire banner and delete all the text and buttons.
Next, you upload the images exhibiting the work, which will be hidden once you’ve done that. You must then head to where it shows the mail icon, ‘Welcome to Phono Support.’ Click it, and you will have a channel you’ll allow people to contact you through.
First, go to where it says ‘Contact box type.’ You need to delete the ‘Call Us Now,’ so click the three dots and hit remove. Upon removing ‘Call Us Now,’ it says ‘Live Chat Now.’ Practically, you only need the live Chat.
You needn’t bother with the phone number, but it’s down to you. I have the Contact Us page and leave the phone number on it. That way, you’ll restrict the contacts via phone numbers instead of live Chat, which is easier to manage.
Once you’ve done that, you need to click it, and it says select Image. If you prefer, you can have a little chat icon image. Again, you’re given the 75 by 75 measurements you need in Canva. You can easily upload a phone icon, which will look awesome.
You can see where it says ‘Want to Talk to Us? Live Chat Now, you leave it that way, but you want to get rid of the text below ‘Live Chat Now’ and leave it blank. You can put ‘Contact 24/7 Support’ or whatever you deem fits your business model.
Footer
Now go back and then back again; you can proceed onward to the Footer, so if you go down to the four, you have an image on foot; hence, if you take a gander at the site you’ve done, you’ve used the very Image that you used on mobile as the Footer
For the photo that you use as a footer image, and because you cannot dim out the Image
on the editor, what you do is head over to Canva, upload the Image, and then dim it out. So you upload the photo you intend to use on Canva before, add an overlay, and dim the Image out. This way, people can read the text over the photo.
If you go to the Footer, you will see the image that you added. You can add stuff like ‘Subscribe Now,’ ‘Get Updates Real Fast,’ and ‘Your Data Will Always Be Kept Safe,’ but you want to keep it as plain and straightforward as possible.
Product Status
At this point, the home page is set up, so you need to add the digital product to your Website. To do so, head back to the Shopify dashboard, go to product, then click ‘add product,’ and scroll down to where you find Shipping. Untick that to ‘this a digital product.’
By doing so, you notify Shopify that you’re selling a digital product. Head to where it reads ‘Product Status,’ then click active and type in a name for your digital asset.
For example, in this guide, we’ve used presets for the product name. Let’s use the 10 2021 Lightroom Premium Presets Pack for PC and mobile.
If you are dealing with video luts, you could do ten video luts or presets for traveling people. The product title must remain clear.
Let people know exactly what it is you’re selling. Also, you want people to know it works on all devices. Deliberately employ specific quotations to communicate precisely what you offer.
Now you’ve got to do a description. In the Description, you can write Designed & created by professional Lightroom editors, the ten premium Lightroom presets,
this 2021 edition is the product of Lightroom professionals exploring the world from food to skylines, checking colors, and bringing every Instagram lover’s dream photo to life using the ten premium Lightroom presets.
Then, put ten Lightroom presets. You can set the wedding one as the first. First, you go to Canva and create a before & after. It works well with conversion rates where you add between the different digital assets. For instance, what it does for travel when you add before & after looks for the travel presets.
You do the same for Goldust, CinematIC, and HDR. You do the same for each one, but for this guide, we’ll limit it to two to give you an overview of what to do. So then, at the bottom of this collection, you put ‘this collection is compatible’, letting people know about its compatibilities.
Media
That’s pretty much it at this point, save. For digital products, in terms of description, not much time goes into their setup. But the media section takes some time, and you want to add the media. Where it says ‘add media, ’ click add media and suggest you only do one photo.
Again, head back to Canva, go home, scroll down to where you find the Instagram post, pick one Image, make a blank, and do a before-and-after.
When you’re done uploading the same images and adding the before-and-after version and Instagram post, this is very important, as it works perfectly with Shopify so that you can have more than one.
Again, that’s up to you, but I like adding them in the Description because, somewhat, they look a lot better.
However, you can determine whether or not to add by looking at the product page. Now, for pricing, let’s use a hypothetical price of $14.99 and a comparison price of $49.99.
You’ll see where it says ‘Charge tax.’ That’s your decision; I won’t offer any guidance about tax. For an inventory, you see ‘track quantity.’ Turn that off. It’s a digital asset you’re dealing with, and there’s no quantity. You want to hit save.
When done, go back to the Shopify editor, proceed to the home page, and go to the product page. When on this product page, it should land you on the product page you just created.
While here, go where it says ‘Collection’. Turn it off unless you have a collection of products. If you don’t have Product Sidebar Deals, turn it off. If you don’t have Sidebar Bestsellers Custom Text Icons and Prom Images, turn them off. You want to keep your product page neat and clean.
Now go to where it says the product page is enabled: Display thumb image, Enable Wishlist, Enable Buy Now, Enable Short Description, Enable product sharing, Enable product description.
You want all these turned on. For reviews, have it turned off until you get some reviews.
Then, enable ‘shipping details.’ You undoubtedly want that on, but it should read ‘Installation details’ instead, given that your digital assets don’t need Shipping.
So, how do you install it? To answer, you must create a product page to link to this. You do this by returning to the Shopify dashboard, clicking where it says ‘online store,’ and clicking pay once.
While here, click add a page, then call the page ‘how to install’ or ‘Installation guide’ however you choose. And then, in the Description, you can enter how to install your Lightroom presets to Lightroom on a mobile desktop.
Next, you’ll upload a video on how to do Installation. The video does not have to be yours; you can use someone else’s with a link to YouTube.
You can do presets, app Icons, and even video luts. Either way, go to YouTube, type in how to upload Lightroom presets or whatever you deal with, click on the video, find what matches your objectives, and then click share.
It says embed, so get it. Then it says ‘start at,’ which is very important. Click start, and then when on the video, work out the position of the start button in terms of what you seek to “instruct on.” You don’t want people to watch the entire video, no. because it’s possible the whole video isn’t about ‘how to install,’ right?
How to install starts from, let’s say, 4 minutes to 7 minutes on the video. So you begin at minute 4. That way, when people click on the video, they watch from where it explains how to install or do whatever you seek to instruct.
When you do that, you click the copy button, head back to the Shopify product page description, click video ICon, click the embed button, paste it here, and the video will show.
Hit save, then go to that product page, and you’ll scroll down to where it says ‘Select shipping info.’ You want to click it and select the page you just created.
When you do that, it should show the installation details; if your prospects click it, it shows how to install it.
This way, you ensure that people buy from you with minimal customer service because you’ve already shown them how to install your digital assets.
Then scroll down and have the ‘Small heading’ turned off. For the ‘Recently Viewed Product,’ have that turned on to see what they recently viewed when people scroll to the bottom.
With that out of the way, head over to where you find ‘Theme setting,’ click on Logo, here you upload your Logo.
Go back, click on FavICon, and upload your favicon. Favicon is a symbol that relates to your Icons & Logo; basically, the Image on the Icons or Logo. Back again, on Preload, have that turned off.
Go back. Typography and text are contingent on what you want. Back again and Color, you change to those accents you have.
When you go to Breadcrumb, turn that off. For the image, it’s the image for which you want to have a cart. You’ll have it as a travel bag, for instance.
I suggest you have the header in the header style as header 2. Then you go to Footer, and the style for Footer is footer10. You don’t need those enabled for QuICk shop options.
Go back, and in the General options, have the following enabled: Enable offer %, Show product sold out circle, Enable Product Review, Enable wishlist, Display subtotal, & Enable add to cart.
If you go back and on Sidebars, have those turned off. For List collections, have them enabled, but it’s subject to you having collections.
The product page has it on layout one. Go back and scroll down to the Cart page, click on it, and have order notes turned on.
It would be best to have them, though it’s up to you. Back again and on the Search page, have it off. You don’t need it for the Contact that too. Please turn it off since you’ll have a contact page on the Website.
Newsletters and newsletters interrupt the experience, so have it turned off. You don’t want them—product countdown off.
You don’t have any. Go back, click on Social media, have it enabled because it’s necessary to have both Facebook & Instagram accounts, and you add them. Suggested products again off, you don’t have any.
Go back and now have the Money options on. You want that. On the Password page, please turn it off, given you’ll have a live Website.
And on the Checkout, you’ll have to add your Logo at Checkout and your brand colors.
At this point, you click on the save button, and the product page should look much more filled, given that everything is done from the Installation process to the product description.
You probably wonder,’ How do I have people receive digital assets when they order?
‘ Well, read on. I’m about to share how you do that, so there’s no fuss.
Digital Product Shopify Guide: Adding Pages
In this section, we’ll talk about adding the pages that you need on your Website, and the pages include:
- Terms & Condition
- Refund policy
- FAQ
- Contact Us
Configuring Your Pages
You can add these five pages by clicking on the add page.
The terms of service of digital assets tend to differ. They’re not the usual ones synonymous with dropshipping, Shopify, and other eCommerce platforms.
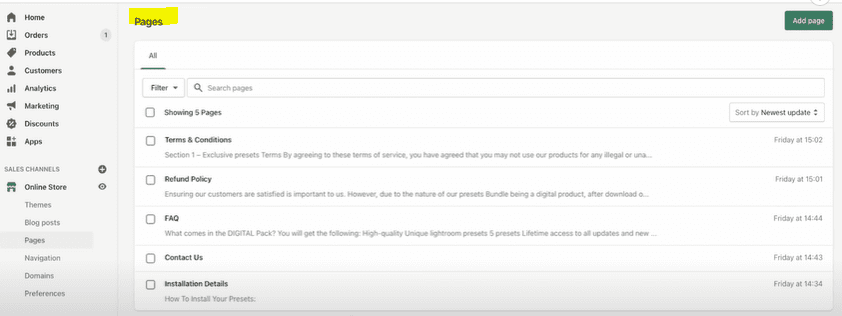
Now that you’ve got all that add to the page, make slight adjustments to the names that need changing, and you should be ready. When you’ve done the pages, head over to the Navigation.
You want to work your Footer menu to ensure the pages (FAQ, Refund Policy, Installation Details, Terms of Service, and Contact Us) appear there.
You do that when you click add the menu, click the link, and then link the pages mentioned in this section.
When you do, you head over to the main menu, but this time, you’ll be on the main menu, ‘ 2021 Lightroom presets’, for instance, and you’ll have it as the link.
You add, then go to the link, go to products, and here’s where you add your products. So go to products, add your products, but name them 10 2021 Premium Lightroom Presets for PC+Mobile. In the main menu bar, you also have ‘How to use’ and ‘Contact Us.’
Digital Product Shopify Guide: A Must-Have App
In this part, we’ll explore the app you need to use to have people download the digital assets immediately upon ordering. The app is Uplinky Digital Download. After downloading Uplinky, click on the app.
When you have the app, it takes you through the installation process, and you follow through, though you’ll need to make minor adjustments.
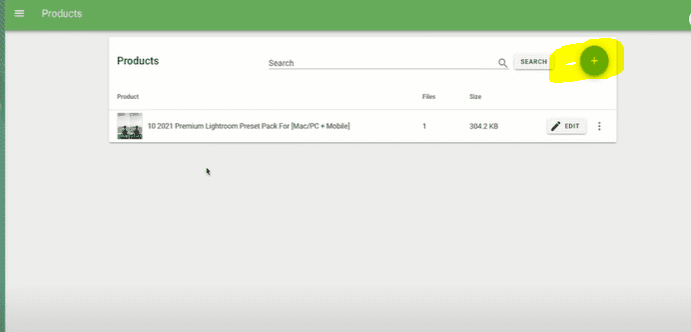
The first step involves heading to where you find products. Click it, then add your first products.
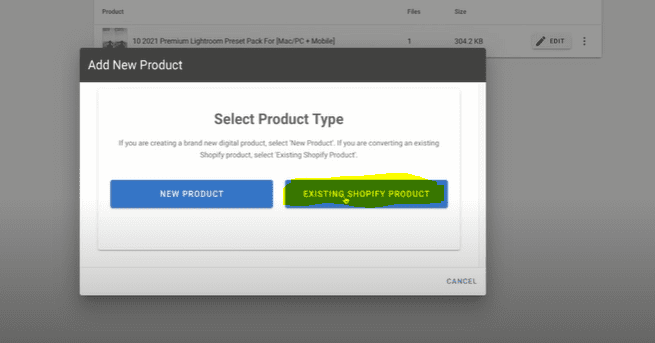
Click on an existing Shopify product and link it to the existing Shopify product, in this instance, ’10 2021 Premium Lightroom Presets for PC+Mobile.
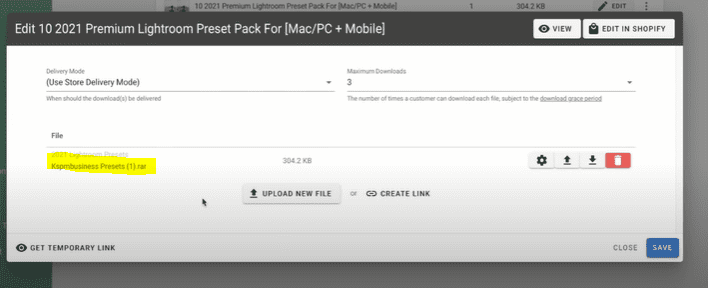
Next, you add a link. If you click Edit, the file will be saved upon uploading. You’ll then upload the file. So, you click Upload New Files.
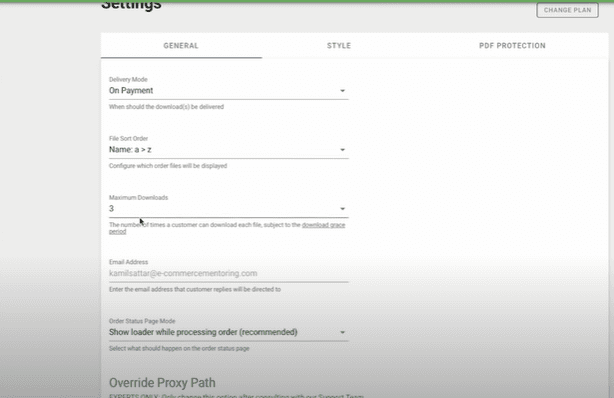
So, you upload the zip files. You’ve to upload the zip files here. Then, for maximum download, put three, and Delivery Mode, you do ‘Use store delivery mode).
When through, click save and then head over to where you find Setting, then scroll to ‘Delivery mode,’ you put ‘On payment, and for ‘Maximum download,’ put three.
On ‘Order Status Page Mode,’ put ‘Show load while processing order (recommended).’ You can then change the Style and even PDF protection, thus adding your logo and whatnot.
Once you have done that, test if it works, but as long as you follow what we have done, it will work for you as long.
Once you have done that, again, you want to do a test order to ensure the digital download works. Do the test order, and it should work.
The Website is done. The next step involves setting payment gateways.
The way you do it is you head over to Settings, then go to payment gateways, and you have them set up. Are there more apps you could do?
Yes. SMS Bump and email marketing are great apps that work with digital products.
If you’re interested in email or SMS marketing, check out our free course (here). The resource glosses over the apps.
Although based on physical products, the concept aptly applies to digital products.
Creating The Marketing Materials
We’ll delve into the marketing materials in this part of the course. And so we’ll do:
- Picture ads, Carousel ads-Canva pro
- Ads Copies
- Ads Headline
Here, we’ll create Picture and carousel ads for Facebook ads using Canva Pro.
Also, we’ll be doing ad headlines & ad copies and drawing from the Facebook ad library.
The Facebook ad library lets you glimpse other brands’ ads. Therefore, head over to the ad library, type, for instance, Video Luts or even Lightroom presets and hit search. You’ll indeed have lots of different brands.
Find a competitor who’s doing well with their ads.
If you check their details, you’ll see that some are running carousel ads and even showing off impressive Lightroom presets.
And you’re bound to land on brands doing a language you don’t speak. As such, you can use Google Translate to get what the ads say.
You’re merely referring to how your competition has structured its ads. Don’t copy and paste ad copy or rework others’ work. Remember that.
Use your competition ads as the template for assessing what works & what doesn’t.
Here, draw inspiration from your competitors’ ads that do well. Look at your ad headlines and copies; you can use the Lightroom presets pack as an ad headline.
Your ad headlines must have a minimum of three & a max of five words.
Emojis work exceptionally well in industries like photography presets. You can also try the others, such as Instagram presets.
Your ad copy ought to be powerful. More importantly, keep it short and sweet.
An example of an ad copy can read, ‘Take your first experience to the next level with 2021 presets aesthetically created by pros; the impressive Lightroom presets to take your photo to the next level.’
You then go to Canva, head where it says Facebook post, and select Facebook post.
After that, delete everything and ensure you have a blank canvas. You need to create a look that can match your competition and performance that does well. Although you take reference, it’s your work with a slight difference.
It would be best to have a Blank Canvas and nine different photos. Now head over to Pexels, type in travels, and download nine images you feel are good fits. Then, add your Lightroom presets to the photos and export them.
Next, start by adding your banner. You go to the text, drag it across to the Blank Canvas, and call it Travel Presets.
‘ After you’ve done that, drag it to the top, then get to the element, drag it to the top over text (Travel Preset), pull it up, then drag it across. Next, change the color to black. It should read easily.
Once you’ve done that, head over to uploads and upload the nine photos you got from Pexels. If you use photo presets, add them to that. Once the photo uploads, click it, and it will be added to the Canva project.
While on the Canva project (blank Canva), go to the top, click on the photo, shorten, and shrink. You want to shrink it to make it smaller, but ensure you don’t cut out the essential parts that grab the attention.
Then stretch a bit. Done—you’ve got yourself a template. Use the photo as a reference for the next step.
Again, grab another image, do the same, crop it a bit, and overlay it on the first at the top left corner. Shrink it, pull it across, shrink it again to fit the first Image, and then drag it underneath it.
Again, the same is true for the following Image. For the following Image, put it over the top reference image.
Cut it out to focus on the central part of the Image. You then shrink, resize, and stretch to fit. Pull it across slightly to fit.
Again, the objective is to capture the central part of the Image, so you’ll repeat the same process.
Because it’s a travel preset, you’re showing travel images with your presets applied. If you have ten presets, you want to have 10 of these for each preset.
Let’s say you have wedding presets. The wedding preset will show images, so you want one for each.
Cumulatively, you ought to have ten presets. Something else that works with Facebook ads is the before and after photo.
Take a single image of the before-and-after you’ve already created and resize it to the Facebook post dimensions. Having the before-and-after as an ad works just fine as well.
The Facebook format requires a grid of all, a before-and-after, and a handful because it’s necessary to split-test each to get a sense of what works best.
Click on the Facebook dimension. The Before & After text should be in the top left corner. Make the background a bit shaded; all these work well on Facebook.
Best Marketing Methods For Your Shopify Digital Products
Facebook ads
In this part of the course, we’ll examine the best marketing methods for selling and promoting your digital assets.
Since I overplayed many digital products, I have tried different marketing methods, from affiliate marketing to Instagram influencers.
Still, Facebook remains robust and the most efficient way of selling.
Facebook, by far, has remained consistent and successful. Now, Facebook ads for digital products present a slight difference. It’s different from how you do typical eCommerce product ads but fuss not; we’ll go through the whole process.
How to Avoid Page Score Issues
We’ll walk you through setting up the ads and all the other great stuff so that you can learn how to do it yourself. Before getting to that, let’s review the fundamentals; you must complete this part.
First, how do you avoid page score issues? Recently, Facebook has developed a page score, a metric contingent on what Facebook perceives of you as an advertiser. They rank you from five to one, with five being the best and one the worst score.
If you set up a new page within the first year of your page, the page score reads three or under, your page is taken down, and you can’t advertise.
But if your page has been around for longer than a year, you’d still be OK with a page score of two.
Anything below that, you’re out, and you can’t advertise on that page.
So, what does Facebook look like? You’d ask. What do they evaluate when assigning page scores? Once your customer gets the product, Facebook sends them a survey touching on the following three areas:
Product quality: Number one, Facebook will ask the customer who bought through your ad about the product quality.
Shipping times: Next, after the customer has bought stuff from you, Facebook will try to find out from the client, via the survey, how your shipping times were.
Customer service: Facebook will also ask about customer service. They’ll try to find out if the emails are up-to-date, what the tracking number is, and other such details.
These three constitute what your customers are likely to be surveyed about. Product quality is the biggest issue in eCommerce, and it hurts most businesses.
Up to this point, if you remember, the best way to beat product quality problems, as we stated in the preamble of this course, is to do product research, Which involves checking reviews, getting a product sample (showed you how to ask for product sample from a supplier)
You can also check with Amazon to see if people are happy with the product since you will likely find people selling the same product as you on Amazon.
The other issue is shipping times. I provided you with the shipping time methods you’ve indicated, like the suitable fast suppliers of AliExpress, so you should be fine. You ensure that your shipping times run between 7 and 14 days.
You can’t use one dropshipping supplier when scaling 30 to 50 orders weekly to stand a good chance with the page score. These orders dictate that you use agent fulfillment centers.
When you scale, you’ll have more incidents.
The thing about scaling is that it stops being about getting sales. Things move to the most complex: maintaining accounts, logistics, etc.
That’s why it’s imperative, and I can’t emphasize enough, that once you hit 30 to 50 orders a week, you leverage the services of agent fulfillment centers. Failure to do so will cause problems.
Customer service.
Here, you should maintain open lines of communication with the customer. If there are issues with their package or problems with their tracking number, you want to update them. It’s also vital that you get a V8. If you’re yet to get one, read to the end; I’ll show you how.
Then, you must set up your title live chat and automation this way. You also need to make sure your customer service works fine. If you adhere to these steps, you should be good. But remember, if you have a page issue score, you can appeal it up to three times a year.
And when you appeal to the page scores, be armed to the teeth with proof. Suppose the issue touches on shipping times; the complaint is that your shipping should be shorter.
You can argue that you’re working towards better shipping times, and you’ll need to adduce proof of your communication with the suppliers about getting better shipping times.
You do the same for product quality issues. Prove to Facebook that you’re working on getting better quality, and engage the manufacturer on the same. Show this proof, and Facebook will likely let you on. Still, you’ve got more appeals left for that year.
How to Avoid Getting Your Ad Account Banned
So, how do you avoid getting your ad account banned?
This is another issue many people face with Facebook ad account bans. It raises a critical question: What does Facebook care about? It’s essential.
Facebook cares about the user experience for you, the advertiser, and, even more importantly, the user experience of those browsing through news fees and whatnot.
First, Facebook will monitor you through bots; they’ll have bots to crawl your Website. Thus, when you set up a new ad on Facebook, you’d get like 100 new visits within a few seconds of a launch. Those are bots checking whether you tick all the requirements.
The second approach is for Facebook to have a human review your profile repeatedly. Quite often, like once a month or two to three times a month, a human will manually review your profile to ensure that everything aligns correctly with the bar.
About the things to have on your Website. Your Website needs to have all the following:
Website rules Facebook looks for
Use a .com domain
Custom content!
ABOUT US PAGE
PHONE NUMBER
LOCATION-city & town
The mandatory pages-terms of service – shipping policy
BLOG: You need 1-3 blogs with 250-1000 words.
Disclaimer saying Facebook does not endorse your site
Use this: This site is not a part of the Facebook website or Facebook.
Inc. Additionally, This site is NOT endorsed by Facebook in any way.
FACEBOOK is a trademark of FACEBOOK, Inc.
For the content, ensure you do not copy works from other people. We won’t address it here for the blog as it’s too detailed, but you should run a blog to ensure you do not have issues.
The disclaimer forms part of your product description. It’s vital that when people come to your Website, you let them know that you’ve nothing to do with Facebook.
Facebook business page rules
So now, let’s look into Facebook business page rules. And what’s in the rules?
Profile Pic
Cover photo
Shop now button
Content 3-5 posts
Post every two weeks or month
Get at least ten likes- invite your friends.
Fill out all Information slots on the page!
Get your page verified- this is the best!
Your Facebook business page must have a profile image (I will show you how to do that), a cover image, and a Shop Now button.
For content, have a minimum of 2-5 posts, and do the posting every fortnightly or a month; you want to avoid Facebook crawling the page and then perceiving it as a scamming page.
Have a way of getting at least ten likes, and then you want to fill in all the information on the page, including the About section, and get your page verified; in other words, get your business manager verified (more about that in a bit).
Business manager validation
We must look at the Facebook ad manager setup to verify your business manager.
Facebook ad manager setup
Set up as a business with the same name as your (registered company)
Use a business credit card or debit card that is (registered to your
company)
Make sure you use 1080p HD videos or high-quality pictures for your
ads
Be careful with emojis
NO CLICKBAIT
NO FALSE ADVERTISING
NO NUDITY
NO ASKING QUESTIONS
NO DISCRIMINATION
Don’t argue with negative comments – delete or block words
First, you must have a registered company, and then you’ll use a credit or debit card registered in your business. That means the debit or credit card cannot be your debit or credit card.
And then, no clickbait, false ads, or nudity. Please don’t argue with negative comments; delete or block them. Tread cautiously with emojis, ask questions, and use 1080p videos or high-quality images for your advertising.
Facebook Ad Policy Course
Now, we’ll head straight to the business manager and Shopify, where you’ll learn how to set up everything. So, we’ll proceed to setting up the ads. But first, you must take the free Facebook ad policy course.
When you complete the course, Facebook will issue a digital certificate. Please keep it safe because it may come in handy when you have issues with your ad account, such as when Facebook blocks or bans the ad account you appeal to.
When appealing the ban, you want to inform Facebook that you took their ad policy course and can upload the digital certificate as a file.
Then, you apologize if you broke any policies but then argue your case because you took the ad policy course, so you know what you’re involved with when it comes to looking at the policies.
If you frame your case this way, you stand a high chance of getting your ad account back. Before you proceed, ensure that you take the Facebook ad policy course.
Facebook Ad accounts
In this part, we’ll look into setting up Facebook ad accounts. Undoubtedly, a lot has evolved regarding the setup since the last course. So head over to your Shopify, move to where you find your online store, click, and then go to preferences. While here, scroll up to where you see the Facebook pixel setup.
Next, click Setup Facebook. Because Shopify and Facebook have an integration, it’s much easier and better. You’ll land on a screen that says, ‘You are about to add Facebook.’ Hit ‘add sales channels.’
Then, you see Facebook accounts, click on ‘Connect accounts,’ and upon successfully doing that, you’ll see a green check next to your Facebook Account as a confirmation that you’ve done it right.
Facebook Business Manager
The business manager follows. If you need a Facebook business manager, head over to the Facebook business manager.
With your business set up, head to your business manager and go to Setting, where it reads business setting, and it should land you on a screen that says, people.
Before you proceed, ensure that you call your business manager the name of your business.
Go to people, add yourself, and recommend adding two others, like your children or partner. Always add two extra people to the actual business manager.
Pages are what you do next. Go to pages, click Add, Add a Page, and then search for your page. In this case, let’s use hypothetical fashion sense. When your page comes up, click add. When done, move to ad accounts.
You should add as many ad accounts as possible for ad accounts. Again, it’s subject to the business manager; in other words, how many business managers can you validate or verify?
You should add an ad account, click Add, then click ‘Create a new ad account,’ and then you’ve to name your ad account. In this case, I use the hypothetical FashionSense’s ad account name.
Click next, and it takes you to a screen that asks, ‘Who will this ad account be used for?’ you want to do ‘My business,’ and then you hit create.
You’ll then come to a screen that reads, ‘Add people & set permission. ‘ Select the person’s name, and you do the same to every person added to your ad account.
Then you hit Manage campaign, hit Manage ad account, and click Assign. After you’re done, create another ad account or, let’s say, three or the number you can manage, make it your backup, and name it your business name backup.
You need this backup ad account. Should your ad account get banned, you can turn to this backup ad account using your actual business name.
And if you can’t create one, it’s probably because you still need to have your business manager verified.
You have Instagram accounts, click Instagram accounts, click Add, sign in to your Instagram, and be connected. You must connect your Instagram account.
You must add three payment options and ensure that all the payment options are business methods: your business debit, credit, and another business debit. The idea is that you will only have payment issues if one payment method is allowed.
The next bit is business info. Scroll down to where you find business info, click it, and ensure you fill it all in your business name—do not leave out anything. Where you see the business’s legal name, put your business’s name as a legal name.
The address has to match the business’s address. You can verify that you need a company set up by filling out the form for business verification status. Then you hit ‘View details,’ and your business must match your Facebook page. In this case, FashionSense, if it doesn’t, it won’t work.
The ‘Ad account creation limit’ indicates how many accounts you can create. Under ‘Business options,’ ensure the ‘Two-factor authentication’ is turned on and done right and the ‘Page & notification’ is turned on. With these done, you should be all set.
If you go back to the page, you have the business manager. You can refresh the page, hit connect and see the Facebook page.
You can see your Facebook page; click connect. Next, you have an ad account, which here is FashionSense. Click connect.
You’ll come to a screen that reads ‘Accept Facebook terms & conditions’ to create an audience. ‘ Click ‘View and Accept terms,’ then click Accept. That should be all, and you can hit done. ‘
It will then ask you to add validated payment details to the Facebook ad account that you connected. It’s here where, if you’ve already added the three payment methods I had recommended, you click ‘update payment details.’
So, how do the payment methods work? If you haven’t already, click’ Business Tools’ at the top left corner.
Go to Ad Manager; as soon as it loads up, go to the drop-down menu where you find the ad account and ensure that it’s the ad account you created (FashionSense). Again, go to Business Tools, where you see ‘Billing.’
Once here, go to Payment Settings, located at the top right. Here, you make the intended changes.
Click ‘Add Payment Method’ to see a screen titled ‘Add payment information.’ Clicking on the ‘Business management payment method’ will show the three payment methods you added to the business manager.
Then, click ‘Make primary,’ it should show that your payment method has been added successfully.
You’ll see the spending limit, which is the maximum you can spend on Facebook.
So, click on ‘Set your account spending limit.’ For the account spending limit, I’d put $5,000, which means I cannot spend over & above $5,000, and I can change it from here.
Once you’ve done that, you’ll have a ‘Facebook target country’ for this. I recommend you pick the US. Next, you’ll have ‘Terms & Conditions’. You should click on accept and then hit Finish.
When you get through, you ought to be greeted by a screen that says, ‘Grow your business with Facebook.’ When you get here, go to Settings. Then go to ‘Marketing Settings’ to ensure everything has been done correctly.
Next, head over to ‘Commerce Settings,’ which will take some time to load. You want to ensure the Facebook commerce account has been set up correctly here.
Next, you go to the Data Sharing Settings page, set it to maximum, and click confirm when you have it at maximum. This creates a Pixel. Initially, you’d have to develop Pixels manually.
But now that Pixel has been created for your ad account go back to Overview. Here, you should set up a Facebook Shop and Instagram Shopping. Upon doing that, click the Start Setup button on Facebook Shop.
You see a Facebook commerce account, and you’ll see where it says ‘create new commerce account’; if you do that, it should Indicate Facebook Marketing as active. Of course, you want to do the same for Instagram.
Under ‘Product Status, ”Approved’ Indicates 0 products, whereas ‘No approved’ shows I product; if you want to click on ‘1 product’, it should redirect you to your Shopify.
And then where it says ‘Available to Facebook,’ you want to have that checked.
With the fundamentals out of the way, head to Ad Manager and create campaigns.
Now that you’re in the Ad Manager, first thing first, set up your Columns. The columns provide specific insights about your ad sets and campaigns.
So the first thing on Columns is to click on Customize Columns, and here you want to have the following columns.
We’ll explain what these mean: you want to have results rate, Frequency, CPC, CTR, CPM, and Video Views at 50, 75, 95, and 100%.
Scroll down to have Link clicks, CTR, and CPC. Add to Cart totals, Initiate Checkout totals, Purchase ROAS totals, Purchase totals, Account name, date created, and Date last edited.
Drag the date created on top, and have the date last edited beneath the date made.
Click save as presets. You can save it as DS for dropshipping ads.
The date created means the time you generated that campaign or ad set. The date last edited suggests when you last edited it; let’s say you made it four days ago. If you edited yesterday, it’ll tell you whether it’s for active or inactive delivery or whatnot.
The Budget talks about how much you spend. The result means you’re looking at how many purchases you’ve made.
Cost per result tells you how much it costs to get that result, like the cost of making a purchase.
The amount spent is the total amount paid.
In the end, if you’re scheduling stuff, that’ll tell you when it’s due to end; it means when you’re ending that campaign.
The result rate tells you how often you get results and Frequency on a scale of one to five.
Five means your ads repeat targeting the same people, which could be better, whereas one suggests a widened target audience base. In other words, the ads are sent to more different, newer people.
CPC stands for cost per click, which refers to how much it costs to get a click. The CTR stands for click-through rate, which means how many people click through to your Website. CPM costs talk to how many thousand impressions you’re getting.
Video Views at 50% means how many people watch your video at 50%, 75% means 75%, 95% means 95%, and so forth. Link clicks show how many people have clicked on your link. Add to cart shows how many have added to the cart without buying.
Then you’ve got initiate checkouts, which give metrics on how many people have gone to the Checkout but have yet to buy. Also, you’ve got Purchase ROAS, a critical column.
ROAS stands for return on ad spend, and we’ll explain how to calculate it in a few minutes, so you don’t need to worry about it for now. Then you’ve got your purchases, so that’s all the columns.
Requirement For the Digital Products Facebook Ads Strategy
PHASE 1 REQUIREMENT
You’ll need $1000-2000 Budget Needed roughly $30-$50 per day
- 5 Photos
- 5 Headlines
- 1 Ad copy
TESTING PHASE1-CAMPAIGN & AD SET SETUP
- ABO Conversion-Do 5 Ad set Budget $5 per Ad set per day
- For Purchase, have ePacket countries, Age 21-65, Gender do both & have Eng for all Language
- Detail targeting ought to target pages, magazines, events & influencers
- Potential reach should reach 1-500 million and exclude Etsy
- And your Placements to be FB Feeds & Insta Feeds only
- Try 7-day click or view
PHASE 1 OBJECTIVES
- Test Different Interests/Audiences
- Find Which creatives are the best
- Out of Photo, Carousel, Video
TESTING PHASE 1-AD SETUP
- Select Both Your Facebook Page & Instagram Page
- Create 2 Ads per Ad set, Ad 1 Photo, Headline1
- Ad 2 Carousel, Ad copy 1, Headline 1,2,3,4,5
- Download Call To Action now.
You’ll have the actual ad setup to select Facebook and Instagram pages. You’ll create two ads per ad set.
Ad1 will be a Photo with Headline1 and the ad copy, and Ad2 will be a Carousel with ad copy1 and headlines 1, 2, 3, 4, and 5. The Call to action you want to have is “Download now.”
It would be best to go where it says Create, hit Conversion, and click Continue. Then, change the campaign name to whatever you do. In this case, it’s Lightroom presets. Scroll down and turn off the campaign budget optimization.
Next, go to the New ad set and call what you put in the Interest Target section. Scroll down and click Website.
For the conversion event, have it listed as purchases. Although it may show as you having no purchase event, don’t fuss.
Scroll down to where you find ‘Daily budget’; you chant it to $5. Then go to Location and click Edit. You want to Google the ePacket countries, then head over to Shopify.
If you scroll down, you should find the ePacket countries, select to copy all, head back to ad manager, hit browse, go down and click ‘Add location in bulk’ then hit select, pick countries and then paste, then click ‘Match countries’
You eliminate countries like Great Britain, given it’s classified as the United Kingdom. You want to get rid of Mexico, a highly fraudulent charged country and remove US minor outlying islands. When done, hit save the list, click ‘Add location,’ and save it as ePacket.
For Age, hit Edit. You want to target between 21 and 65+, and where you have Gender, you all.
Now, for ‘Detail targeting,’ and you’re doing Lightroom presets, you want to have the ‘Detail targeting expansion’ turned off. The detailed targeting expansion should be on only when your potential reach is below a million.
Because we’re doing Lightroom presets, type in Lightroom. You’ll see Adobe Photoshop Lightroom, which has a size of over 46 million, and Adobe Lightroom Presets, which are more specific to what we’re doing.
I’d do Adobe Photoshop Lightroom myself. It offers a broader audience. With Facebook, given a wider audience, it uses algorithmic machine learning to find the right audience.
Next, go to Language, hit Edit, put English all, then head to where you find Exclude, then put Etsy here,
it would help if you excluded Etsy, given there are sellers who deal presets on Etsy, and when you exclude Etsy, you’ll find the niche going down accordingly.
Scroll to where you find Placement here and hit manual Placement. For devices, turn off the following: audience network, messenger, and Instagram.
Then, you want to turn off in-stream, search, in-article, and stories. You only want our Facebook News Feed and Instagram Feed turned on. Once that’s done, scroll back up and name your ad set in the interest section. For instance, you can call Lightroom 21-65 ePacket broad, and the ad set should be ready.
Once that is done, go to ‘New ad’ and name it a single image. Then select Facebook and Instagram pages—you must do both. Then scroll to where you find Add Media, click it, and hit Add Image.
Then, go to Upload, and you upload that Image of Before & After. Upon successful Upload, hit next and then hit done. Then you go where it says ‘Primary text.’ Here, you go back to your ad copies and paste them over.
You can use the free Google Doc cheat sheet provided here and copy the ad copy example, head back to Ad Manager, and paste it into the primary text box. You do the same thing where you have a Headline: head over to the Lightroom headline you created, copy it, and paste it.
Scroll to the description, and here you put download Instantly. In the Website URL box, ensure you put a URL that takes prospects directly to the product page, not the home page. For the Call to action (CTA), you put download. You must place a call to action to download it.
Once that is done, head back to the top left of the Action Menu and Duplicate the ad again. Hit Duplicate, set the number of Duplicates to one, and then click Duplicate. Next, change the ad name to Carousel.
Scroll down to where you find Format; you’re asked how you’d like to structure the ad here. You hit Carousel, and it’s reformed to Carousel.
Scroll down to where you find the carousel card and what you want to do: 5-10 carousel images. Do precisely five. So, click Add Carousel, click on the ones you have, and then add headlines. And here, you need to have five different headlines.
The headline here has Lightroom Preset, the description has the same download instantly, and the website URL remains the same.
Then scroll down to where you find ‘Automatically show the best performing cards first,’ turn it on ‘Add a card at the end with your page profile picture,’ turn off, Primary text leave the same, and Call to action put download.
With that done, go back to the top and click on Select Image, hit Upload Image, and here you upload the grid photo.
Upload that as your first grid photo, and then click continue so that you have it as your first. It can be your wedding presets, for instance.
Also, if you want to change the headline to match your preset, in this case, the wedding preset, put the preset pack.
You can even use wedding emojis here to showcase the Carousel you do.
Move down to the next Carousel, and you do the same thing. In the description, you put download instantly; in the headlines, you write travel this time, you put travel preset pack.
You can change the emoji to a globe emoji showcasing the traveling theme. Click Select Image, hit Upload Image, and this time, upload travel presets instead. The website URL has a link that lands on the products page. The primary text remains the same.
You’ve done two. You need to do a third, but you should have five. You’ll do the same to all five different preset packs or whatever digital thing you deal with. Because of time, we’ll limit ourselves to these two for this guide.
So, if you go to Expand Format and have a look, even when you change View Preview to Desktop, you get a view that prospects will have when they see when they look at your actual Facebook ad.
Here, you see the download button for wedding preset packs. A click on the Carousel button displays the Travel version. It’s an excellent professional look.
Again, you’ll need five of these to do Instagram Blogger, HDR, or other stuff, but you need five.
After that, you move to the top ad set level with a four-box symbol. Click it, then hit Duplicate, do four for the number of Duplicates, and then click Duplicate. Interest is the only thing you’re changing in the ad set level.
So, you scroll to interest, click Edit, and hit Suggestion. You can click any button but have image editing instead. It’s a good one. Then, you scroll back up and name the ad set image editing (21-65+ ePacket broad-copy). It’s the new interest you’ve selected.
If you want to do the same thing as the next one, scroll down to interest, click Edit, hit Suggestion, and choose what Facebook suggests. You can use Adobe Photoshop (remove Adobe Lightroom) and scroll back to change the ad name to Adobe Photoshop.
You want to do the same thing to the third and fourth; find the suggested interest, put it, and not touch the ad set’s original level. You will find it at the bottom.
When you have done that, go to the top right and click Review & Publish to ensure they are published.
With those scheduled and running, the following phase makes for the killing and scaling metrics. Thus, this is what you want to do:
TESTING PHASE 1
Run the campaign for 72 Hours
- Kill the following ad sets if they don’t meet the rules:
- 12 Hour rule = the campaign to have one link click per ad set
- 24-hour rule = ensure CPC-cost per click isn’t higher than $1 per ad set. If so, kill
- 48 Hour rule = no ATC-add to cart or IC- initiate Checkout per ad set kill
- 72 Hour rule = 1 sale per ad set or 3 ATC/IC or kill
- If you have at least one sale for the whole campaign, you can move forward to Phase 2
- Duplicate the winning Interest 4 times and change the Interest on Facebook as a suggestion
If none of these ring a bell, you should head to the ad set level and assess these rules (24,48 & 72 Hours). Here, you’ll change the columns; remember the ones you customized!
You’ll then need to scroll across, and for the 24-hour rule, ensure the CPC is under $1. If not, turn it off. You look at the Purchase and ATC and want at least one link click.
Now, you need ad sets that survived, and you need to pick the best. At least one or two that should have done well; if not, you’ll have to repeat the process, but this time with a new set of ad sets.
You want to opt for the ad sets that I’ve done the best and have had at least one sale. If you have some with two sales, go for the one with superior metrics. Let’s say you have two with a sale. You pick the one with more ATC (add to cart).
And so you go with the campaign with more ATC, turn off all the others, and then duplicate the winning ad set and do it four more times. As in the number of copies, you do four, then hit Duplicate.
You’re using what’s performing the best, for instance, if the Carousel does better than a single image, and how you assess it by duplicating the tab to look at the ad-level metrics. Upon duplicating the tabs, you go to ads, change them to ad levels, and provide the data.
Again, for the sake of this guide, you will look at the data for the carousel and single-image campaigns. You look at metrics like CTR and IC (Initial Checkout) to see which performs better. If the Carousel campaign performs better than the single-image campaign, you eliminate the single-image ad by clicking on the three dots and then hitting delete.
And it doesn’t stop there. You also pick interest based on Facebook suggestions for what’s performing best. In our case, we settled on Image editing.
Click Suggestion, and here you choose anything related, but this is the first time you’ve used it; in this case, we can do Graphic design.
So, you use that and do the same for the other four ad sets and find a new interest that you’re yet to use but relates to the winning interest. Then, you want to narrow the ad to an ad set that performs the best. Again, if the single Image performs worse than Carousel, you delete it, keep Carousel, click the publish button, and run that campaign for 48 Hours.
TESTING PHASE2
Run the campaign for 48 Hours.
And you follow these rules
- 24-hour rule = CPC-cost per click higher than $1 per ad set kill
- 48 Hour rule = 1 sale per ad set or kill
- • If you have at least three sales for the whole campaign, you can move forward
- • To Phase 3
- • If you have 1-2 sales, reset the process from phase 1 with other interests
- • Related to the winning interest and use your 2nd best ad
In this case, you use the second-best creative, the single Image out, given that it’s the one we didn’t use for the first campaign. Now, you’re in Phase 3.
TESTING PHASE 3
Campaign setup
Here, you do the following.
- Duplicate the ad sets with 2-3 sales three times in the original Abo campaign. For example – Lightroom-wedding Love has two sales in phase 2. You duplicate the ad set 3 times without changing anything
- The ad setup is the same, but you’re using the winning ad From phase1
- Pick the one with the best CTR & ATC if there are winning ads.
So, what you’re doing here is, if an ad set has got at least two to three sales, you want to duplicate the ad set three times in the original campaign. The only thing you’re doing is just duplicating any ad set that had two sales three times.
For instance, Adobe Photoshop has two sales. You’d hit the duplicate button, change the number of copies to three, hit Duplicate, and hit publish. Duplicating and publishing are all you’re doing in Adobe Lightroom.
The following are the killing and scaling metrics you use when duplicating an ad set three times.
TESTING PHASE3
Run the campaign for 48 Hours.
You’ll kill aggressively due to profitability:
- 12 Hour rule = CPC-cost per click higher than $1 per ad set kill
- 24-hour rule = ATC or IC-2 per ad set kill
- 48 Hour rule = amount spent higher than BEP per ad set kill
- If you have at least four sales for the whole campaign, you can move forward to phase 4.
- If you have 0-3, reset to phase 2
It would be best to observe the above killing and scaling metrics because now you’re moving into scaling methods, and sure as sunset, your bank should afford your scaling method. If scaling proves expensive and out of reach for you, don’t scale.
You’d have to wait for your payment gateways, considering that the gateways can take anywhere between 3-21 days.
I’d recommend getting a business charge card if it differentiates from a credit card, given it has a different way of spending. The charge card is more aggressive. You can get one with American Express.
The charge card offers a great way to manage your cash flow. Instead of waiting for your payment gateways to be paid, you can use the charge card while it is being spent.
TESTING PHASE4 FB STRATEGY
Campaign & ad set setup
- Abo-conversions-10 ad sets-budget $7 per ad set, per day
- Purchase- top-performing country-age 1-65-gender both Language Eng All
- One custom audience %laa per ad set
- Placements – auto placements
- Seven days click or view
Now, we’ll switch gears to Look-alike Audience (LAA). What’s LAA? Ideally, it’s a scenario where someone comes to your site or views your video.
Facebook creates an audience related to those who viewed your video to find people like them.
A Look-alike Audience is what we’d refer to as a Warm audience. So, the first Look-alike Audience we’d look into is the Video Views Look-alike Audience for 95, 75, and 50%. You’ll use those column setups you made earlier to create these Video Views Look-alike audiences.
Suppose you’ve got a different ad account (you can have more than one), and you open one that’s got nothing to do with FashionSense (hypothetical). As you scroll through the columns, you’re in the Campaign level, and you scroll to where you see Video View Plays at 95, 75 & 50%.
And you want to ensure that all these Video View Plays at 95, 75, and 50% columns have more than 2,000 views. In other words, each column, 95, 75 & 50, should read 2,000.
To proceed with the video, you must have 2,000 in the column; if you do, it will work effectively.
You can skip this section if your winning creative isn’t a video because you can only do a video review when winning video creatives.
So, if the Image was your best ad & not the video, carry on with tweaking interests; you can skip this video part to the bit about Page View, which we’ll do shortly (read on).
For now, head over to Business Tools and come to ‘Audiences. ‘ This screen can take a bit to load. You see where it says Account. Ensure that you are in the right Account. You want to come where it says ‘Create audience. ‘ Click then go to ‘Custom audience’ and go to video.
Here, click ‘Choose content type,’ select 50, next click 75, and then 95%. With the three in here 95,75, and 50%, hit video. Also, you choose the right page. Then select all the videos and click ‘Confirm.’ You do the same for 95, 75, & 50%, and click confirm.
Then scroll to ‘In past,’ which indicates 365. You can change this to however long you’ve been doing the ad, let’s say 14 days, for example. Then type in the audience name as VV (video view), then 95 slash 75 slash 50, put percent at the end, and then name it whatever you like. Let’s say FashionSense, for example, VV 95/75/50% FashionSense.
Click Create audience, which will take up to 30 minutes to populate. After 30 minutes, the entire system should go. Assuming it’s been 30 minutes already, come to ‘Create audience,’ select ‘Look-alike Audience,’ and then select ‘Existing audience.’
Once that’s done, select the audience you created and go to ‘Other.’
Scrolling to the bottom of Other Sources, you will find that the audience is 95/75/50%. Here, you’re greeted to a little bar reading 0-10%, and you’ve got 1-2, 3-4, 5-6, 7-8, and 9-10%.
The percentage represents those most similar to your audience. Take one percent, for example. It includes the people most similar to the audience that has seen your video, and ten percent represent people less likely to be identical to those who saw your video. And that’s how the percentage works.
If you scroll down, you will see where it says, ‘Look-alikes now use ad set location,’ depending on your ad account’s Age. You can either create your countries in the ad set or here. Given that our ad account is a new version, you can’t make it here, but if your ad account is an old version, you’d add your countries.
I suggest you add your top country; add the US here if it’s your best country, for instance, if you have the option. If not, wait for the ad set. First, go to ‘Select audience size,’ create 0-1%, then hit create.
Click Create audience again, hit Look-alike, scroll to the bottom to ‘Sources other,’ and select your source. You do 1-2% this time and then hit Create Audience. You do the same thing, look-alike, and choose your source, but now you do 2-3%.
And you want to repeat the process over & again. It’s repetitive and takes time: look-alike, select the source and create an audience. Cumulatively, you need ten look-alikes created. Continue 3-4%. 4-5%, 5-6%, 6-7%, 7-8%, 8-9% and 9-10%.
Afterward, head to the ad manager, click Create campaign, then Conversion, and click Continue. On the campaign name, you put VV 95-75-50% US. You put the US because it’s the country you are doing.
Also, you need to turn off CBO1. Head over to the New ad set, and you name the ad set (LAA1%). You must call it LAA one percent because you’ll do ten different ad sets, each with a different percentage.
For the Conversion event, do Purchase, scroll down to change the ‘Daily budget,’ and if you want to put at $7, you change to seven do LAAs you don’t spend much, given Look-alike is a Warm audience and therefore you can spend less.
Scroll down to ‘Custom audience,’ click it, and you’ll see all your different Look-alikes. Now, select 1-2%, scroll to Location, and put in your top-performing country and, in this case, type in the US.
It says ‘Age’ has it nice and bland (18-65), and ‘Gender’ too, so leave it to ‘All gender.’ Not both with ‘Detail targeting expansion,’ Language leave as ‘All languages,’ and Placement have as ‘Automatic placements.’ And now you’re all system go.
Next, you proceed to where it says ‘New ad’ and change the ad name to ‘Winning creatives.’ With that done, you want to upload your best creatives, which include your best Headline, ad copy, and Image and video.
Whatever’s been your winning creative, you add it back into ads. How simple can it get? That’s all you do: adding your winning creatives back into ads.
You then head back to the ad set, click on the three dots, and duplicate nine times. Change the number of copies to nine, then click Duplicate.
When it’s done duplicating, you scroll to the bottom to find the original and change it to two percent. So, you must scroll to Custom audience, delete Look-alike (0-1%)-95/75/50%, and select 1-2%. Then scroll back up, and you call it LAA 2%.
The following ad will set you 2-3%, the next 3-4%, 4-5%, and so forth. When you go through, click on the publish button, and it’s active. You’ll run the campaign for 72 Hours, and below are the killing and scaling metrics.
TESTING PHASE 4 FB STRATEGY
Run the campaign for 72 Hours.
- Kill the following ad sets if they don’t meet the rules:
- 12 Hour rule = one link click per ad set
- 24-hour Rule = CPC-cost per click higher than $1.75 per ad set kill
- 48 Hour rule = no ATC-add to cart or IC- Initiate Checkout per ad set kill
- 72 Hour rule: 1 sale per ad set or 5 ATC/IC or kill
- Replace the turned-off ad sets with a duplicated winning ad set
It would help if you replaced the turned-off ad sets with duplicated winning ad sets.
We have ten ad sets. Suppose you turn off eight ad sets because you are not doing well. That leaves us with two ad sets.
Assuming the two left ad sets have 3% and 6%. You duplicate the ad set to replace the ones turned off. In this case, you duplicate the 3% & 6% ad sets to compensate for the ones turned off.
You want to monitor and evaluate everything in the last three days.
Head to the ad manager, alter ‘Lifetime’ to last three days, and click Update.
You must continually assess your ad sets according to the rules (24, 48, and 72 Hours) because they’re as good as the last three days.
It’s how you ought to judge your ad sets upon launching live new charts: over the last three days, that is, in the previous 24 Hours, 46 Hours, and 72 Hours.
You shouldn’t get attached. If the ad sets don’t meet the performance threshold, turn them off and permanently replace them with what’s done well in the past. That takes us to the next phase, which is testing phase 5.
Page View Look Alike (LAA)
TESTING PHASE FB STRATEGY
Campaign setup for LAA
- You need 2500-3000 page views
- If you don’t have the requirements, keep testing your interest
Phase five is all about Page pageview look-alikes.
I recommend skipping this section, the Page view if you don’t still need winning video creatives. How do you reach the pageview audience?
You go to Business Tools, then to Event Manager, click it, and you are greeted with a page with ‘Pageview,’ ‘Viewcontent,’ ‘Add to cart,’ and ‘Initiate checkout.’ For the Pageview, you must have between 2,000 and 3,000 page views.
And frankly, it’s even juicier when you have 2,500. I emphasize here that you can’t do Pageview if you have, let’s say, a page view of between 1,000 and 2,000. You need between 2,000 and 3,000. If not, carry on with VV LAA and continue with interest targeting.
But if you have 2,000-3,000 page views, head back to the Audience section, click on Create new audience, then click Custom audience, go to the website, and scroll to where you find ‘In the past.’ You change that however many days you’ve run the ad. If you’ve been running your ad for 25 days, you change it to 25.
Then, go to where you see ‘All website visitors’ and change to Pageview. Audience name: You put Pageview LAA with your store’s name or digital product (Pageview LAA FashionSense), whatever you want. Click Create Audience. Again, it takes 30 minutes to set up.
With that done, head back to Create audience, then go to LAA audience and next Guest. Repeat the same steps: click select source, then click another source.
Next, please scroll to the bottom where you see Pageview LAA, select it, and repeat the same process you did with the Video view.
And here’s what you do. You do 0-1, 1-2, 2-3, 3-4, etc. Again, cumulatively, you have ten different LAA. You’re doing the same video view structure.
If you forgot, scroll back and re-read; it’s the same video view setup, but this time, you apply to page views and the same with the actual campaign.
TESTING PHASE5 FB STRATEGY
Campaign & ad set setup
- Abo-conversions-10 ad sets-budget $7 per ad set, per day
- Purchase- top-performing country age 18-65-gender both Language ENG All
- One custom audience %LAA per ad set
- Placements auto placements
- Seven days click or view
Thus, when you set up the campaign, you do the same campaign encompassing ten ad sets and a $7 daily spend, and you ensure each ad set has a different Page view LAA value: 1%,2%, 3%, 4%l. It’s the same, with the only difference being that the Value is not applied to the video view now.
So, it’s implicit that when you relaunch the campaign, it’s subject to some rules.
TESTING PHASE5 FB STRATEGY
Run the campaign for 72 Hours.
Kill the following ad sets if they don’t meet the rules:
- 12 Hour rule 1 link click per ad set
- 24-hour Rule = CPC-cost per click higher than $1.75 per ad set kill
- 48 Hour rule = no ATC- add to cart or IC- initiate Checkout per ad set kill
- 72-Hour Rule = 1 sale per ad set or 5 ATC/IC or kill
- Replace the turned-off ad sets with a duplicated winning ad set
You will leave the campaign to run for 72 hours but base your evaluation on some rules. The 12-hour Rule is to click one link, and then the rest remain the same.
In the 24-hour Rule, the CPC has to cost under $1.75 or $1.50. Then, for the 48-hour Rule, you must have at least one out of the cart. If not, initiate Checkout. You will have at least one sale or five out of the cart; the rules stay the same, but this time, you have the 12-Hour Rule, the link click rule.
View content LAA audience.
TESTING PHASE 6 FB STRATEGY
Campaign setup for viewing content LAA
- You need 1500-2000 view content
- If you don’t have the requirements, keep testing interests or other LAAs
- The setup is the same as the other LAAs
Now, we’ve entered phase six. Here, it’s all about ‘Viewcontent Look-alike audience’; therefore, you’d head back to Events Manager, and you need to look at where you find Viewcontent.
But you need between 1,500-2,000 View contents. If you don’t hit this threshold, continue with Page and video view LAA. It would help if you carried on with doing interest targeting.
If your content reaches 1,500-2,000, head back to the audience section, click Create Audience, and do not need to create a custom audience. For anything above View content, you do not need a custom audience. You proceed straight to Look-alike.
Thus, click ‘Select your Look-alike source,’ scroll to where you see Value-based source, and then select ‘Ads Pixel for Shopify Facebook Ad. ‘ You must choose Pixel. It would help if you did that.
You’d then change it when you click ‘Other event with value’ and select Viewcontent. Again, you head straight from Pixel to where you find others and click View content. When you do that, you go again into doing 0-1, 1-2, 2-3, and so forth, then click on Create Audience and repeat the process repeatedly.
Thus, you do anything with Viewcontent and above in the LAA. Afterward, you return to the ad manager and do the same setup.
By that, I mean you do one campaign at $7 per day, ten ad sets, each with a different Look-alike value. It’s the same, with the only difference being how you create an audience in the audience section, i.e., heading straight to LAA.
Add to Cart Look-alike (ATC LAA)
TESTING PHASE 7 FB STRATEGY
Campaign setup for add-to-cart LAA
- You need 200-300 add-to carts
- If you don’t have the requirements, keep testing interests or other LAAs
- The setup is the same as the other LAAs
We’re in Phase 7, and in this section, we look at Add to Cart Look-alike. You need between 200 and 300 ATC.
If you hit that milestone again, you do the same process: head over to the audience, create an audience Look-alike, and then select Pixel.
Upon selecting your Pixel, go to ‘other event with value’ and then select ‘Add to cart.’ You repeat the same number of Look-alikes, ten in this case. You do the same campaign; killing and scaling are the same. Everything is the same.
Purchase Look-alike (Purchase LAA)
TESTING PHASE 8 FB STRATEGY
Campaign setup for Purchase LAA
- You need 100-200 purchases
- If you don’t have the requirements, keep testing interests or other LAAs
- The setup is the same as the other LAAs
We’re in Pgase8, and phase eight is all about Purchase Look-alike. Again, you come back and see how many Purchases you have.
You need to make at least 100-200 purchases to purchase LAA. If you’ve yet to hit the milestone, carry on with the other ones, interest targeting, you know, and work your way to Purchasing LAA.
If your purchases suffice, head over to the audience, then straight to Look-alike. Next, you go to Pixel, which should already have purchase checks.
You want to make 10 LAA and repeat the same in the campaign, with ten ad sets. Everything else remains the same, including killing and scaling.
TESTING PHASE9 FB STRATEGY
How to scale LAA audiences
- Start to group the most successful LAA % in 1 Ad set. For example, if add to cart 1& 3% are Performing well, make a new LAA for 1-3%
- Then, create an ad set for it.
And how do you scale the LAA audience? The best way to scale the LAA audience is to group the most successful LAAs into one ad set. For instance, suppose you have ATC 1% and 3% that perform well. You can make a new LAA for 1-3% and then create it for an ad set.
The point is, assume 1 and 3% of ad sets do well independently. You group them up, so you head back to the audience section and group them up. Assuming you’re doing ATC as an example, grouping up involves heading straight to Look-alikes and selecting your Pixel again.
Then, you add to the cart, and you want 1-3%, so you change the two ad sets to one to three percent. You drag from one to three and zero to one, grouping them up.
Again, 4% and 6% of ATCs have done well independently. You group them up, and you do one 4-6%. The reason behind grouping the ad sets stems from the fact that the practice has proved influential.
Once you have made that audience, you must create and publish an ad set three times. You create and put it into a new campaign, so you have three ad sets of the same 4-6%. Let them run. It’s the best way to scale grouped LAAs.
TESTING PHASE 10 FB STRATEGY 2021
How to scale LAA audiences
- Start to test other top-performing countries
- In LAAs, try the UK instead of us
- Or group the best-performing countries in on LAA
The other great alternative to scale LAAs involves testing the best-performing countries. So, for example, you’ve been doing LAAs but US-focused only. Now, you might test your second-best country. And let’s assume the UK is your second-best country, for instance. You want to do the UK.
You can change the US to the UK or group them in one ad set. If you do the US and the UK as one LAA, I recommend that you test both to determine which country works best, as it depends on how your ad account reacts.
Retargeting
TESTING PHASE 11 FB STRATEGY 2021
Campaign setup for retargeting
- Try all the same values in LAAs in retargeting
- Work your way back the funnel, starting at 180 days -7 days
We’ve entered phase eleven, and this section is about retargeting. And what’s retargeting? Retargeting is a complete departure from LAA.
LAA is where Facebook is based on similar people who’ve previously seen your product.
Still, with retargeting, you show your ad to somebody who has visited your website and added an item to the cart without buying it.
Retargeting powers you to target them, this time using a more creative ad to get them to buy your stuff instead of just adding it to their cart.
So, how do you retarget? In the ad manager, you go to the audience section. Hit Create Audience, scroll to Custom Audience, click on the website, and scroll to where you see ‘Website visitors’ and have to acquaint yourself with funnels.
Funnels have Pageview at the bottom, whereas Initiate Checkout is at the top. Thus, Pageview is at the funnel’s start, and Initiate Checkout is at the funnel’s bottom, so you always start with Pageview.
It would always be best to start your way back; moving your way forward and starting your way back, in this instance, would take 180 days.
So you retarget to the last; that is, you do a retargeting ad for the previous 180 days of people who viewed your content. Start at the back, work your way forward, and always want to do ad sets that are 180 days and then make the other ad sets in different ways.
The other alternatives you can do include 90, 30, 14, and 7 days. As such, I’d recommend doing 90 days, 30 days, 14 days, and 7 days; they’re the alternative funnels you can employ when you retarget. Again, make one ad set per the number of days: 7 days, 14 days, and so forth.
Pageview Retargeting
Once you do this, you exclude people. When you do pageview targeting, your retargeting ads should only see Pageview. You then refine by going to ‘All website visitors’ and picking ‘View content.’
You then click on ‘Exclude people’ again, but this time, you refine by going to ‘All website visitors,’ and you pick Add to cart. You click on exclude people again, but you do this for Initiate Checkout.
You exclude people because you intend your Pageview to be seen. You plan your retargeting ads to hit those who’ve seen your Pageview. You don’t intend your retargeting ads to see View content, Add to cart, and Initiate checkout audience because you plan to those separate, and it’s the reason you exclude them.
Ensure that the past day matches, in this case, 180 days. Once you do that, proceed to name your audience. You can call this audience ‘Pageview retargeting ATC, VC, IC. ‘ There, carry on, and click Create an audience.
Next, you want to create the same retargeting, but instead of 180 days, you do 90 days, excluding the same audience. You repeat the same retargeting for 30, 14, and finally, 7-days. Cumulatively, you need to have five different retargeting funnel days.
You do the same, but this time, let’s say you do View content, so you exclude Pageview and all the other ones you’re retargeting. After you do that, you can create the campaign funnels.
TESTING PHASE 11 FB STRATEGY 2021
Campaign & ad set setup retargeting.
- ABO-conversions-10 ad sets-budget $5 per ad set, per day
- Purchase- top 5 counters- age 18-65 – gender both Language ENG all
- 1-custom audience retargeting Value excludes other non-retargeting values
- Placements auto placements
- 7-day click or view
Now, you’re at the stage where you create the campaign for the retargets. Click the Create button, hit Conversion, and then click on Continue. Then, for the campaign name, you put ‘Retargeting’ and the actual ad set name.
Also, the campaign name should be the Value you do, and you do one campaign per Value; hence, Viewcontent would have its campaign, ATC, the same as the LAA. Every LAA has its campaign in the Value. Therefore, always have your campaign per Value.
Then you need to head over to the New ad set and call the ad set the retargeting you’re doing, in this case, Pageview. Then, you add 180 days to the ad set name.
The ad set is about 180 days. Next, scroll to ‘Conversion events,’ and you go for Purchase. Scroll to ‘Daily budget,’ and you change that to $5 again with retargeting; there is no need to spend big.
Again, scroll down to where you find ‘Custom audience,’ then select Custom audience, and here you find your custom audience, which in this instance reads ‘Pageview retargeting exclude ATC, VC, IC.’ Click to select.
Where you find the Location, you do all the countries you’ve been doing. You can opt, for instance, for the ePacket countries if that’s what you do.
As such, you click where it says ‘Add location in bulk’ and then click ‘Browse. ‘ You select ‘Saved location,’ then hit ePacket countries, and it will add all the ePackets for you. You want to be both Age and Gender broad; don’t change. For Placements, leave as automatic.
Now, head over to ‘New ad,’ and it’s crucial. For the ad name, it is called retargeting. If you’re a new ad, scroll down to ‘Media’ to click Add Media and add a video. If you recall, I had you make that retarget Video. So, you go to upload, click on downloads, and click that retarget Video.
Also, you need to add a ‘retarget’ funnel ad copy. Now, you go back to your doc cheat sheet, copy the Headline, and paste it in the headline box to read ‘4.9 STAR REVIEWS’ since your retargeting ad creative completely contrasts with the average creative.
Again, using the cheat sheet (here), copy the retargeting ad, copy the text, and paste it into the ‘Primary text’ box.
Next, move to the ‘Description’ box and type ‘Free shipping. ‘ This time, you head over to ‘Edit video,’ click Upload, and upload the retargeting funnels.
Click on testimonials to open it, then hit continue. You click save and have a glimpse of what targeting looks like, and you play the Video. It’s a retargeting video. It ought to be an exceptional creative ad.
Next, you proceed to the ad set and duplicate it fourfold, meaning you’ll now have five ad sets. You must add the other ones.
The other four ad sets will have four other values, and by values, I’m referring to value days.
Thus, the following ad set, and in this case, the ad set, will have 90 days. You can name Pageview 90 days, third, Pageview 30 days, fourth, Pageview 14 days, and finally, Pageview 7 days as the five ad sets you to do.
When through with doing the ad sets, click publish the campaign.
TESTING PHASE 12 FB STRATEGY 2021
How to scale winning campaigns
- Duplicate the campaign into CBO format and make the CBO $100
- Make the minimum ad set spend $7 for five ad sets minimum
- Increase the campaign budget by 30-50% only if profitable
- Adjust the ad set a minimum spend based on the winning ad set
Now, folks, don’t tire. We’re on the home stretch, and Phase 12 marks that. This section is about scaling the winning ad campaigns, and the best way to scale winning campaigns involves converting them into CBO formats.
If you have the winning campaign, you’d select it, click Duplicate, and then convert it to CBO format. What do you do? You proceed to campaign levels (campaign objectives), scroll to CBO (campaign budget optimization), turn it on, and change the CBO budget to $100.
Next, scroll back up to ‘Ad set spend limit.’ You find it under Budget & Schedule, and here, you set the minimum ad set spend limit.
You click Edit, then click ‘Add set spend limit,’ and set it to $5 or $7 in the’ Daily minimum’ box. It’s subjective and doesn’t set the maximum; it only sets the minimum. You do the same to the other ABO and then publish.
Only every 3-4 days can you increase your CBO by 30-50%, although that’s subject to profitability. Assuming that your CBO has run for four days and is profitable by 0.1%, you can increase it by 30% or 50%.
Constantly adjust the minimum spend on the ad sets that perform the best. Now, you want to go to that ad set (Testing ABO) and assume that the ad set performs the best. You can change the minimum ad set spend from $5-$10 or still from $7-$20, primarily informed by how well it’s doing.
Again, you adjust the ad set spend based on the number of ad sets you run. It’s always dependent on those different variants. Ultimately, that’s how you scale ad sets in Facebook CBO formats.
Those were made for the 12 different phases of Facebook scaling and testing. Your take-home includes a thing or two.
Automated Rules
Now, we’ll switch gears to a couple more advanced features you’d leverage in the ad manager to help you automate it and achieve the best possible outcome.
First, you have automated rules. Click on an ad set, go to ‘Rules,’ and either apply ‘Create a new rule,’ ‘Apply existing rule,’ or ‘Manage rule,’ which is what rules do.
One handy Rule is that if you aren’t active on Facebook or you’re busy, you’re on a bus, or you can’t do stuff on Facebook, but you need Facebook to turn off things for you,
You can create rules, and subject to certain variables, Facebook can turn some ad sets or campaigns acting on your instructions.
For example, you can have an automated rule that turns off ad sets or campaigns that perform below the breakeven point. The Rule name can be ‘ROAS POINT.’
Then, for the ‘Apply rule,’ you can apply it to one campaign, and for ‘Action,’ you set ‘Turn off the campaign.’
Scroll to Condition for ‘Cost per Results,’ scroll to what reads ‘Website purchase ROAS’ and then select ‘is greater than,’ and here you do ‘in between.’ And you’re only doing 1-1.3, and that’s your ROAS, something between 1-1.3, & turns off.
For the ‘Time range’ section, you do the last three days because you’re only as good as the previous three days; therefore, the Rule will evaluate every three days, and when ROAS performance is between 1 and 1.3 points, it will turn off.
For the ‘Attribution window’ you default account, ‘Schedule’ section, you want Daily at midnight (London time).
Then hit create, which applies a rule to the campaign ad: if the campaign has yet to reach a website breakeven point within the last three days, the ad is turned off. This way, you don’t lose money.
Again, you can do lots of different stuff in the rules for the three rules, like ATC. However, there’s a catch to Facebook rules; they can prove technical and fiddly, and therefore, exercise caution because failing in the correct execution can ruin your campaign.
Please double-check the rules created.
Digital Products On Shopify: Plans
So now you’re building your digital products, your Facebook ads perform well, and you’re even starting to scale. The juicy part is that you’re building a solid brand. What next?
Well, naturally, you want to protect your digital assets. Protect from who? People who’d resell without your permission. You don’t want people to use your imagery or resell your stuff without permission.
But how do you protect yourself against such a thing? By copyrighting your digital assets, you want to leverage the services of fraud protection Companies like Red Points. The company offers different plans.
You can access unlimited takedowns, the marketplace, trademark, and image protection through varying plans. The different plans power you to do lots of other stuff. The red point offers you a terrific way to deter fraudsters.
Equally important, you should have a notice agreement in place so that when people order your digital product, they will receive a notice cautioning them that they can’t resell it and that dire consequences will ensue if they do.
The agreement notice should elucidate the terms and conditions of reusing your digital products (content) to customers.
Get Your Premium Dropshipping Store TODAY!
With our customized stores, perceiving what works becomes a thing of the past. No more fussbudget; on your part, all that's needed is to replicate one of the successful stores and start bringing in money.
Start Shopify For Only
Try Shopify free for 3 days, no credit card is required. By entering your email, you agree to receive marketing emails from Shopify.
Related Posts
Comments (0)