
If you want to start an online book store, the data is…
Shopify Dashboard Made Simple: Quick Access

Before I take you through the Shopify Dashboard, this is solely a follow-up of our Print-on-demand series.
Right after you open your Shopify store, I will walk you through the step-by-step process of setting it up so you are ready to start marketing your business and making your online sales.
Shopify Dashboard features give merchants quick, easy access to their store data and analytics, enabling them to make informed decisions about their business.
The dashboard overviews critical metrics, including sales volume, orders received, revenue generated, orders fulfilled, and average order size.
Additionally, merchants can view their store performance over time using detailed graphs for each metric.
Additionally, the dashboard provides access to reports on key metrics, including abandoned checkout rates, customer acquisition costs, average product price, and more.
Merchants can use the dashboard to manage their inventory levels. They can see how much stock they have in their store at any time.
Table of Contents
Understanding the Shopify Dashboard
Go to the dashboard on your Shopify store. Play around with the buttons available to explore the options in your store. Exploring this button’s functions will help you become familiar with the interface.
It’s a simple step after getting accustomed to the buttons’ functions. You will see that making settings and modifications will come quickly because you are already familiar with their functions.
The Shopify Dashboard is your centralized command center within the Shopify platform, offering a customizable, high-level overview of your e-commerce store’s performance.
It allows you to monitor key metrics such as sales, orders, and marketing efforts in real-time and provides access to management areas for orders, products, customers, and marketing tools.
You can personalize the dashboard by adding and arranging reports and widgets to prioritize the data most important to your specific business needs.
Now, let’s start navigating the user dashboard. Begin by clicking the top right-hand corner of your dashboard; you will see that it has the name of your Shopify store, and you will also find the type of niche you chose to sell in that corner.
Right at the dashboard’s center, you will find the “Add a product” button, which lets you add a product you want to sell to your online store.
You will also find the customized store icon, which lets you tailor your Shopify store to suit your needs. You can buy a domain or subscribe to an exclusive domain if you want a unique brand.
Advanced Shopify Dashboard Features
While the basic Shopify dashboard overviews key metrics like sales and orders, several advanced features can significantly enhance your business operations. One of the most significant benefits of the Shopify dashboard is its ability to consolidate information and save time.
By providing a central hub for all your essential data, the dashboard eliminates the need to switch between different stores or reports, allowing you to focus on what matters most: growing your business.
Organization Settings
For businesses managing multiple Shopify stores, Organization Settings provides a centralized platform for overseeing user access, store management, and billing across all stores. This feature streamlines administrative tasks and provides a consolidated view of your entire operation.
Enhanced Marketing Tools
Shopify offers built-in marketing tools that can be accessed and managed through the dashboard. These tools include:
- Shopify Forms: Capture leads and grow your marketing list by creating customizable forms.
- Shopify Automation: Automate marketing workflows using pre-built templates or by creating your own.
- Shopify Email: Nurture customer relationships through targeted email campaigns.
- Customer Segmentation: Create customer groups based on various criteria to deliver personalized marketing messages.
- Shopify Inbox: Engage with customers in real-time through live chat to improve customer service and drive sales.
Shopify Dashboard Display
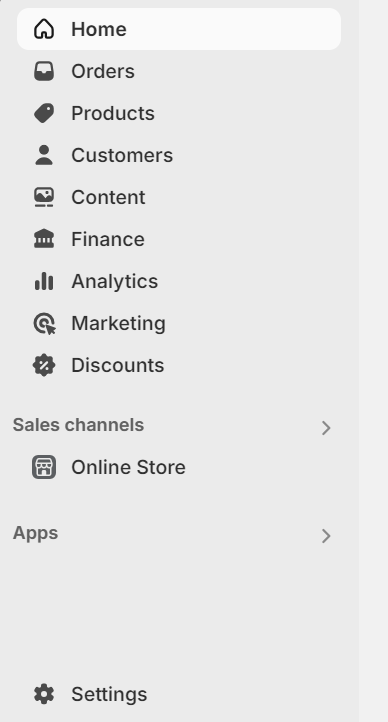
Your home button is in the left-hand corner of your screen. This button serves as your store’s home page and displays information, news, notifications, and sales.
On the dashboard, you also have the Orders button; at the start, it will be blank, but once you start getting sales and product orders, it will populate.
The Shopify Store dashboard displays vital metrics that provide insight into your store’s activity, updated performance, and customer behavior.
You can access your Shopify dashboard by logging into your Shopify account and clicking the “Partners” link in the main navigation.
You can also access your Shopify account using the App you can install on a mobile device from either the Google Play Store or Apple Store.
You can customize the account Dashboard by clicking on the account settings.
You can then add or remove sections and change how they appear.
Your Shopify dashboard displays metrics in both numeric and graph formats.
On this page, you can view every sale made by your store, including the customer’s name, the product the customer ordered, the price paid, etc. All this information can be found in your Order tab.
Shopify Dashboard Important Features
The Products icon is also on the dashboard. It lets you view the inventory your Shopify store has created.
With a few clicks on the button, all the products you sell will be generated automatically and placed on your Shopify store while you print on demand.
To use the print-on-demand icon, you can read along to learn how to automatically add your product to your store in a few seconds.
As you scroll down, you will see the Customer’s Tab. Right at the customer’s tab icon, you can view a list of all customers visiting your online store.
You will also be able to view customers who have visited your store and signed up, as well as those who have yet to place an order for your products.
This page has an analysis icon. An analytics button is a unique feature of the Shopify store that lets you analyze your overall sales performance and the number of visitors to your store over a given period.
It also displays the number of repeat customers, the total number of orders, and the average amount your customers spend at your store, which can be analyzed.
So, we know pretty well that Shopify is embedded with a powerful analytical tool.
Below the tab, you can find a discount icon enabling you to generate a discount code for your customers within seconds; that’s great, right?
You can also see the app store icon; at the app store, you can install some apps as plug-ins and find paid and free apps.
As we move through the course, you will learn how to install print-on-demand apps that help keep your store running smoothly.
Besides that, you can find the online store; on the online store, you can manage your theme, customize your theme, manage your domain, and your navigation menu.
You can manage all other aspects of your online store here. Scroll to the bottom left, where you can find the settings icon.
The settings menu allows you to manage everything related to shipping and control the price you will charge for shipping a particular product.
The basic information about the number of days for the shipping process is that you can customize your checkout process so customers can navigate to check out the product they’ve ordered.
Advanced Reporting Tools
The Shopify dashboard provides access to a comprehensive suite of reporting tools beyond essential sales and order data. These reports offer valuable insights into various aspects of your business, including:
- Customer Reports: Analyze customer behavior, demographics, and purchase history. Some key reports in this category include:
- First-time vs. returning customer sales: Track the ratio of new to returning customers to understand customer loyalty and acquisition strategies.
- Customers by location: Identify your base geographically to tailor marketing campaigns and target specific regions.
- RFM customer analysis: Analyze customer behavior based on recency, frequency, and monetary value to segment customers and personalize marketing efforts.
- Sales Reports: Track sales by product, category, channel, and more. Examples include:
- Total sales by product: Identify your best-selling products to optimize inventory and marketing strategies.
- Total sales by channel: Analyze sales performance across different channels, such as online stores, social media, and marketplaces, to identify areas for improvement.
- Average order value over time: Track the average value of customer orders to measure the effectiveness of upselling and cross-selling strategies.
- Marketing Reports: Measure the effectiveness of your marketing campaigns and identify areas for improvement.
- Sales attributed to marketing: Analyze the impact of your marketing campaigns on sales to measure ROI and optimize spending.
- Sessions attributed to marketing: Track the number of website sessions your marketing efforts generate to assess campaign reach and effectiveness.
- Behavior Reports: Understand how customers interact with your online store, including bounce rate, conversion rate, and top searches.
- Bounce rate: Measure the percentage of visitors who leave your website after viewing only one page to identify potential issues with website design or content.
- Online store conversion rate: Track the percentage of website visitors who purchase to assess the effectiveness of your sales funnel and identify areas for optimization.
- Top online store searches: Analyze customers’ most frequent search terms on your website to understand customer intent and improve product discoverability.
- Inventory Reports: Monitor stock levels, track product performance, and identify best-selling items.
- Average inventory sold per day: Track the average number of units sold daily to optimize inventory management and avoid stockouts.
Days of inventory remaining: Calculate the estimated time it will take to sell out of current inventory to make informed purchasing decisions.
- Service and drive sales.
Summer ’24 Edition Updates
Shopify introduced several key features in its Summer ’24 Edition that further enhance the dashboard’s functionality :
- Print extension: Streamline order fulfillment by printing invoices and handling other tasks directly from the dashboard.
- Flow template app extension: Automate various workflows by attaching automation to apps.
- Coding updates: Improved JSON parsing for JavaScript and optimized batch execution to enhance checkout processes and overall performance.
- .dev Assistant: This AI-powered tool helps developers create custom solutions more efficiently by generating GraphQL queries and mutations.
These updates provide dropshippers with more tools and flexibility to manage their businesses effectively.
Conclusion
One of the first things to do on the Settings page is to choose your display theme; this is crucial.
When you sign up on the Shopify platform, you get access to all these tools for designing your store. You can navigate them, use their free themes, or buy a suitable theme.
This will help you build a beautiful, professional e-commerce store.
In the next module, we will discuss navigating the online store section, choosing a suitable theme, and customizing it to have a fantastic store.
Get 30% off the Debutify Theme using the code REFERRAL30.
After that, you launch your store, market your product, and start making sales.
Start Shopify For Only
Try Shopify free for 3 days, no credit card is required. By entering your email, you agree to receive marketing emails from Shopify.
Related Posts


Comments (0)