If you are looking for Shopify website builders, you’re obviously trying to…
How To Add Products To Shopify (Collections & Tags)
To fully address the questions of ‘how to add products to Shopify,’ one must ask themselves what type of store they are running on the Shopify ecommerce platform.
Adding products to your Shopify Store is the first step before they go live on the front end.
You must either manually add the products to the store backend or use a third-party app; either way, for customers to see the products on the homepage, they must be added in your Shopify admin backend.
To accurately give you a detailed process on how to go about products and inventory on Shopify, it depends entirely on the kind of store you created or managed.
There are two types of stores for products and inventories on Shopify.
Those who sell their products, which means they have offline inventory, and those who do dropshipping business rely entirely on a third-party app to do the fulfillment and everything for them.
For those who run offline stores with inventory management, adding products to their Shopify store means taking product photos, writing the descriptions, adding each variant, and doing everything manually using the Shopify product tab.
Those in dropshipping business depend entirely on thirty-part apps like Dsers, which helps with product importation, pricing formulas, and tagging.
Before we talk of the process as a whole, there are steps we must get out of the way to end up with a highly optimized product page with everything done the right way.
If you are reading this, there is a Shopify offer doing rounds of $1/month, which means you pay only $3 for 3 months of using the Shopify ecommerce platform.
Jump on the offer and sign up today for a $ 3/3month Offer.
Sign up for a free trial and enjoy 3 months of Shopify for $1/month on Select Plans.
Table of Contents
What are the necessary steps to add a product to Shopify?
Now that you have a niche and product in mind, you must have the product details before it’s added to your Shopify store.
Product Image
A product must have high-quality images, which means if you still need to get the product at hand, you must look for product images online.
The best place you can get high-quality product images is on Amazon, even though it’s not a professional move. Instead, it saves time and money.

You will have to go to the Amazon search bar, search for the product keyword, browse through the vendors with good images, and focus on images with no brandings and store names.
You can then download and use the images, but it’s recommended you add your touch to the image; you can edit the color or add your store logo to at least not appear as a duplicate of an existing product image on Amazon.
This method works best if you have a Canva Account, which allows image editing and has a lot of effects that help fine-tune a product image from an original form to a new image.
Store owners must invest in photography if they are selling their products; there is na need to take product photos and edit them to align with Shopify image sizes and pre-upload requirements.
In this digital age, phone photography saves the same purpose an expensive camera would; hence with a smartphone, one can take professional product pictures for their store.
Product Descriptions
Now that we have the product pictures out of the way, we need product descriptions written or generated before we add products to the Shopify store.
Product description plays a significant role in conversion; customers need to learn more about the product, its constituents, its story, the solutions, and every FAQ answered.
The recent ecommerce study by Nielsen Norman Group indicates that about 20% of customers who failed to place an order are due to a lack of relevant product information in the descriptions.
Start a free 3 Day trial and enjoy 3 months of Shopify for $1/month Instead of $39/month on selected plans. Sign up now
It builds trust and converts customers who are browsing around; the chances of having them buy the product are high.
Store owners with a budget can seek the help of a copywriter on freelancer sites like Fiverr, while those on a budget would go the AI way.
Read How We Use AI To Write Product Descriptions Within Seconds.
AI like Jasper or Copygenius is designed to write good product descriptions for Shopify products using an inbuilt command.
There are 10,000 free words on Jasper AI. You can try it out now. The 10,000 words can write up to 1000 product descriptions; suppose each description at 100 words.
Jasper Ai helps you write 10x better content highly optimized at a fraction of the cost of a human copywriter. It’s a piece of software that uses artificial intelligence to generate winning marketing copy…on demand…in under 30 seconds.

Jasper can also generate store content like About Us and FAQS.
The Ai descriptions output, however, requires a little human touch, which means you will edit, remove or add information that the software didn’t include in the descriptions.
Whether using AI or a copywriter for descriptions output, adhere to the following;
The descriptions must focus on your ideal buyer hence addressing their worries or giving product information that is likely to have them change their mind or take action while on the product page.
Highlight the product’s benefits, which will entice the customers to believe you understand not only your product but also confidence of its value to them.
The product description should not only inform but also appeal to your customer’s imagination, create a picture to help them see the problem the product is solving and why they need it that badly.
Suppose you only have a little time on your hands. In that case, you can use Shopify Magic AI, designed to help entrepreneurs with professional product description ideas and templates for their Shopify store.
As part of how to add products to Shopify, adding social proof to your product description plays a significant role in making your tour store appear trustworthy.
Imagine you’re shopping online for a Christmas gift; as you browse through products on store X, you’ve found four products that you love; the only difference is one has over 200 reviews with pictures with an overall product rating of 4.9 stars.

The Second product has only 120 reviews and is rated 2 stars only, and the rest have no reviews or feedback; which one are you likely to purchase?
Well, your guess is good as mine; the one with the reviews and highly rated carries the day.
Now, you ask yourself, why is social proof valuable to your online store business strategy?
Well,
- 83% of consumers recommend brands they follow on social media to family and friends.
- 95% of online shoppers rely on online reviews left by previous customers.
- 82% of Americans make purchase decisions based on referrals and recommendations from family and friends.
In summary, social proof psychology on product pages gets your store more sales.
Product Pricing Formulae
While adding a product to a Shopify store, you must set the product cost and shipping rates; this helps determine your profit and losses.
Suppose product X costs $2 from the manufacturer or the suppliers. In that case, it means you need to calculate the expenses you incur before reaching the warehouse hence should be recovered after a successful sale.
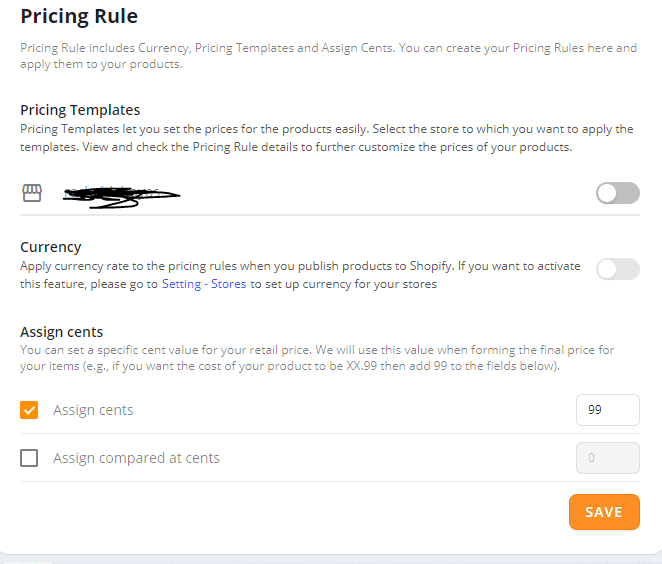
For dropshippers, it’s easy with Dsers dropshipping apps, which have product pricing formulae where a dropshipper can decide on a standard setting that applies to all the products imported from Aliexpress to Shopify.
The setting allows the store owner to be in charge of their markup margin by the multiplier of 3,4, or even 10.
It means if the product is $2 on Aliexpress, the moment it’s edited, then pushed live on the store homepage.
The product sale price will automatically adjust based on the pricing formulae in place pre-configured in the Dsers app.
Anyway, dropshippers and store owners who sell their products must have product pricing formulae before adding products to the Shopify store.
How to Add products to Shopify manually
The default option for adding products to the Shopify store is the Shopify add products feature in the backend office.
The add product feature is accessed when you click on the products tab; there, you find various options like Export, import, and add product.
When you click add product, the first prompt is the product title; here, you write the desired product name based on the keyword or your branding. The product title should be short, catchy, and memorable.
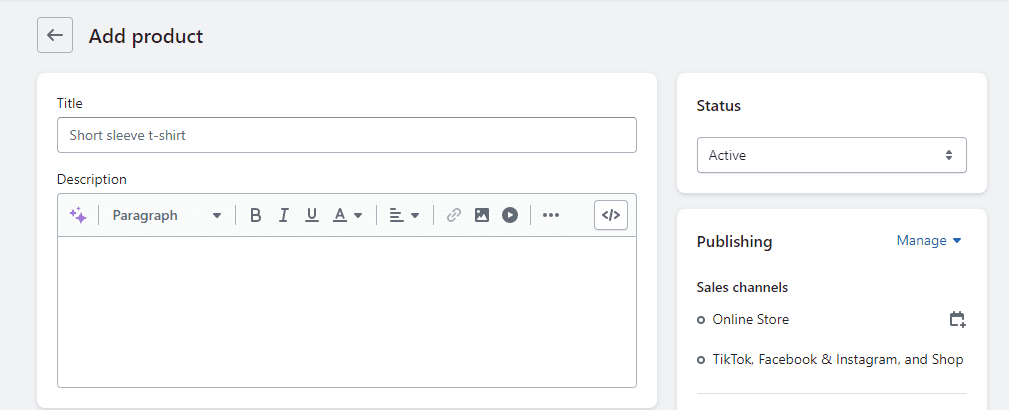
The product description tab is provided to accommodate the already written product description.
The tab also has its in-built editor that helps with on-page editing, adding elements, description images, and having some parts of the descriptions in either italics or bold to send a message or emphasize a specific point.
Apart from inserting images and video, you can align text, bulletin, and hyperlink-specific texts suppose you want a reference or act as an outbound link which helps with link building and SEO.
Product Images
Uploading the product images is the next task, and when adding products to Shopify, you can add an unlimited number of images (product images).
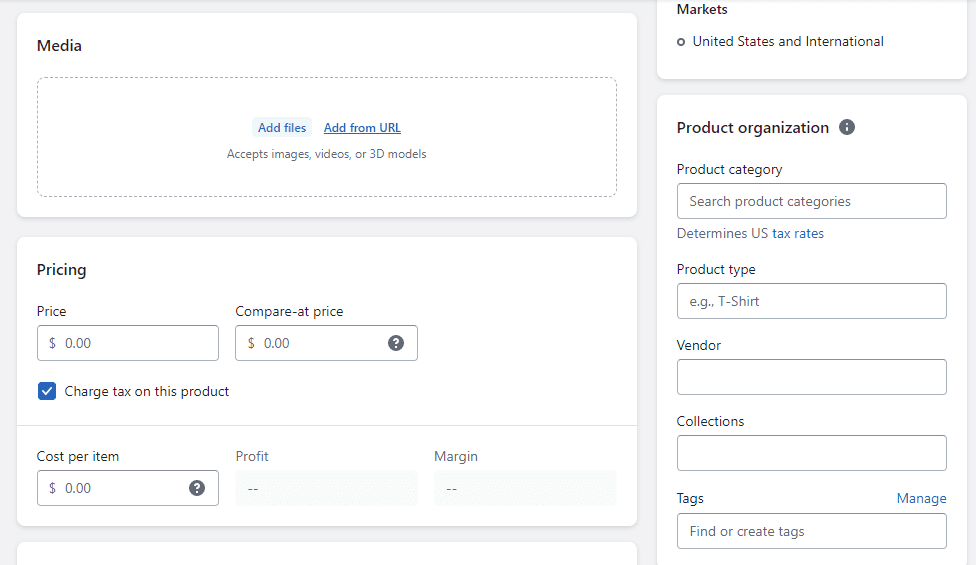
You can add 3D modeling, PNG, or JPEG images. Ensure that the most appealing image of your product is set as the default image, which acts as your product thumbnail.
Setting Product Price
Setting your product price is essential, and in this step, you can enter the product price and the compare price.
You may ask yourself, what is a compare price? It is also known as a Sale price.
For example, let’s assume product X is $12 on your Shopify store, and you want to create a sense of agency on the product page; you can decide to show the product’s previous price to be $29 (compare price) and that the product is now discounted.
Get started with Shopify dropshipping.
Shopify has the apps and tools to connect you to reliable dropshipping suppliers. Jumpstart your business with Shopify Today.
Try Shopify free for 14 days; no credit card is required.

If you’ve created collections already, add the product to the right collection and apply the relevant product tag before changing the product page status from draft to active.
The product must also be visible in all the available Sales channels in your product page setting.
This also applies to inventory settings where you need to specify the inventory location and indicate if you are selling a physical product or a digitally downloaded product which doesn’t require the customer to leave their shipping address.
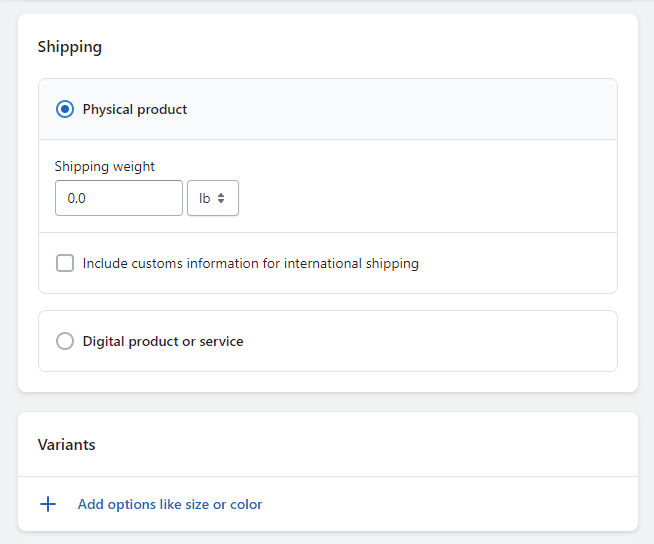
If the product you are adding to Shopify has variants, it’s at this stage that your specific product variants are used in terms of colors, sizes, materials, and style.
A product on Shopify can have up to 100 variants to choose from, ensuring all the variants are up to date.
As part of adding products to Shopify, you can configure your Search engine listing by having the product name or keyword as part of the product URL.
You can then optimize the product meta descriptions and ensure you follow Shopify SEO guidelines; this will help with ranking.
The product will be live on the storefront when everything is done and saved.
How To Add Products To Shopify Using Third Party App
The second and easiest way to add products to Shopify is by installing the Shopify app that helps import products from Aliexpress or a platform.
In this case, let’s assume you are doing dropshipping business; we will then use an app called Dsers dropshipping app which is the best Oberlo alternative as matters dropshipping business is concerned.
Aliexpress owns the Dsers dropshipping app, so we analyzed these 20 Oberlo alternatives since the Oberlo app shut down recently to see the best Shopify app for adding products to Shopify.
Dsers took over the aliexpress to Shopify product importation, and in this section, you will learn how to use the Dsers app.
Now, the first step is to head over to the Shopify app store; while on the dashboard, you want to search for Dsers in the search tab, you must install it and follow the installation process and instructions keenly.
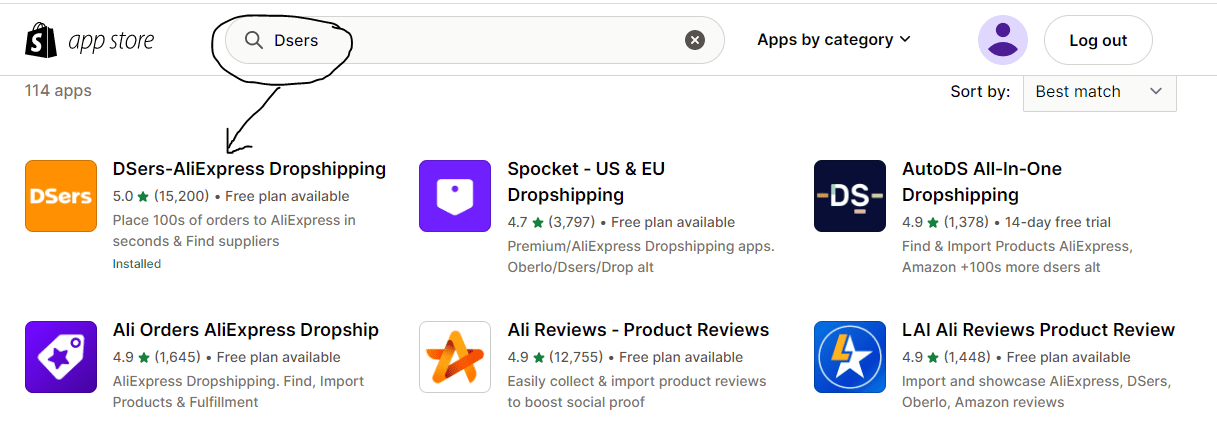
After installation, you must create an account at the dsers website and link your aliexpress account for order and product synchronization.
The dsers Chrome extension must be installed on your browser, severely Chrome browser; it helps with one-click importation without having to log into your Shopify to do the product importation via the app.

Now that we have the Dsers app installed and its Chrome extension activated, whenever you see a product that matches your criteria, with a single click, it will be imported to the Dsers app, which is an integral part of your Shopify store.
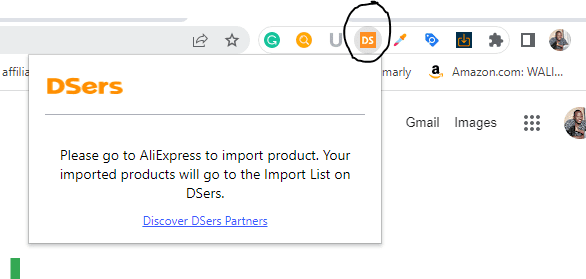
All the imported products appear in the import list; here, you will edit the product title, select images, edit variants, and set product prices.
Using Dsers, you can set up product prices and compare prices the same way as when we added products to Shopify manually.
The only difference between Dsers and the manual process is that the importation is one click away, easy to edit product details, and it can import over 1000 products within minutes, unlike manually doing it.
After the product is imported, the same can is done before it’s published online on the storefront.
Dsers helps with order management and fulfillment and has vetted suppliers on their dashboard.
For example, suppose you are using something other than Aliexpress suppliers.
The app has free and paid plans depending on your budget, and It recommends you stick to the free version.
Read Also:
- Shopify Bot Protection: What It Is and Why It Matters
- How To Translate Checkout Page Language on Shopify Store
- How To Create Shopify Refund, Privacy, And Terms of Service
- 25 Shopify Side Hustles Could Make You 100K Monthly
- How Order Processing On Shopify Works: Workflow & Logistics
Conclusion
Adding products to Shopify is simple, with each section laid out in the backend office of your store. The manual method may sound tedious, but worth it for any store owner selling physical products.
While on the other hand, Dropshippers import products faster and retain most information as received from the supplier’s website or marketplace.
To Add products to the Shopify collection follows the same manual method we highlighted as we started this guide.
Start Shopify For Only

Try Shopify free for 3 days, no credit card is required. By entering your email, you agree to receive marketing emails from Shopify.


Comments (0)